Campus Technology
- Classrooms
- Microsoft Surface Pro
- MLC Email
- MLC Signage
- Phones
- About your phone
- Dialing
- Voicemail
- Transferring Calls
- User Control Panel (UCP)
- Call Recording
- Feature Codes
- Ringtones
- Create a Phonebook
- Sharing video files with students
- Bookstore Textbook Information
Classrooms
Classroom Displays
MLC Classrooms in the WCC, Music Hall, and Music Center are equipped with a display that can be hooked up to your device. There are three general display types; interactive whiteboard, projector, and TV. Please see the Interactive Whiteboard page for information on those specific devices. Instructions on connecting to the projectors and TVs can be found below.
Displays (TVs)
-
- Plug the HDMI cable (with an adapter, if required) into your device. The adapter ring is labeled if your device does not have an HDMI port.
- Turn on the display.
- The default display input is HDMI1. If your device's screen does not appear, use the Input button on the remote to select HDMI1.
- The best screen resolution for your device when using the displays is 1920x1080. Click here for instructions on how to change it.
- Some of the displays are mounted on adjustable mounts. Please keep them pushed as close to the wall as possible to reduce strain on the mounts. If you need adjustments made, please contact IT Services.
Projectors
- Plug the HDMI cable (with an adapter, if required) into your device. The adapter ring is labeled if your device does not have an HDMI port.
- Turn on the projector.
- The projector should default to the proper source to show your device. If your device's screen does not appear, use the Source Search button on the remote.
Sound
- As of Summer 2024, in most cases, sound is run through the display and not through a different sound system. If you need help switching your audio output, please watch this short YouTube video.
- Your device needs to be connected via the HDMI cable (with or without an adapter) for sound to work.
- Sound levels are controlled on your device and through the volume control on either the display or projector.
- There are still a small number of rooms with auxiliary sound systems. Please contact IT Services if you require their use and need help.
Document Cameras
There are currently two types of document cameras being utilized in classrooms on campus. Please reference either the room number or picture of the document camera to identify which type is in the classroom.
HDMI Document Camera
These document cameras can be found in WCC 168 and the Art Lab.
Instructions
- Turn on the TV and document camera.
- Use the input button on the TV remote and choose HDMI 2.
- Put whatever you'd like to display underneath the camera.
- Adjust the brightness using the arrows on the document camera.
- Zoom in or out using the grey knob on the end.
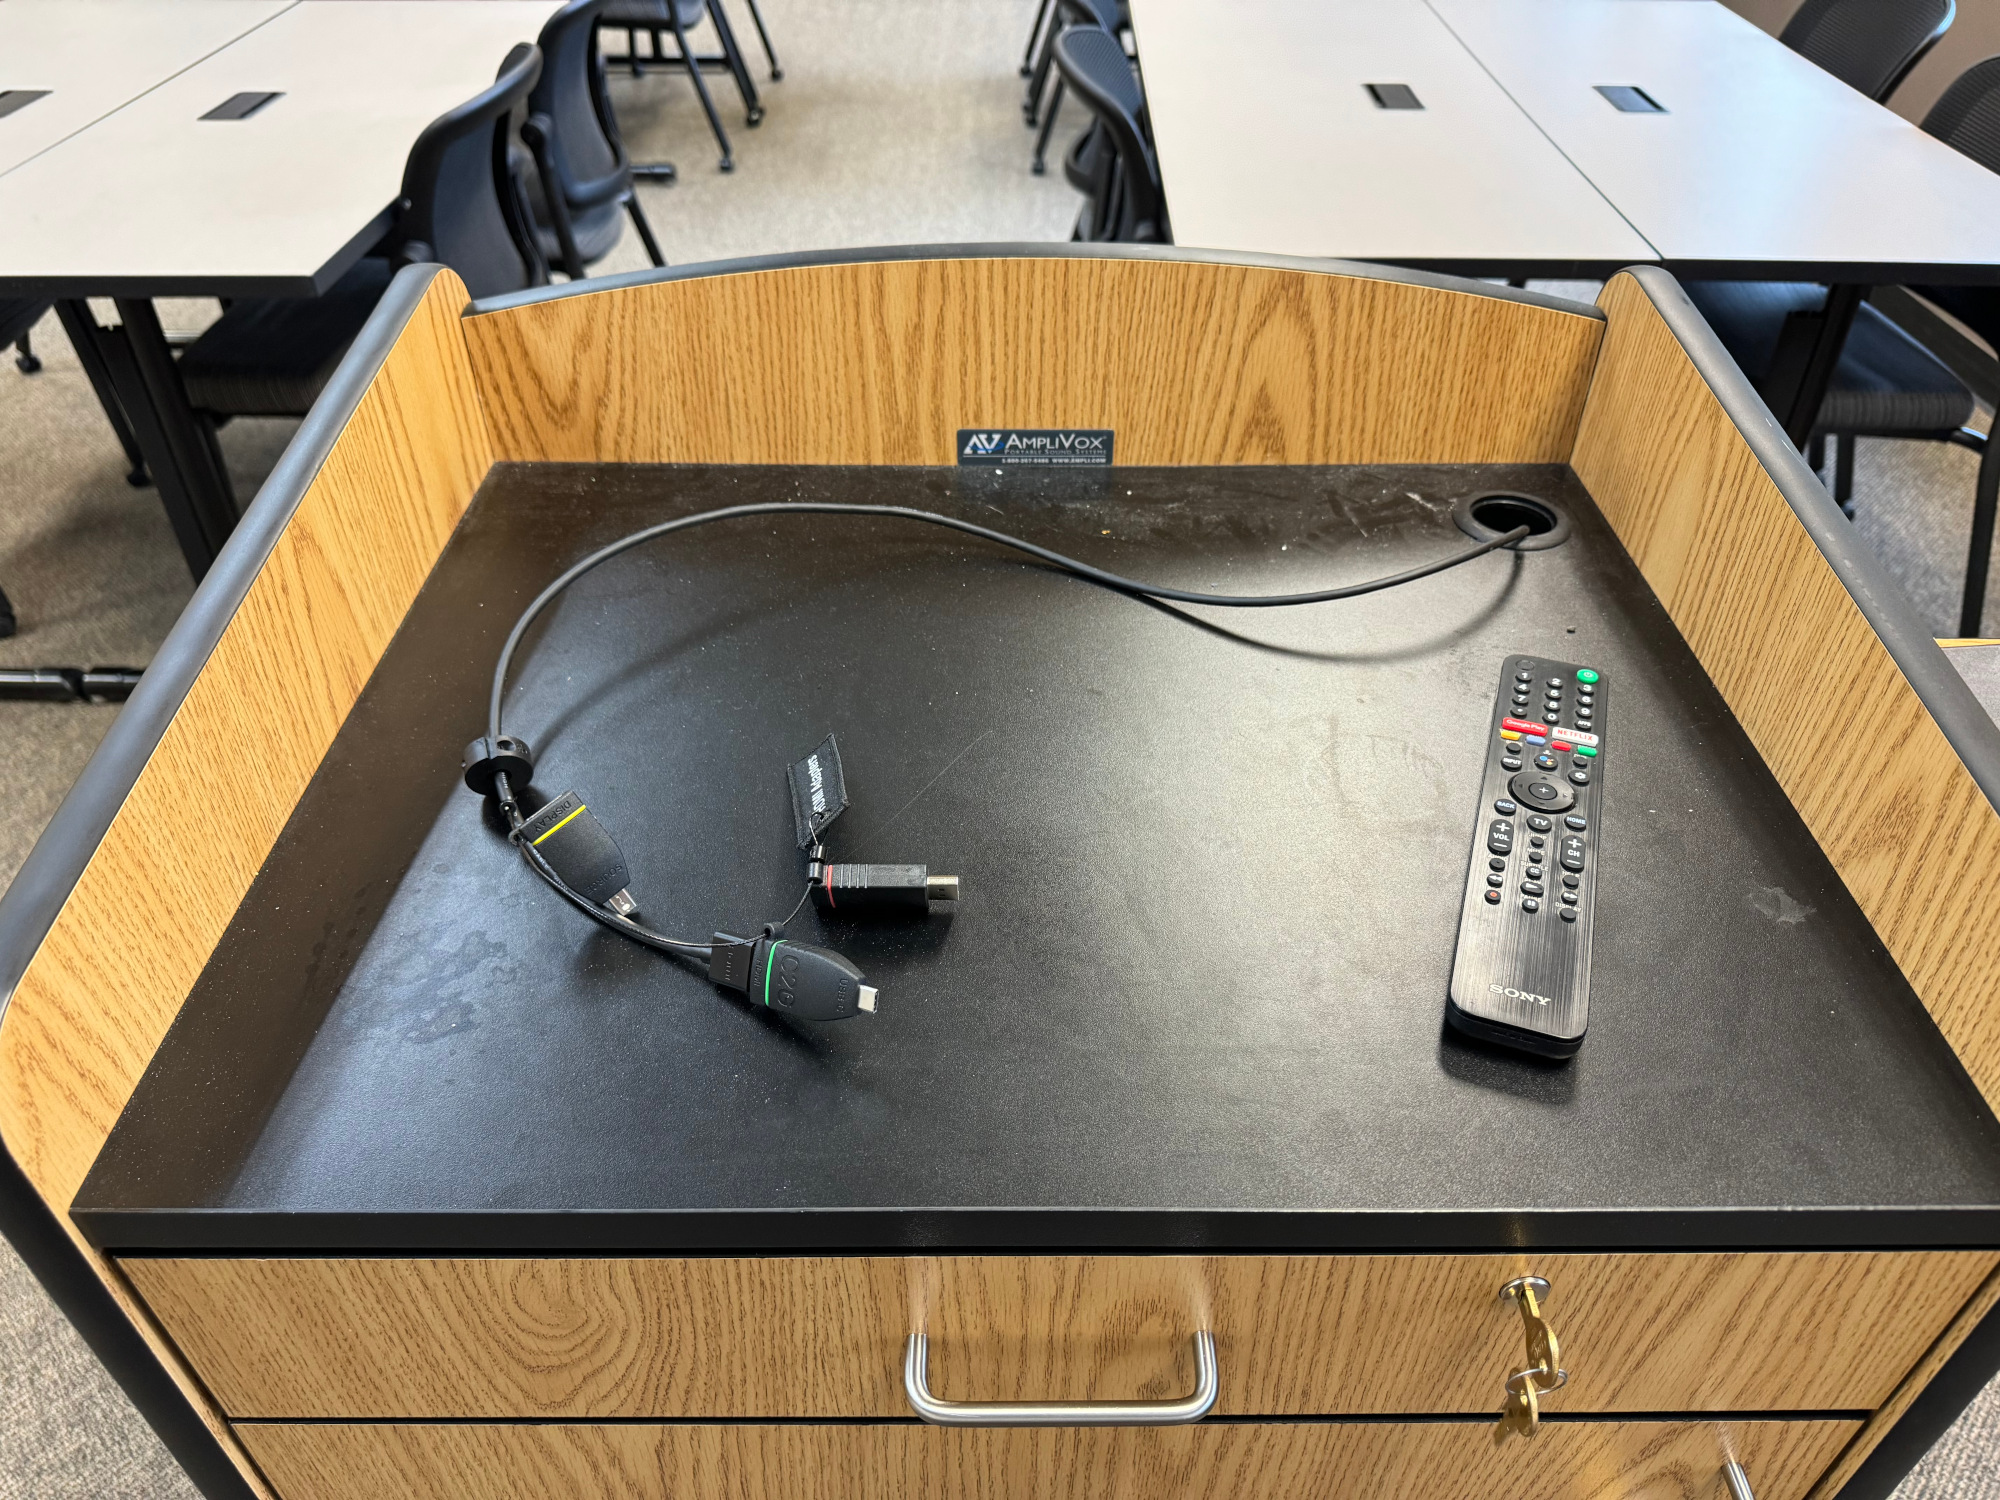
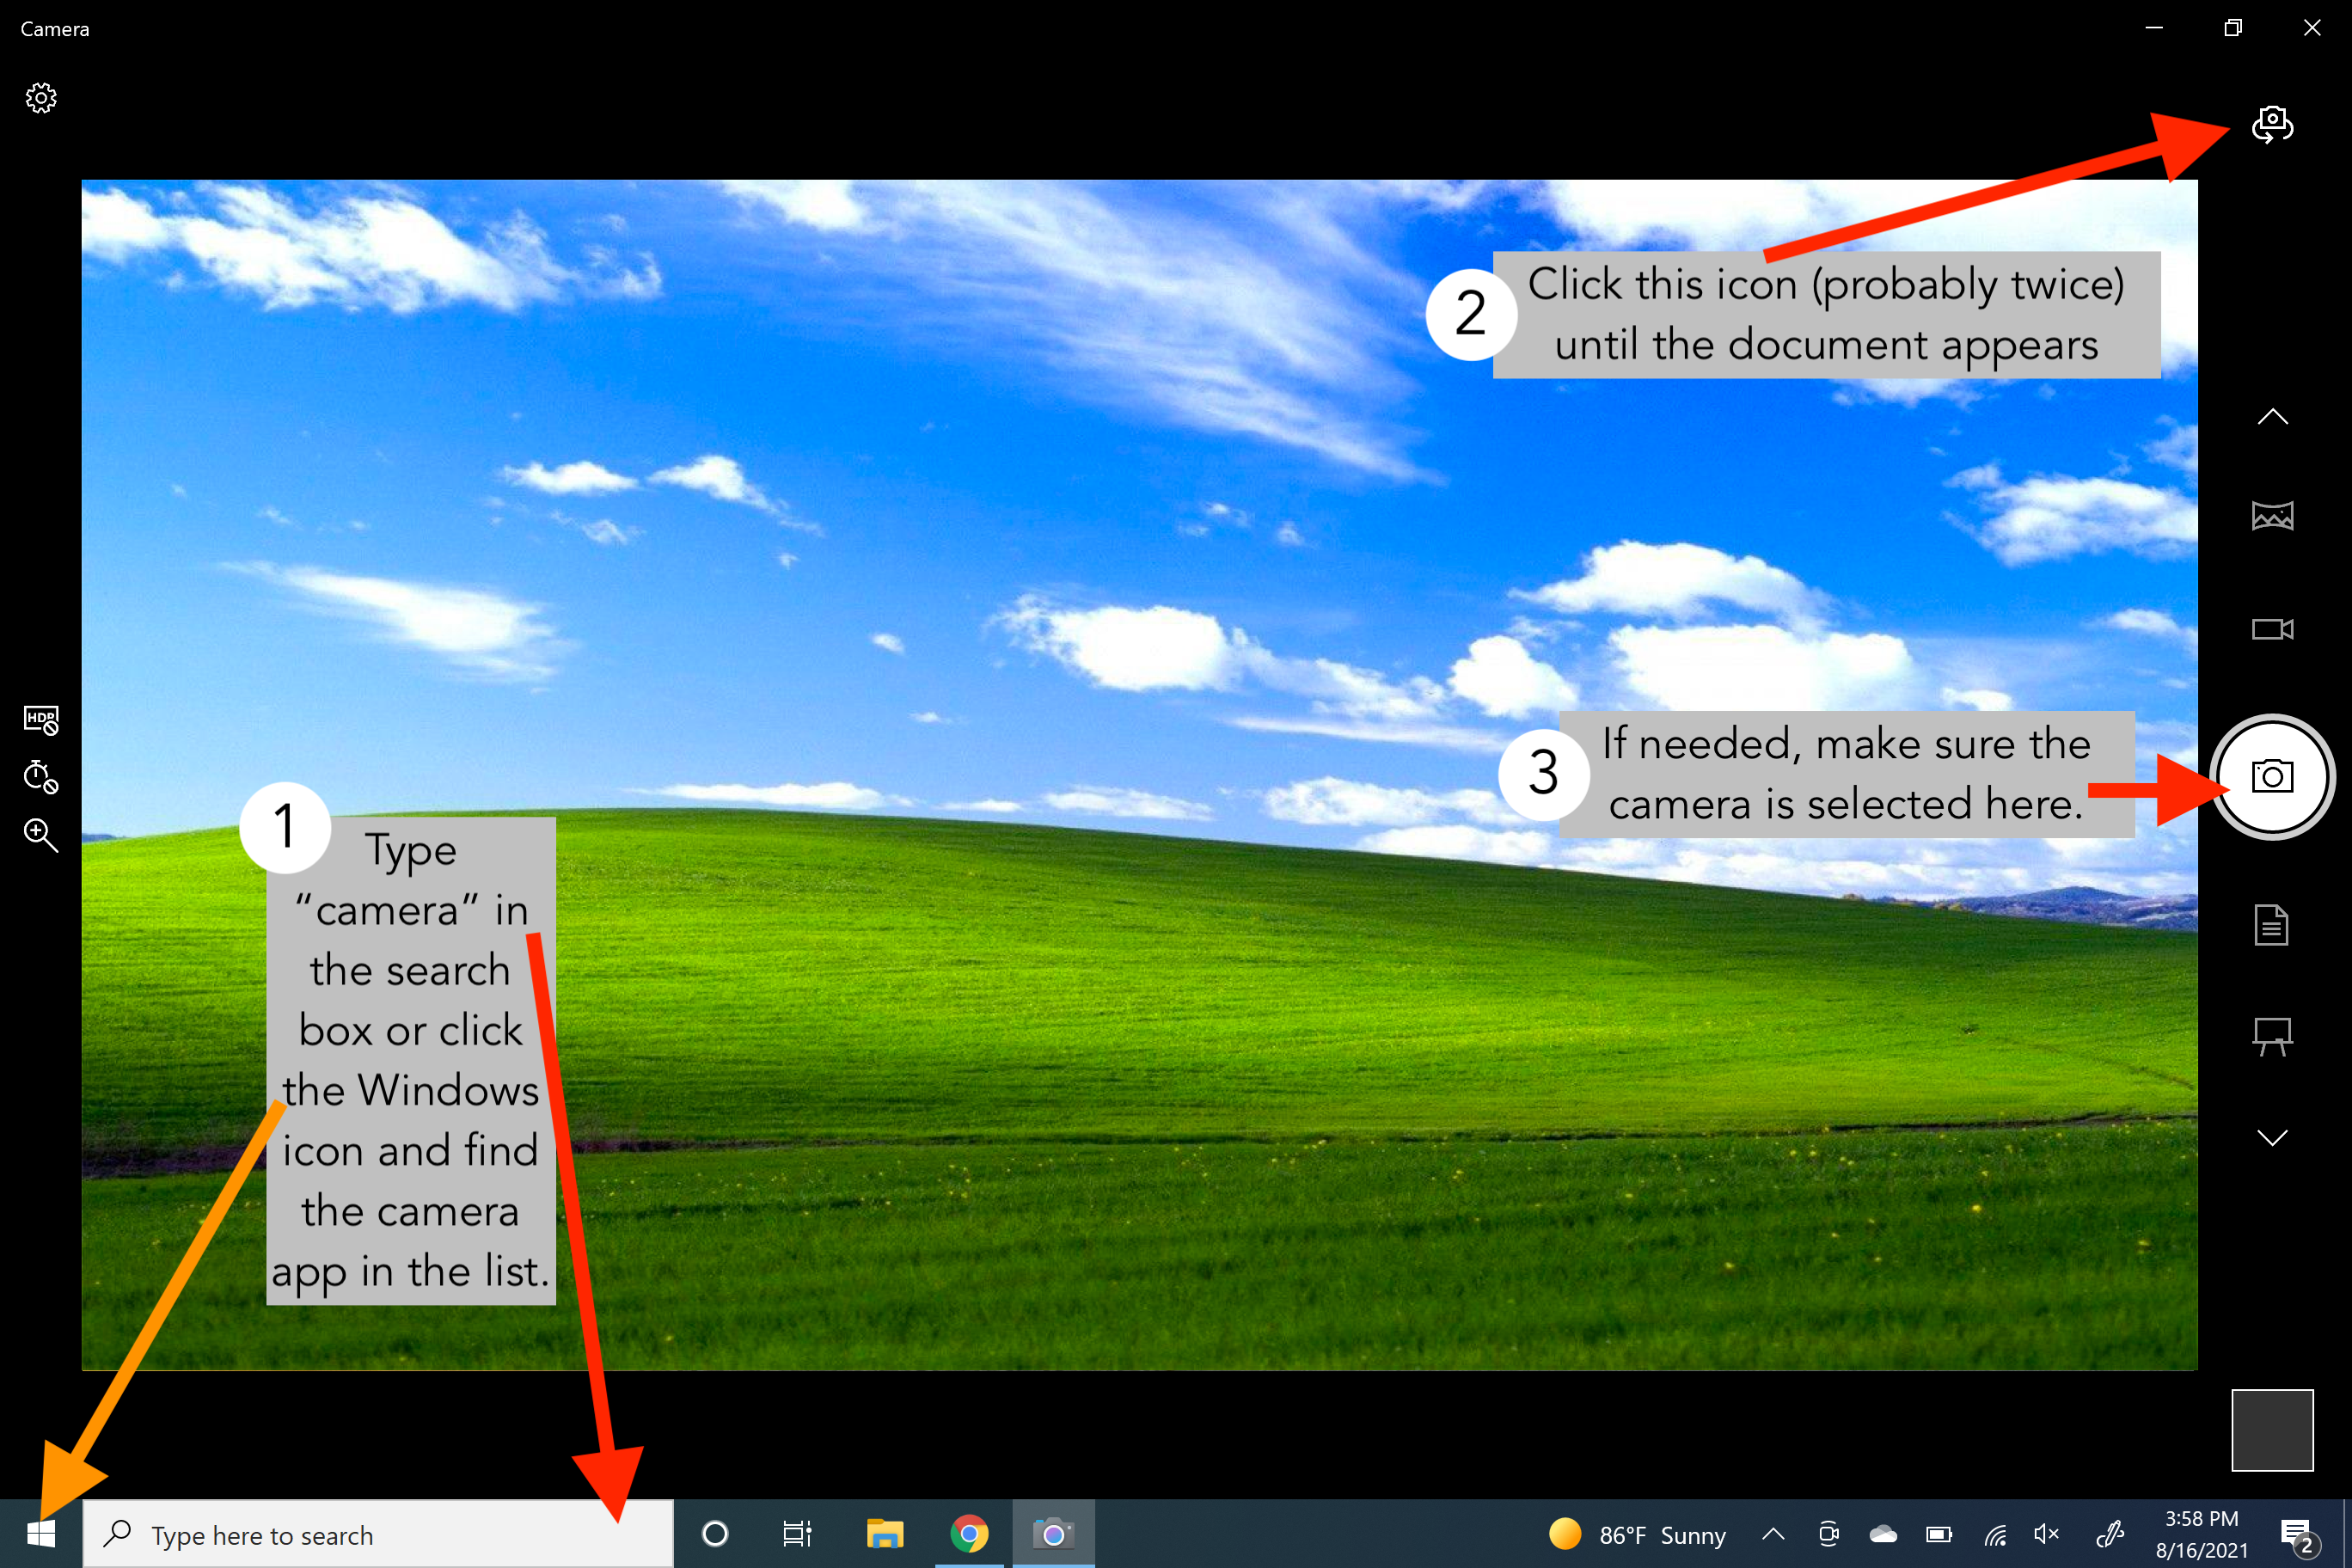
USB Document Camera
These document cameras can be found in MC 217, MC 123, MH 205, WCC 278, WCC 276, WCC 162, WCC 181, and other classrooms.
Instructions
- Turn on the TV.
- Plug your Surface Pro into the docking station.
- Open the Camera App on your Surface Pro
- You can do this by typing camera into the search bar or clicking the Windows button in the lower-left corner and choosing Camera.
- The camera app will open on your Surface Pro. It will default to your webcam.
- Click the camera icon
 in the upper right corner until the document camera appears on the screen. You will probably need to click it twice.
 - If you are getting strange blue highlights on your image, make sure that the round camera icon
 is selected on the right side of the screen.
 - If the image on your screen appears upsidedown, press the teal button on the side of the document camera.
Interactive Whiteboards
Four of the WCC classrooms are equipped with interactive whiteboards (IWBs). These are sometimes also referred to as SMARTboards, interactive panels, touch screens, etc. There are currently two main types. Please reference the room numbers below to find out what type of board is in your room.
Newline Interactive Panel
Newline interactive panels can be found in WCC rooms 174 and 162.
Getting Started
-
- Turn on the IWB either via the remote or the power button on the front of the display.
- Turn on the TV(s) with the remote.
- Tap the IWB screen to start. You can use your finger or the stylus.
Using the Whiteboard
-
- Tap the Whiteboard icon on the IWB.
- Use your finger or the stylus to draw on the whiteboard.
- You do not need to connect a computer to the IWB to use the whiteboard feature.
- Whatever is drawn on the IWB will be displayed on the side monitor(s).
Displaying from a Computer
-
- Plug the USB from the docking station on the podium into your Surface Pro.
- Double-tap HDMI 1 to display your Surface Pro on the IWB.
- Whatever is on your device and the IWB will also be displayed on the side monitor(s).
- You can interact with your device from the IWB. It's basically a giant touch screen.
- The best screen resolution for your device is 1920x1080. Click here for instructions on how to change it.
Additional Features
-
- The Home
 icon on either side of the IWB screen will take you back to the main screen.
 - The Annotate
 icon on either side of the IWB screen will let you draw on whatever is on the screen.
 - The Marker
 icon on either side of the IWB screen launches the whiteboard.
 - The PC
 icon on either side of the IWB screen and on the home screen does not take you back to your Surface Pro. It tries to launch an internal PC, which is not a feature on our boards.
- The Home

Microsoft Surface Pro
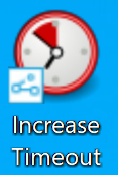
Increase Screen Timeout
By default, the Surface Pro screen will go to sleep after 5 minutes of inactivity. Follow these steps to increase the time to 60 minutes.
Note: Following these steps will increase the time for one session - i.e. one class period. Follow the instructions below each time you want to increase the timeout.
Instructions
From the desktop:
-
- Double click the Increase Timeout icon.
-
-
- If you do not have this icon, follow the instructions below for using the ZENWorks application launcher.
- A new window will pop up letting you know that your computer will stay awake for 60 minutes. Hide the window by clicking the minimize icon and continue your work.
-
-
- When you're done teaching or completing your task, click the X to close the program.
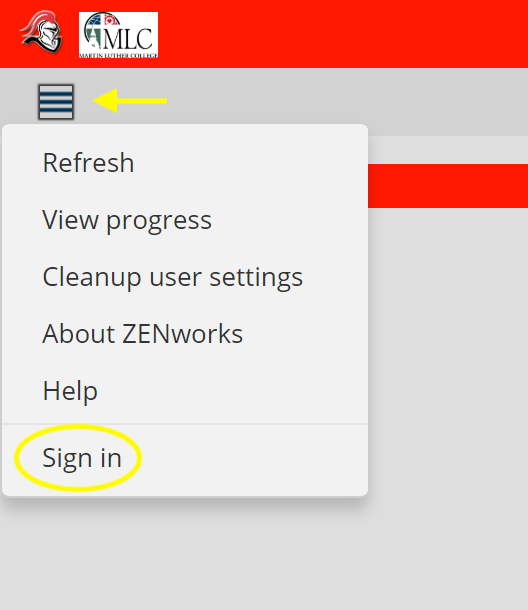
From the ZENWorks application launcher:
-
- Open the ZENworks application launcher by following the instructions below.
- Click on the up arrow in the bottom right of the screen.
- Open the ZENworks application launcher by following the instructions below.
![]()
-
-
- Click on the ZENworks
 icon.
icon.
- Click on the ZENworks
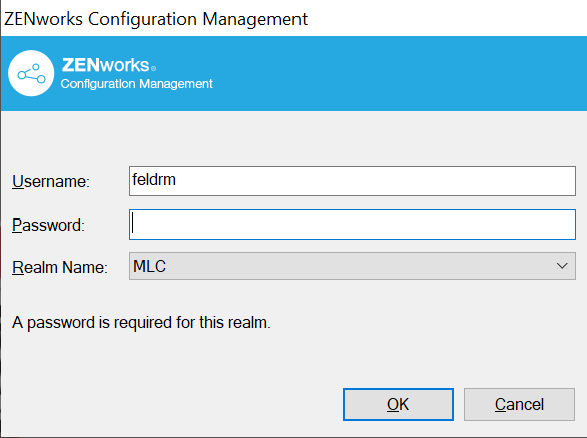
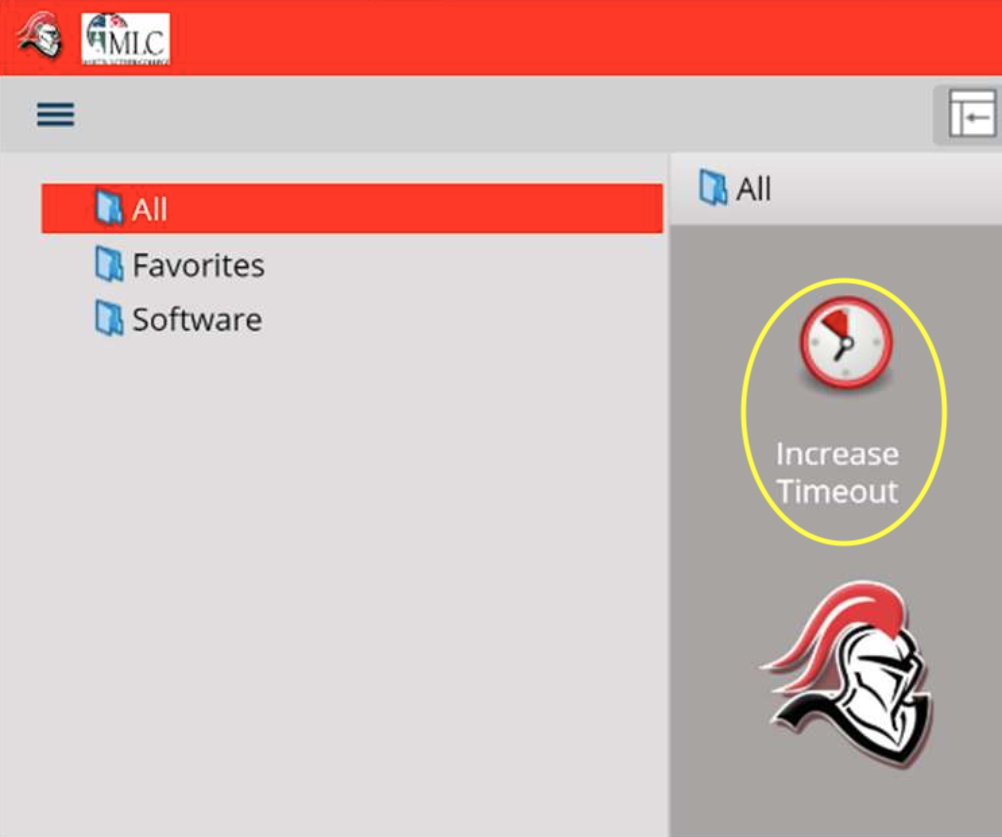
- The ZENworks application launcher window will appear.
- Check if you are logged in by looking for your username in the top left corner of the window underneath the MLC logo.
- If you are not logged in, click the hamburger icon in the upper left corner and click sign in.
-
-
-
- Use your MLC username and password to log into ZENworks and click ok.
-
-
- Double click the Increase Timeout icon in the application launcher window.
-
-
- If the icon does not appear, click the hamburger icon in the upper left corner and click refresh.
- A new window will pop up letting you know that your computer will stay awake for 60 minutes. Hide the window by clicking the minimize icon and continue your work.
-

-
- When you're done teaching or completing your task, click the X to close the program.
MLC Email
Accessing your MLC email for the first time
Your MLC Google Workspace Account password for your MLC email is different than your MLC Account (Moodle & Portal) password. To retrieve your initial password, follow these steps:
-
Log in to the MLC Portal at http://portal.mlc-wels.edu
-
Navigate to Directory > By Person using the top navigation bar
-
Click on the
Metab to view your directory entry -
Take note of your Campus E-mail address (that will be the username for your MLC G Suite Account)
-
Click on the key to display your initial password, and write it down
MLC Signage
How to upload signs to the sign system on campus.
Signage System
The new signage system allows any staff or faculty member to submit signs through the signage website. This will let people manage their own signs. Once a sign is submitted, the Student Life Office will be able to approve them or request a revision, similar to how Portal News works.
First, visit https://signage.mlc-wels.edu and log in with your MLC Account credentials.
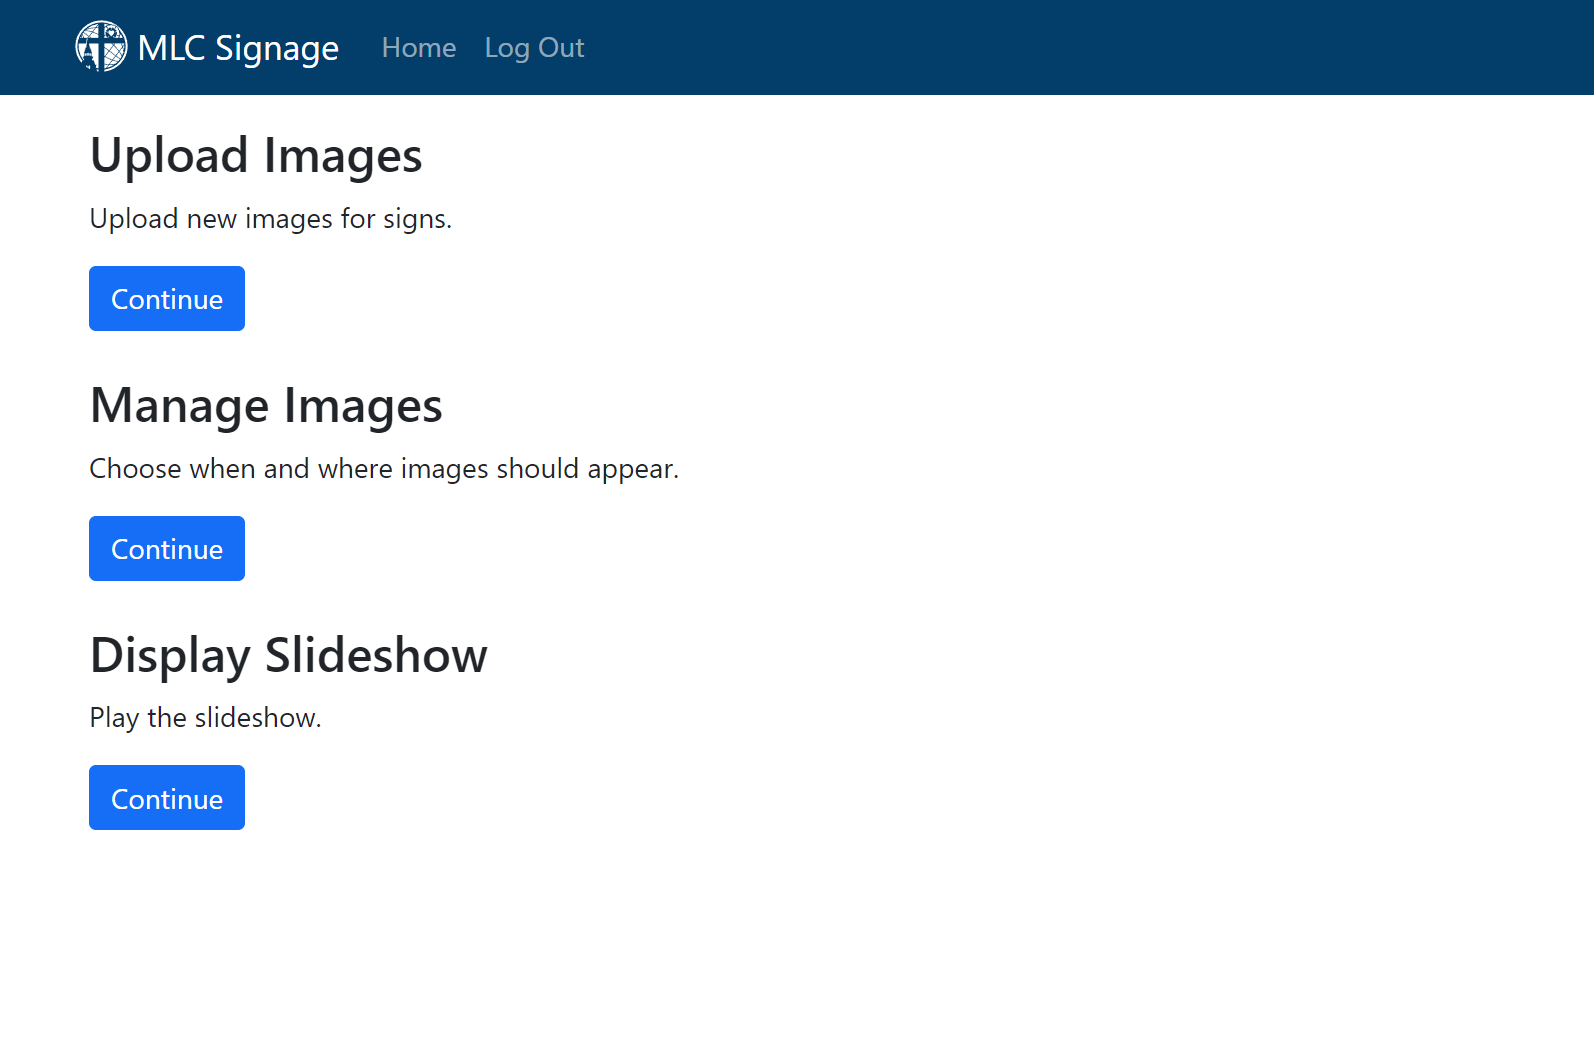
Submitting a sign is very straightforward. Simply click the Continue button under Upload Images.
You'll be prompted to select an image to upload on the next page:

The TVs around campus all use a 16:9 aspect ratio and are 1920x1080 pixels in size, but the signage system will do its best to fit images of other sizes.
Once you select a valid image, you can make some decisions on when and where the image should show, and add a comment.
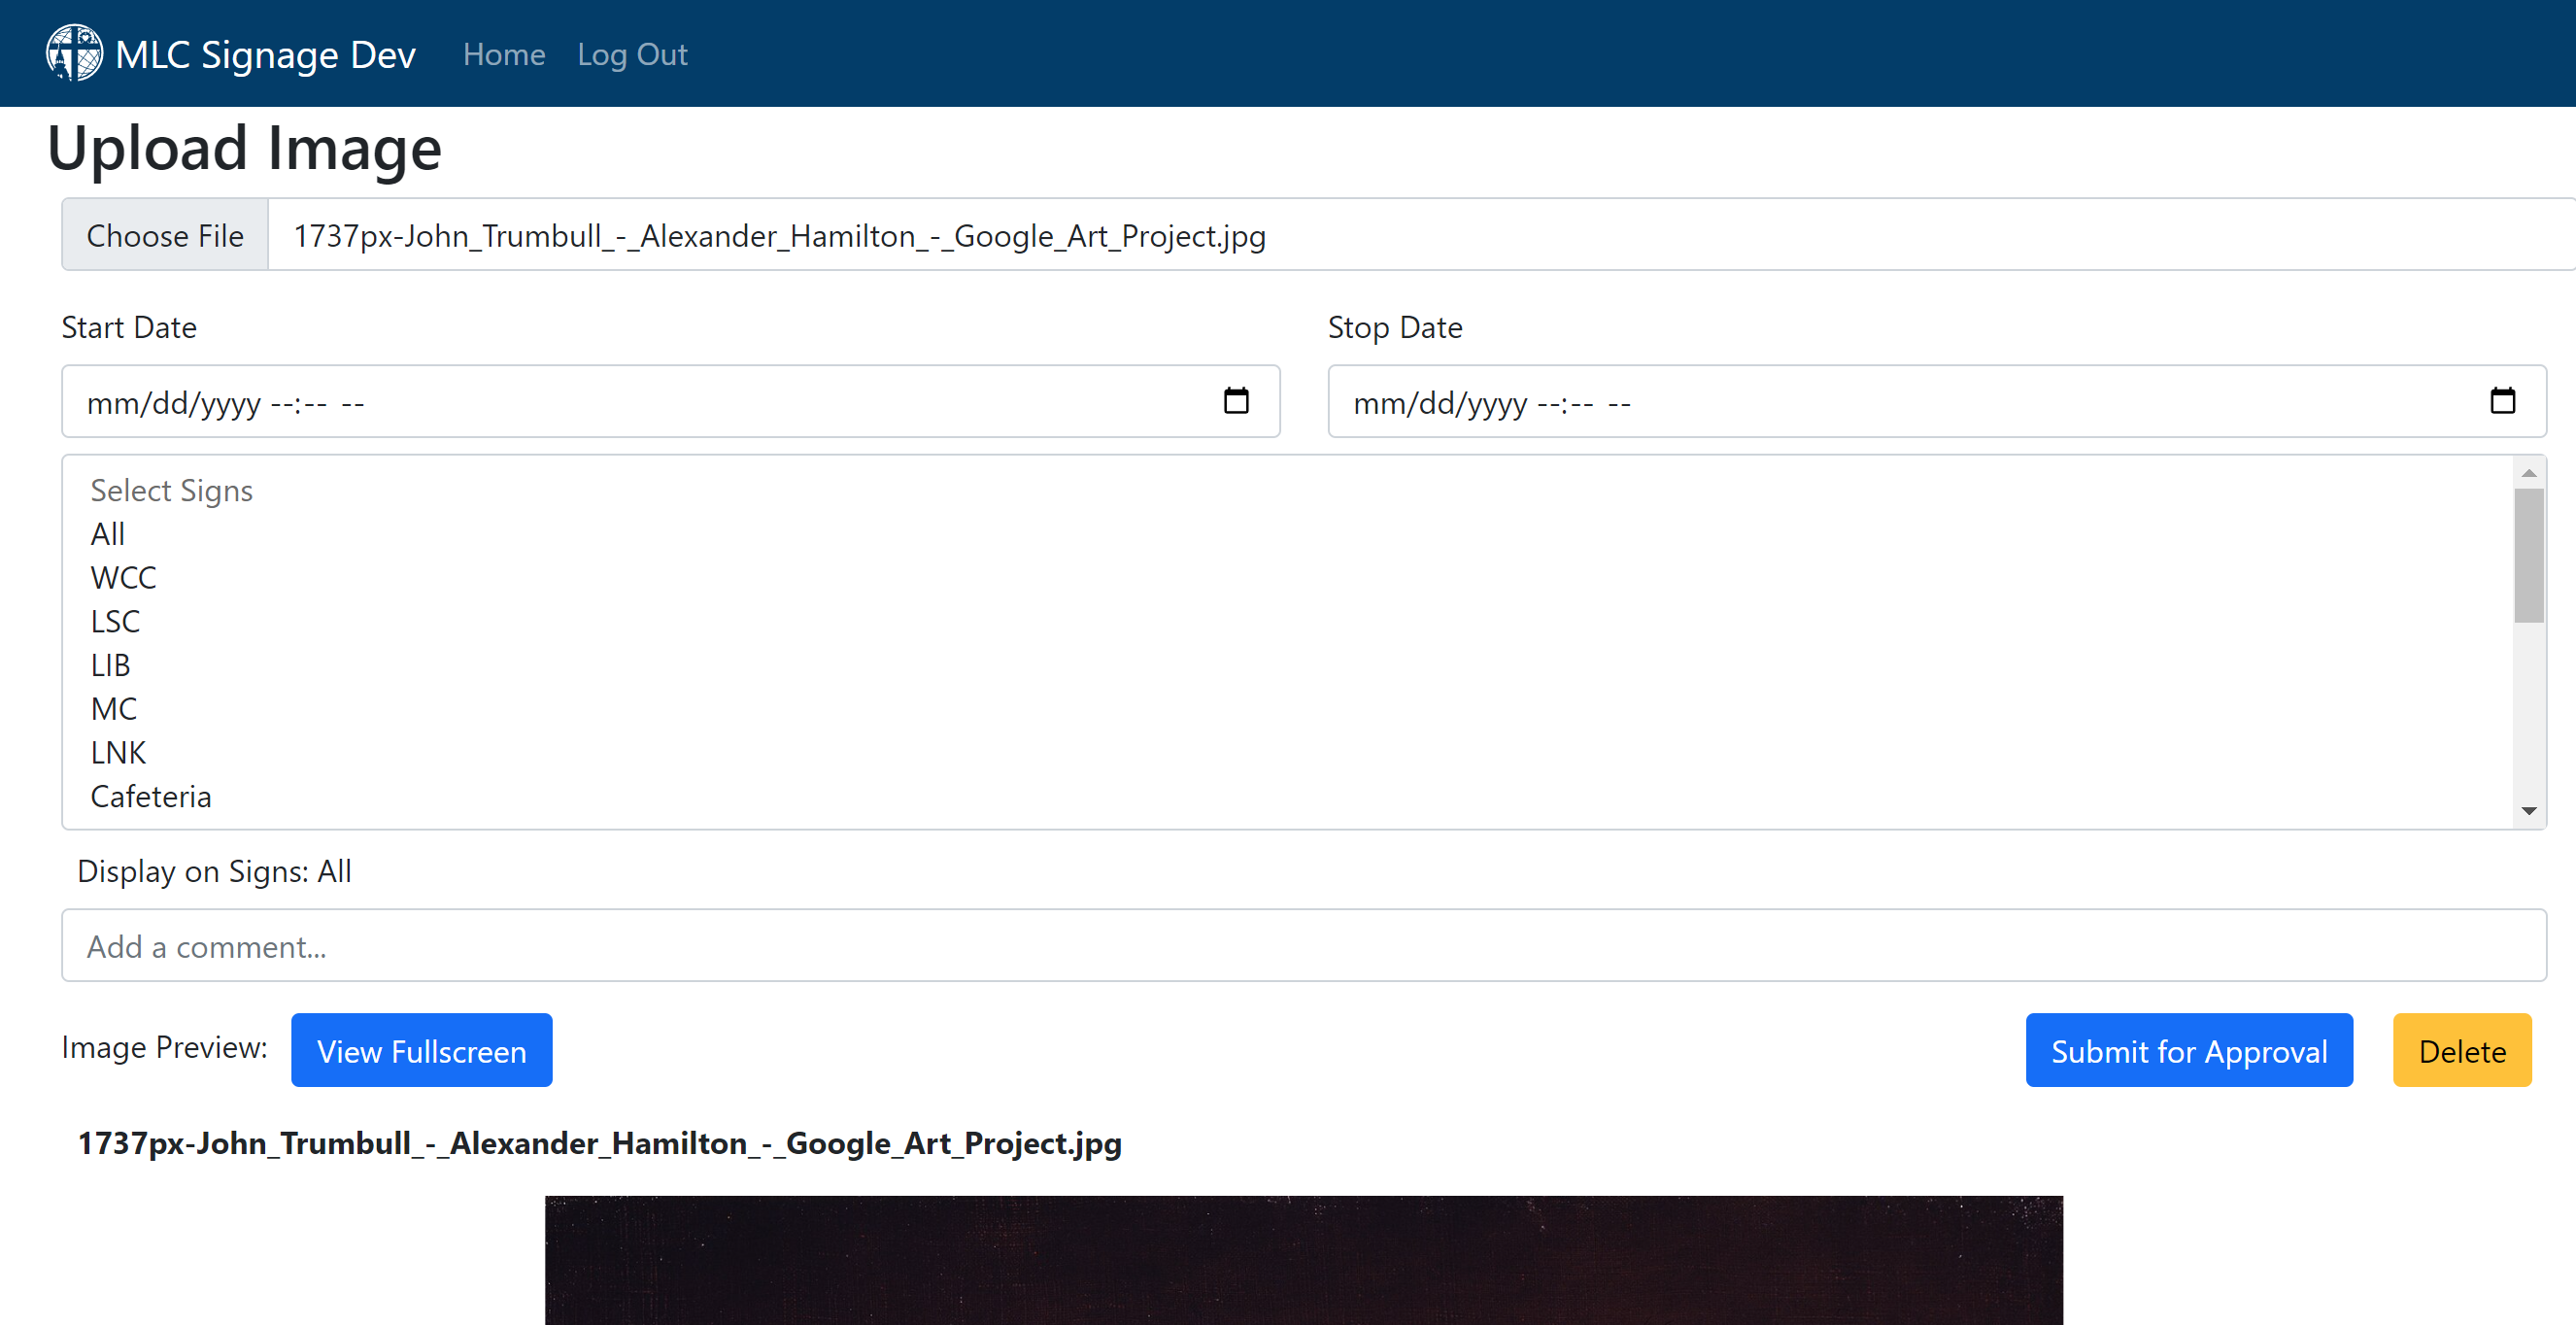
If you leave a stop date blank, it will stay on the signs forever. Similarly, if you do not set a start date, the image will appear instantly on the selected screens.
Once you've checked to make sure you are happy with your sign, you can preview it with the View Fullscreen button, or use the Submit for Approval button. This will submit the sign to be approved by one of the administrators for the sign system.
If you realize you've made a mistake and want to modify one of your signs, you can do so from the Manage Signs menu that is accessible from the main page of the website. Any sign that you personally uploaded can be modified or deleted.
Phones
About your phone
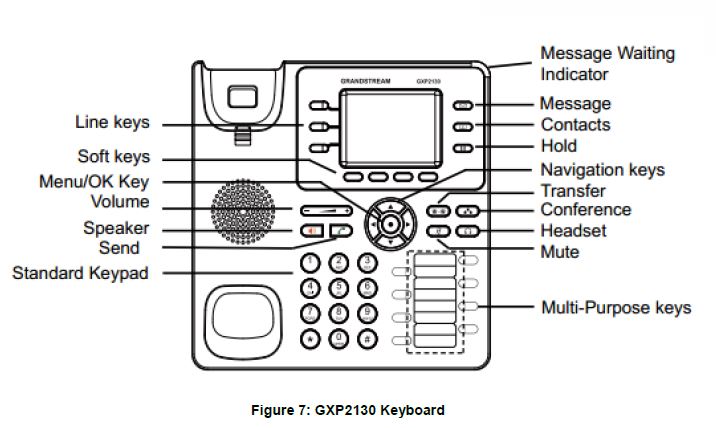
Grandstream GXP2130
-
Line keys
-
We have 2 line keys, you can have 2 separate conversations of which one is on hold
-
-
Soft keys
-
depending on what you are doing, different menus will appear on these soft keys
-
-
Menu/OK key
-
Unordered List Item displays menu of information such as call history, status, contacts, etc.
-
-
Speaker
-
Allows switching between handset and speaker
-
-
Volume
-
Volume control for speaker and handset
-
-
Send
-
Place call after dialing number
-
-
Message Waiting
-
Flashes red when there is a new voicemail
-
-
Message
-
Dials your voicemail box
-
-
Contacts
-
Displays your phone books. The LDAP Directory has the MLC extensions preprogrammed
-
-
Hold
-
Places a call on hold
-
-
Navigation keys
-
Navigate through menu options
-
-
Transfer
-
Transfer call to another number or parking lot
-
-
Conference
-
Use to create a 3-way conference
-
-
Headset
-
Switch to headset if connected
-
-
Mute
-
Mute your speaker, handset or headset
-
If pressed when you are not in a call, this places your phone in the 'do not disturb' mode and sends all call immediately to voicemail
-
-
Multi-Purpose keys
-
These keys have been preprogrammed as call appearance buttons or busy lamp field (BLF) for office groups allowing you to pick up calls for each other. They are unprogrammed for indidividuals.
-
On classroom phones they have been pre-programmed as speed dial buttons for IT Services, HR, Nurse, etc.
-
Dialing
Internal extension information
Faculty and staff have 3 digit extensions in the range 100-399. You can use the LDAP Directory on the phone to search for extensions of faculty and staff, or use the phone link on portal
-
Note - To leave a voicemail for faculty or staff, without ringing their phone, dial * then their extension. i.e. *XXX
Classrooms are all 4 digit extensions:
-
On campus classrooms begin with the digit 4 followed by the room number i.e. 4XXX. For example to call WCC287, dial 4287
-
ECLC classrooms begin with the digit 5 followed by the room number i.e. 5XXX
Local Calls
Calls to the exchanges below are considered to be local. All phones are allowed to place local calls. To place a local call dial 9 followed by the 7 digit number. (9 XXX XXXX)
-
217, 228, 233, 240, 276, 354, 359, 404, 441, 543, 601, 766
Long Distance Calls
Long distance calls are only allowed on faculty and staff phones. Phones in common areas or classrooms cannot place long distance calls. No long distance access codes are needed. To place a long distance call dial 9 then 1 followed by the area code and 7 digit number. (9 1 XXX XXX XXXX)
Voicemail
Faculty and staff phones are configured for voicemail. Phones in common areas and classrooms do not have voicemail boxes.
-
To access your voicemail from your phone, press the message button on your phone or dial *97, enter the password
-
To access your voicemail from someone else's phone dial *98, enter the extension, enter the password
-
To access from outside the building, call your DID, if you have one, 233-9156 or have the receptionist transfer you to your extension if you called 345-8221. When the voicemail greeting answers, press *, enter your password.
All voicemail messages are also emailed as a .wav file to your MLC email address. You can listen to your voicemail messages on any computer or smart device with audio capabilities. (Note- deleting the email does not delete the message from your voicemail box.)
Voicemail guide and setup
Use this printable guide
Transferring Calls
When in an active call…
-
Press the transfer button or the soft key labeled Transfer on the display
-
Dial the extension number of the receiving party. (Note: dial * then the extension to send the caller directly to voicemail)
-
Choose between the soft keys BlindTrnf (blind transfer) or AttTrnf (attended transfer)
-
If BlindTrnf was selected, the call was transferred and you may hang up
-
If AttTrnf was selected, the caller is placed on hold while you call the extension. Use this in a situation where you want to screen callers. If the person does not answer, press Cancel then Resume on the soft key label to be connected back with the caller. If the person does answer, press the Transfer soft key to complete the transfer, or the Split soft key to go back to the caller when the transfer is refused.
User Control Panel (UCP)
- The User control panel (UCP) is a web based GUI that allows you to set up dashboards and customize widgets that allow you to view and control call events, forwarding, history, conferences, fax, and voicemail to name a few.
- If you are a first time user, request access from IT Services by email at support@mlc-wels.edu
3. To access your UCP (currently accessible only from campus) follow this link https://pbx.mlc-wels.edu/ucp/
| Initial login |
|---|
| Adding a widget |
| Call Forward |
| Call History |
| Voicemail |
Call Recording
If you feel that you have a need to record conversations, contact IT Services for access.
Once given permission (request permission from IT Services), you can record any call that you are on by pressing *1 while on the call. Call recordings are accessed through your User Control Panel (UCP)
Feature Codes
Managing Call Forwarding Feature Codes
A phone user can dial feature codes in conjunction with forwarding numbers to turn call forwarding on or off for different conditions. Forwarding numbers can be local extensions or remote phone numbers.
| Code | Action |
|---|---|
| *72 | Activate call forward ALL - extension will not ring, call is immediately forwarded. If the call is not answered, voicemail is handled by the forwarding number i.e. cell phone voicemail |
| *73 | Deactivate call forward ALL |
| *90 | Activate call forward BUSY - call is forwarded if the line is busy |
| *91 | Deactivate call forward BUSY |
| *52 | Activate call forward NO ANSWER -extension will ring 3 times, then call is forwarded for 3 rings. If call is not answered, voicemail for the extension is engaged. |
| *53 | Deactivate call forward NO ANSWER |
Voice Mail
Voicemail can also be accessed by pressing the key with the envelope on your phone.
| Code | Action |
|---|---|
| *97 | Access voicemail from your extension. |
| *98 | Access voicemail from selected extension. Allows you to access your voicemail, or someone else's from any extension |
Managing Do Not Disturb
This feature can also be toggled by pressing the mute button.
| Code | Action |
|---|---|
| *78 | DND Activate |
| *79 | DND Deactivate |
| *76 | DND Toggle |
Managing Call Recording
| Code | Action |
|---|---|
| *1 | Toggle In-Call Recording |
Information Services
| Code | Action |
|---|---|
| *69 | Call trace |
| *65 | Speak your extension |
| *60 | Speaking clock |
Speed Dial Programming
You can program multiple speed dial numbers on your phone. When prompted, enter the speed dial location, followed by the telephone number
| Code | Action |
|---|---|
| *75 | Set up the speed dial location and number |
| *0X or *0XX | Access and dial the number stored in location X or XX, etc |
Ringtones
Our phones are capable of using the default system ringtone and 3 additional ringtones that can be customized by the administrator (IT Services). We are currently experimenting with ringtones, trying to find professional sounding ringtones. Each of you may select any one of the four available ringtones. The video below walks you through the process.
Note: You may need to set these each day until I figure out how to keep it from resetting each day.
Create a Phonebook
View the video below to create a phonebook of frequently called numbers. Feel free to experiment with the fields that are available. Use as many or few as you wish.
Sharing video files with students
You can find instructions for how students can share video files with instructors at https://help.mlc-wels.edu/books/new-to-online-learning/page/share-a-video-file-with-my-instructor and they work just as well for instructors. However, you can also create a folder with the proper sharing settings so that it is easy to upload files, grab the sharing link, and link in Moodle.
A friendly reminder, please default to storing as much of the large video files in your Google Drive account as possible at this time.
- Create a folder in Google Drive to share the files in. Give it a name you will easily remember so that you can come back and share more files in the future.
- Modify the sharable link settings so that you can share with anyone at Martin Luther College. This will make sharing the files in the folder really easy.
- Upload your files. Remember, please use Google Drive for any large files (like videos).
- Select the file and then select the sharable link settings. Copy the link from the resulting menu.
- Copy and paste that link wherever you'd like to share files with your students (probably Moodle). Remember, if you want your students to be able to stream the video it will take time for Google to process it. However, they are still able to download the video and view it themselves until the process is finished.
That's really it. However, you can watch a helpful video as well to see it in action!
Bookstore Textbook Information
This section of KnightHelp explains how to submit your textbook information to the MLC bookstore, as well as some other important textbook information.
Please keep the Bookstore informed when textbook changes are in the works. For example, if your department has decided that the next school year is the last year that you plan to use the 3rd edition of a textbook, and after that you will probably be switching to either the 4th edition or a different textbook altogether – please let us know! This sort of information is extremely helpful, especially as we decide what we want to buy back from the students at the end of each semester.
The more we know, the more we can help you and ultimately the students get what they need as easily and affordably as possible.
If you have any questions that aren’t addressed here, certainly let us know. Our email address is MLCBookstore@mlc-wels.edu. Thank you!
Textbook Submissions
Each spring our on-campus faculty are sent an email regarding Textbook Submissions for the following school year. Here’s a quick look at how to enter your Textbook Submissions.
Option 1 - Entering Textbook Submissions via Portal
Instructions
-
-
Log in to Portal
-
Under Tools, select Textbook Requests.
-
This will open the Textbook Requests form. Here, you will see the various courses you are teaching, with places to fill in textbook information.
-
Tips
-
-
If you know the ISBN for the book you want, try entering it into the ISBN box and hit enter. If everything looks good, hit “Add.”
-
If you want to see what was used the last time you taught the course, click on the History Button. (May not be available for all courses on your form.)
-
-
-
-
If you want to remove an entry, just click delete to the left of the entry and it will be deleted.
-
If you’re teaching more than one section of a course and the same books are required for all sections, simply hit CLONE and the form will duplicate the item to all the other sections.
-
The textbook information that you enter on this form goes into a sort of holding table. It’s not immediately visible on the book list on the portal. This gives the Bookstore Manager the opportunity to look over the items, check (or enter) the ISBNs, ask questions, and so on before the books are posted for all to see.
Option 2 - Submit Textbook Information via Email, over the Phone, or in Person
You don’t have to use the form on the portal to let us know which books you will be using for your courses. If you prefer to email, call or stop by that is also an option. The important thing is to let us know ASAP so we can get that information posted BEFORE registration.
Textbook Timeline
The Higher Education Opportunity Act of 2008 (HEOA) requires all institutions receiving federal financial aid to publish, in time for registration, a list of all required and recommended books and other course materials for all classes offered at the institution. This includes all schools—undergraduate, graduate, and professional. The items we must display are:
- Book title, including edition
- Book author
- ISBN number
- Retail price
Because of this, we at MLC follow this timeline for undergraduate courses:
March Instructors submit their textbook information for the following school year to the Bookstore.
Early April Textbook information is posted on the portal.
Mid-April Current on campus students register for next year’s courses.
The timeline for Online/Continuing Education is as follows:
Mid-January to Mid-February Instructors Submit Textbook Lists for Summer Courses
Registration for Summer Courses Opens February 15th
Mid-May to Mid-June Instructors Submit Textbook Lists for Fall Courses
Registration for Fall Courses Opens July 1st
Mid-September to Mid-October Instructors Submit Textbook Lists for Spring Courses
Registration for Spring Courses Opens October 15th
The Book List
The Book List is located on the portal under Information. Using the dropdown, you can view the current or upcoming semester, or even look back at previous semesters.
A Few Tips from the Bookstore Manager:
- Don’t miss the NOTES field. When you’re looking at the Book List, be sure to slide all the way over to the right to view the notes field. This is where we can post all sorts of helpful information, including comments from the instructor, links to the publisher, and even links to free e-versions of books when available.
- Use ctrl+F to locate your course or a book more quickly.
- Checking the Book List shortly after it’s posted (mid-April) for the upcoming year is always a good idea. If you see anything you want changed, just let us know.
- You don’t have to be logged in to see the Book List, but once a student has registered for their courses, they will want to log in before going to the Book List. By doing so, they will then only see the books for the courses they are taking.