COVID-19 Remote Working
COVID-19 has forced some of our staff to need to work remotely. This area will capture pertinent information to make your work away from campus easier.
Remote Working Introduction
In response to COVID-19 and the continued restrictions on campus, IT Services has put together some remote work options for various groups on campus. This area gathers together helpful information on what you can do while you are off campus and how to accomplish those tasks.
Support Options
While it is nice to be able to drop in and talk with IT Services personnel, now that we are apart (even if only for a short time) we are looking at revamping our support options to better be able to serve remote employees and students.
As such, it is recommended that you utilize the Martin Luther College Support page to send a support request in or email support@mlc-wels.edu to do the same. This will allow us to easily assign issues to the right person or schedule a time when we can talk or meet with you remotely to handle your support case.
Stay tuned for more information on possible revised hours of operation as well.
Remote Work Resources
Martin Luther College
Connecting to the VPN
Some of your work will require you to connect to the Martin Luther College network here on campus and in order to accomplish that, your machine will need to initiative a VPN (Virtual Private Network) connection. This process creates a secure, private "tunnel" between your computer and the network at MLC.
You can view a video on how to connect and disconnect or read the instructions below. In order to follow these instructions you will need to receive permission from the MLC Human Resources office and have your device setup by MLC IT Services.
Connecting to the VPN
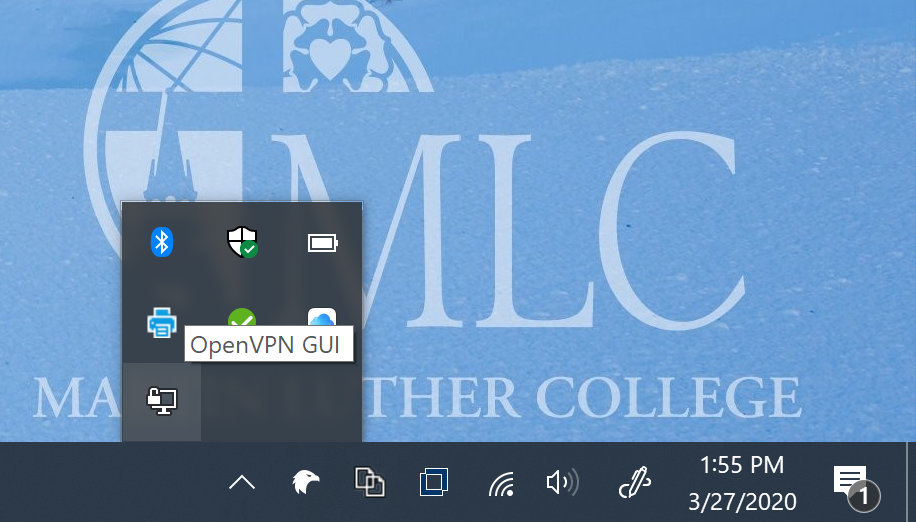
- Find the OpenVPN GUI client icon in the Windows taskbar at the lower right of your screen. You may need to click the Show hidden icons arrow to get it to show up.

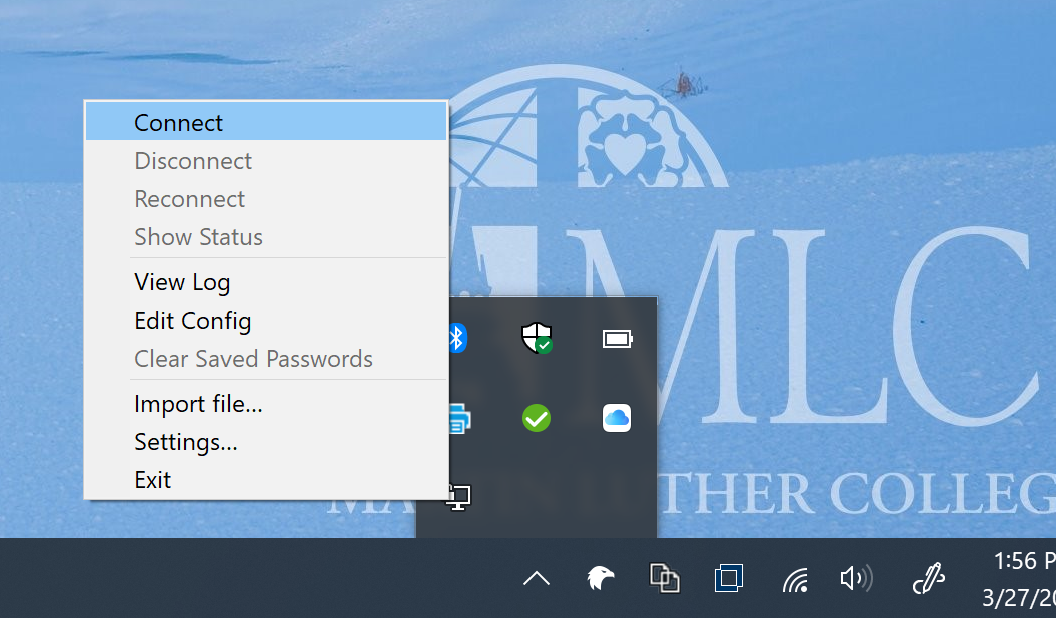
- Right click on the OpenVPN GUI client icon and left click on Connect.

- Enter your MLC Account username and password into the resulting login box and click OK. The OpenVPN log messages and connection screen should disappear when the connection has been made.


Disconnecting from the VPN
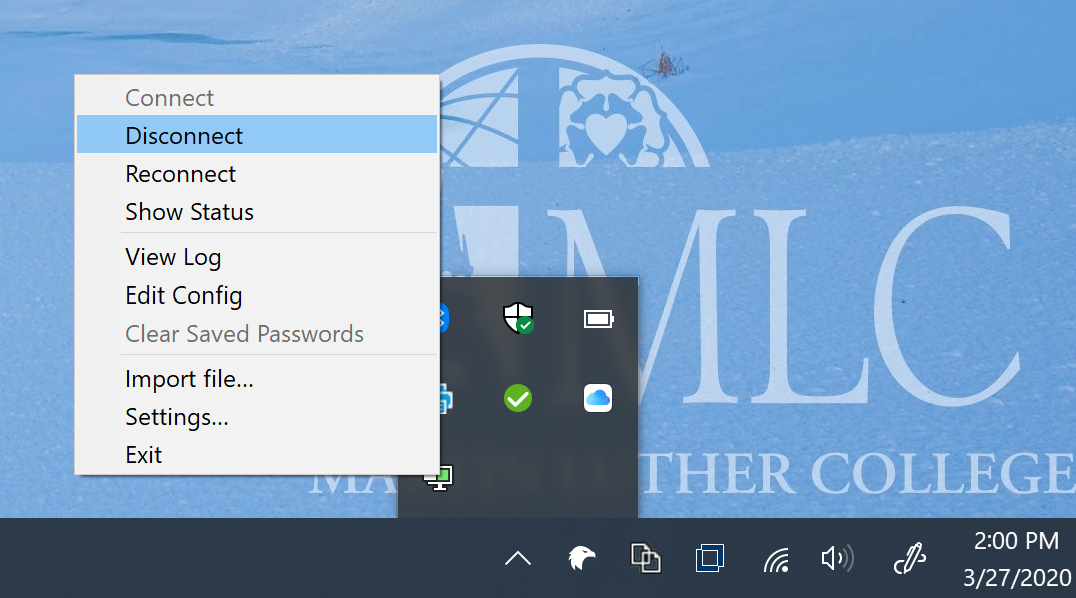
- Find the OpenVPN GUI client icon in the Windows taskbar at the lower right of your screen. You may need to click the Show hidden icons arrow to get it to show up. The icon should now be green.
- Right click on the OpenVPN GUI client icon and left click on Disconnect.

Checking the Status of the VPN
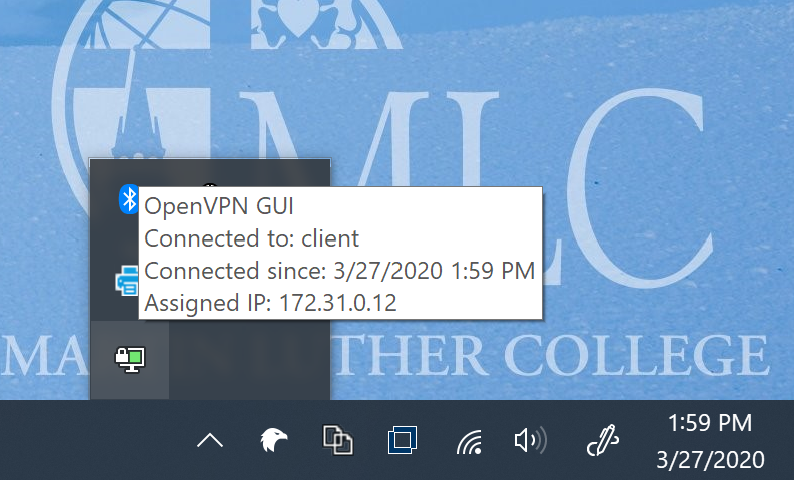
You have a couple of options for checking the status of your VPN connection. In each case, find the OpenVPN GUI client icon in the Windows taskbar. You may need to click the Show hidden icons arrow to get it to show up.
- If you are successfully connected, the icon should be green. If the icon is grey, the VPN is disconnected.
- Hover over the icon and you can view the status.

If you have issues at any time, please contact MLC IT Services.
Connecting to Your MLC Computer
In order to get your work done, especially if you need to connect to the database, you need to connect to your computer still at Martin Luther College. Remember, the first step is always to connect via VPN to Martin Luther College. Before you can connect to your computer at Martin Luther College, you will need to have that connection setup by staff from IT Services. If that is not done, contact MLC IT Services.
Connect to Your Computer
Remember, you need to have an active VPN connection to Martin Luther College before attempting to connect to your computer. You can find videos below for both types of setups.
- Double-click the connection profile on your desktop. It should automatically connect to your desktop, otherwise enter in the password provided by IT Services when prompted.
- You should now be logged into the computer and see either the desktop of the virtual machine we have setup for you or the OES Network login screen like you would if you were sitting at your desk:
Virtual Machine Desktop
Before you can connected to the Campuse-wide Database, you will need to first log into the OES Client. You can also watch this video to see how to do it.
- Find the Client for Open Enterprise Server icon in the Windows taskbar at the lower right of your screen. You may need to click the Show hidden icons arrow to get it to show up.
- Right click on the icon and left-click on OES Login....
- Enter your MLC Account username and password and click OK.
You should now be logged into the OES Network on campus and be able to access any files and/or databases that you would need to work with.
OES Login Prompt
You can treat this prompt just like you would if you were to log into your workstation at MLC. You can also watch this video to see how to do it.
- Enter your MLC Account username and password and press the Enter key. Your machine should log in and you should be set to go.
There are no additional steps. You should now be logged into your machine at Martin Luther College and be able to carry out any duties you need to.
Disconnect from Your Computer
When you are done working on your computer at Martin Luther College, you need to click the X on the top of the screen on the blue toolbar.
If you have any questions, please contact MLC IT Services.
Keeping In Touch
Video Conferencing
Video conferencing is an important way that teams of people at MLC continue to keep in contact with one another while working remotely. However, there are some things to keep in mind when attempting to keep in touch with each other in this way:
- Do dot try and conduct a video conference using your remote desktop connection. This will not work the way you are hoping and may result in a slow, frozen, or otherwise inoperable connection. If you run into issues, you can restart the remote connection or even the entire Surface Pro to get back to where you want.
- You can use the Surface Pro for video conferencing. You will need to make sure you are opening a browser that is local to the Surface Pro, either Google Chrome or Microsoft Edge more than likely. Either minimize or close your remote session and then find the browser that is locally installed on your Surface Pro. The Surface Pro you are using has both video cameras and microphones built into the device.
There are any number of video conferencing platforms you may be able to use with your team:
-
Google Meet
- This is the preferred meeting option and is part of your MLC G Suite Account. Meet is also built into Google Calendar.
- BigBlueButton
- If you would like to use BigBlueButton with your team, please contact IT Services.
Team Chat
Text-based communication has the benefit of being asynchronous so that team members are able to read and respond when it is convenient for them. Text-based communication is also very light on bandwidth usage and so is very effective no matter what type of connection to the internet you may have. Here are some options you have while working remotely:
-
Google Hangouts Chat
- This is part of your MLC G Suite Account and integrates well with other G Suite applications.
If you have any additional questions or needs, please reach out to IT Services.