# Communication Tools
# Emailing Students
# Quick Mail Block
# Class Announcements Forum
The Announcement forum is available by default in all courses. It has some unique features.
- Only teachers can post in it.
- All students are automatically subscribed to it, meaning they will get an email whenever you post something.
- Students cannot reply to announcements, only view. The benefit to this over email is that they can easily come back to review what was sent and you don’t have to copy all their email addresses.
##### Instructions
- Log into Moodle and enter your course.
- Click on **Announcements**
- Click **Add a new topic**
- The next screen is very similar to an email window. Put a subject in the subject line and your information in the message textbox.
- Click the blue **Post to forum** button.
- In 15 minutes, your post will be visible to students and sent to them via email. In that 15 minute window, you can change the announcement if needed.
# Video Conferencing - Big Blue Button
You can find some information at the EdTech blog in the post titled [*BigBlueButton Basics*](https://blogs.mlc-wels.edu/edtech/2020/07/22/training-tuesday-4/).
# Video Conferencing - Google Meet
# Synchronous Chats
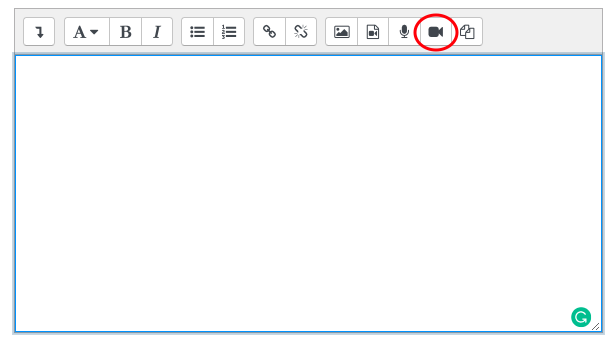
# Recording Video in Moodle
Anywhere that instructors or students have a textbox to enter text, they can also record audio or video. This can be used for students to introduce themselves or explain their learning, or for instructors to give project directions or assignment feedback. You need a webcam and microphone to use this feature. Most recent laptops have these.
#### Instructions
1. Enter the activity where you want to record the video. Examples of this include a discussion forum post or assignment.
2. In the textbox, click the **video camera icon**. Note that if you are in a discussion forum, you might need click **advanced** for that option to appear.
3. After you click the icon, a window should appear with a red **Start recording** box. Click that box.
4. If prompted by your browser, **allow** Moodle to access your webcam and microphone.
5. After you click **Start recording**, a screen showing what you are recording will appear. Below that screen is the **Stop recording** button and a countdown timer. The timer indicates how much time you have left in the recording.
6. When you are finished with your recording, click **Stop recording.**
7. If you want to start the video over without saving what you've done, click the **x** in the upper right corner of the window.
8. After you click **Stop recording**, a preview of your video will appear if you want to watch it. If you want to redo the recording, click **Record again**. Otherwise, click **Attach recording** to insert the video in the activity.
9. Depending on the length of the video, it might take a while to process and appear in the textbox. When it does, submit the assignment or feedback like you usually would.
[](https://help.mlc-wels.edu/uploads/images/gallery/2019-08/Video-Icon.png)
##### Troubleshooting
- Check that your webcam/microphone are properly configured on your computer.
- Check your browser settings to make sure it is allowing the use of the webcam/microphone.