Moodle for Faculty
Tips and instructions for instructors using Moodle in online and face-to-face courses at MLC.
- Beginning Moodle Videos
- Course Layout and Design
- Best Practices for Teaching Online Courses
- Layout and Navigation Basics
- Using Topics
- Using Blocks
- View Course as Student
- Course Organization Tips
- Fixing Orphaned Content
- Showing Hidden Content
- Using Master Copies
- Activities
- Resources
- Moodle Assignments
- Asssignment Overview
- Moodle Assignment Settings
- Adding Moodle Assignments
- File Submission Types
- Grading Moodle Assignments
- Uploading a Google Doc to a Moodle Assignment
- Using Google Docs Commenting for Grading Within Moodle
- Moodle Discussion Forums
- Moodle Quizzes
- Communication Tools
- Class Announcements Forum
- Video Conferencing - Big Blue Button
- Video Conferencing - Google Meet
- Recording Video in Moodle
- Grading
- Initial Gradebook Setup
- Student View of Grades
- Grading Moodle Assignments
- Grading Moodle Quizzes
- Grading Moodle Discussion Forums
- Other Grade Items
- Grading Methods
- Overriding Existing Grades
- Excluding Individual Grade
- Exporting Grades
- Reordering Gradebook Items
- Using Grading Guides
- Beginner's Guide to Moodle Gradebook
- Setting the Grading Scale
- Adding Extra Credit
- Rubrics in Moodle
- Groups
- Moodle Profile
- How Do I?
- Activate My Course
- See Moodle as a Student
- Uploading a File from Google Drive
- Set Course to Hide
- Import Course Content
- Remove Course Sections from a Meta-Site
- How Students Can Contribute Files or Links
- Adding a Link to a Webpage in your Moodle Course
- Use Groups in a Discussion Forum
- Turning In Grades
- Adding a TA
- Permanently Deleting Old Courses
- Course Surveys
- Set Course to Hide/View
- View Class Roster
- Initial Communication with Students
- Fixing Orphaned Activities
- Using a Meta-Course
- Add Course Sections to a Meta-Site
- Edit Multiple Due Dates
- Open a Course for One Student
- Fix the "Not part of a Group" Error
- Show/Hide Course Content
- Glossary
- Semester Checklists
- Beginning of Semester: Online Course
- Beginning of Semester: On-Campus Course
- End of Semester: Online Course
- End of Semester: On-Campus Course
- Course Workflow for Online Courses - Updated February 2021
- Helping Students Succeed
- Monitoring Activity Using Course Blocks
- Tracking Student Activity Using Reports
- Class "Attendance" in Moodle
- Enabling Student Access to Logs and Reports
- Regular & Substantive Interactions: Online Faculty Guidance
- Finding a Course
- Adding Library Resources to a Reading List
Beginning Moodle Videos
- Finding Your Way Around
- Dashboard
- What is a Course?
- Course Layout
- Editing Course Sections
- Editing Icons
- Adding and Editing Text
- Course Blocks
- Drag and Drop Files
- Activity Completion
- Uploading Files
- Using the File Picker
- Adding Images
- Activity Chooser
- Adding a URL
- Starting a Discussion Forum
- Posting an Assignment
- Gradebook
Course Layout and Design
Best Practices for Teaching Online Courses
Some Best Practices for Teaching Online Courses, based on prior experience with teaching online courses through MLC and student feedback from various courses.
Length of lessons
Weekly or every 2 weeks. In EDU9502: Designing and Constructing Online Courses, everyone learned that course material should be "chunked" into small segments within a lesson and that lessons should normally be only one or two weeks in length. Students prefer new lessons beginning on the same day of the week throughout the course.
Which day of the week should a lesson begin/end?
During the fall and spring terms, most students in the graduate program are teaching full-time, which gives them little time to work on their grad course on school days. Therefore, they complete the bulk of their work for a given lesson over the weekend. For this reason, many of them indicated that in the spring and fall they prefer that new lessons begin on a Wednesday and end on a Tuesday since it places the weekend in the middle of the lesson time period.
However, during the summer term, they prefer that lessons run from the typical Sunday through Saturday (or Monday through Sunday) since they prefer to do the bulk of their work during the week and not on the weekends. Some instructors simply prefer to run courses from Sunday through Saturday even during the school year, which is okay. Ultimately, it is up to the course instructor.
Preparing to teach a course during the 8-week summer term
When transforming a regular semester-long online course (15-16 weeks) and teaching it in the summer term (8 weeks), there is no need to redo or combine any of your lessons. The idea is to simply take each two-week period from the fall or spring semester offering and cover the same material in one week in the summer term. For most instructors that means they cover two lessons per week in the summer, often running one lesson from Sunday-Wednesday and the other lesson from Wednesday-Saturday. (Remember, in the summer term most students prefer a Sunday-Saturday "week", as explained earlier.)
Keep all students working through the course at the same pace
Typically, some students prefer to work ahead while others seem to wait to do things at the last minute. In an online course, it is important that students are working on the group aspects of the lesson at the same time. One good method to attempt to satisfy both extremes is to make the "lesson guide sheet" document visible to students about a week prior to the start of the new lesson, but don't make the posting or submission areas visible until the official start date of the lesson. If following a "Wednesday-Tuesday weekly format," some instructors make the next week's lesson guide sheet available on a Friday evening, so students that want to work ahead can use the weekend to do so, but they can not submit their work until the lesson officially begins on the following Wednesday. (Also, see the sections on Post due dates... and Group discussion forum due dates below.)
Post due dates to inform and pace student work
A schedule of activities can be posted in a variety of ways. Some instructors provide a document listing all of the activities and the due dates at the start of the course. Others provide general dates for lessons in the Moodle heading areas of topical blocks, and specific activity due dates within the instructions for the activity, or in the activity set up in Moodle. Others make use of the Moodle calendar. Many instructors use more than one method. If your lesson is spread across more than a week, it is wise to make some activities due before the end of the lesson so students cannot save everything for the last minute. (Also, see the suggestion below on Group discussion forum due dates.)
Group discussion forum due dates
Set a posting due date for the original contribution to a forum, and then a later posting due date for replies. For example, if a new weekly lesson starts on Wednesday, some instructors set a due date of Saturday for the initial post and a due date of Tuesday for all reply posts. This forces all students in a group to make their initial contribution to the forum by the middle of the weekend, which allows those that want to take care of their reply posts obligations on the second half of the weekend and without having to stay up late into the evening to do so.
Provide a "Student Expectations" document
Different online instructors have different expectations of students. It is very helpful to your students if you post your expectations of them at the very start of the course. It is also a good idea to include what students can expect from the instructor!
Use the Moodle Grade Book
Students are used to seeing grades, and comments, on various activities posted to the grade book in Moodle. The current grade book can accommodate many different methods of grading. However, if you have not used it before or recently, getting it set up can be confusing. However, Rachel is always able, willing, and happy to assist you in setting up your grade book and understanding how it works. Simply let her know how you would like grades to be calculated and she will set up the grade book for you!
Use "Choice" for students to select activities
The "choice" activity feature in Moodle is very good at allowing (forcing) students to select from a list of possible choices for a given activity so you do not have more than one student selecting the same project or activity in a given lesson. It can also be used to get student feedback (vote) on a particular question.
Use "Groups" for discussion work
Small groups are often used in discussion forums to greatly cut down the amount of reading and posting that students need to do during the course. At the end of a group activity, it is a good practice to set the group setting to "Visible groups" so all participants will be able to view the discussion that occurred within other groups. When the change is made, it is a good idea to add some text in the forum introduction such as: Please note: The setting in this forum has been changed from "Separate Groups" to "Visible Groups." To see the work from a different group, select the group by using the "Visible groups" button located below. Generally, viewing or reading these additional posts should be optional.
In Moodle, it is less confusing to students to have them in only one group at a time. If students are members of more than one group at a time, students need to exercise additional care so that they post to the correct group for each activity. They need to specify the correct group prior to selecting the "Add a new discussion topic" button.
There is not a perfect group size, but groups of four or five seem to have worked well in discussion forums for many instructors. If one person is late in posting, the others still have two or three different people they can make their reply post to.
Grading discussion forums
It is important that students understand the grading rubric that is being used for discussion forum work. A convenient way to assign points is to use the "Sum of ratings" setting in the forum setup, and then assign a certain number of points for the initial post and a certain number of points for each reply post. It is also good to include a general message in the forum introduction area so students understand the rating being used, such as (This forum is worth 10 points. You will receive up to 5 points for your initial post and up to 3 for each reply post.)
Use the "Folder" resource to allow students to see work produced by others
On the course homepage, create a "Folder" resource and then upload student files into it. (You may zip student files into a single file, upload the zipped file into the folder, and then unzip.)
Instructor participation/presence
It is important to let students know that you are actively reading their work and checking in on the course on a nearly daily basis. This is especially important in discussion forums. Please refer to the guidance on Regular and Substantive Interactions for more information.
Be consistent in how materials are to be turned in
Most instructors make use of the assignment activity upload features in Moodle to receive student work and provide comments back to the students. Others might use a different method. There is no one method that needs to be followed, but it is good to be consistent throughout the course.
Scanned files
Scanned pages from books should be scanned directly in a PDF (not jpg) format with multiple pages combined together in a single document. This will greatly reduce the overall file size, make the text and/or images clearer, and be much easier for the students to work with. (Feel free to contact Rachel for assistance.)
Lesson Feedback after each lesson/unit
Waiting until the end of the course for summative feedback is not as useful as gathering feedback after each lesson. You can use the Feedback activity at the end of each lesson where students are asked to complete 3 statements;
The most useful thing in the lesson was…
The most challenging part of the lesson was…
The lesson could be improved by...
Although this is still gathering information after the fact, such feedback can be very useful information for the next time the course is offered and sometimes even useful for making adjustments to future lessons in the current offering of the course.
Faculty assistance
Many useful screencasts and documents have been placed here on KnightHelp. Also, feel free to contact Rachel for assistance.
Layout and Navigation Basics
Course Layout Explained
Turning Editing On
1. Enter the course site you want to edit.
2. Click the blue Turn Editing On button in the upper right corner.
Adding Course Content
1. Turn editing on for the course site.
2. Click Add an activity or resource in the topic where you want to add content.
3. From the resulting window, choose the activity or resource type you'd like to add and follow the prompts.
4. Clicking each choice will show a description of the activity or resource on the right side of the window.
5. After making your selection, click Add and follow the prompts for the activity or resource.
Deleting Course Content
1. Turn editing on for the course site.
2. Click edit underneath the content or activity you want to remove.
3. Choose Delete.
4. Choose Yes.
Using Topics
MLC courses use collapsed topics by default. These topics can be used to organize course content, help students locate assignments, and efficiently hide and show groups of content to students.
Tips for Using Topics
- Topics can be thought of like file folders. Each topic can contain a variety of activities and resources.
- Topics can be used to organize a course in numerous ways, depending on the type of course and instructor preference.
- By week - each week of the course gets one topic containing the information and activities needed for the week.
- By unit/chapter/lesson
- By content type
- Showing/hiding a topic also shows/hides all the content within that topic in the student view.
- New courses have a default number of topics added automatically. Topics can be added or deleted to fit the course content.
- If content is imported from a previous course, topics can be imported as well.
Working with Topics
Editing Topic Names
- Enter your course and turn editing on.
- Scroll to the topic you want to edit and either
- Click on the pencil at the end of the topic name, type the new topic name, and press enter.
- Click Edit at the end of the topic box and choose Edit section. Edit the section name and click Save changes.
Showing/Hiding Topics
- Enter your course and turn editing on.
- Click Edit at the and of the topic name.
- Click either Hide section or Show section from the edit menu.
- Hiding a section will remove both the topic and all the content in the topic from student view. To indicate this, the topic name will appear in italics and a Hidden from students message will appear under the title.
Highlighting Topics
- Enter your course and turn editing on.
- Click Edit at the and of the topic name.
- Click either Highlight or Remove highlight.
- When a topic is highlighted, a thin blue line appears to the left of the topic content.
Adding Topics
- Enter your course and turn editing on.
- Scroll to the bottom of the course page.
- Click the blue + underneath the last topic currently in the course.
- A new topic will appear at the bottom of the course. It will automatically be called Section # (whatever number comes next). Follow the additional directions on this page to edit the topic.
Deleting Topics
There are two options for deleting course topics.
Option 1
- Enter your course and turn editing on.
- Click the Edit menu next to the topic you want to delete.
- Choose Delete section.
- If prompted, click Delete on the confirmation screen.
- Note that if a topic is deleted using this method, all activities and resources within the topic will also be deleted.
Option 2
- Enter your course and turn editing on.
- Scroll to the bottom of the course page.
- Click the blue - underneath the last topic currently in the course.
- The last topic in the list will be removed.
- Note that if a topic is deleted using this method, all activities and resources within the topic will be tagged as orphaned and will not be visible to students. The content must be moved to an existing topic in order for students to see it.
Rearranging Topics
- Enter your course and turn editing on.
- After turning editing on, compass arrows will appear to the left of each topic.
- Click the compass arrow next to the topic you wish to move and drag it to the proper location
Using Blocks
Course blocks are the boxes of information on the right side of the course page. These blocks can be edited to fit the needs of the course. Many of these blocks can also be added to your Moodle Dashboard.
Adding New Blocks
- Log into Moodle and enter your course site.
- Click on the Edit mode toggle in the upper right corner to turn editing on.
- Click the arrow button on the right side of the page to expand the blocks drawer.
- Click the name of the block you want to add to your course
- The block will be added to the list of blocks on the right side of your course page. Information on specific blocks can be found below.
Editing Existing Blocks
- Log into Moodle and enter your course site.
- Click on the Edit mode toggle in the upper right corner to turn editing on.
- Click the arrow button on the right side of the page to expand the blocks drawer.
- Click on the gear in the block you wish to edit and choose the appropriate option.
- Configure block: access the options for the particular block.
- Hide block: the block will no longer be visible for students.
- Permissions: change permissions within the block.
- Check permissions: view the permissions within the block for specific users.
- Delete block: remove block from the course site.
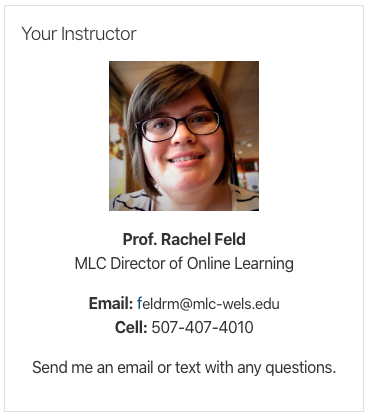
Instructor Information Block
Students find having a block with information about the instructor on the course home page is helpful, especially in an online course. Please follow these instructions to add this block to your course. If you already have an instructor block but need to update it, please see the next section.
- Log into Moodle and enter your course site.
- Click on the Edit mode toggle in the upper right corner to turn editing on.
- Click the arrow button on the right side of the page to expand the blocks drawer.
- Choose Text from the list.
- A block with the title (new Text block)should appear at the top of your course blocks.
- Click the Gear in the HTML block and choose Configure (new Text block) block.
- On the next page, enter the title for the block. Your Instructor is typically used.
- In the Content textbox, enter the information you'd like your students to see. This could include your name, photo, email address, preferred method of communication, etc. See the sample below. Use the toolbar in the textbox to format your text.
- Scroll to the bottom and click Save changes.
- Repeat steps 6-9 to adjust the formatting as needed. Note that some formatting will depend on the size of the screen the student is viewing your course from.
Updating the Your Instructor Block
- Log into Moodle and enter your course site.
- Click on the Edit mode toggle in the upper right corner to turn editing on.
- Click the arrow button on the right side of the page to expand the blocks drawer.
- Click the Gear in the Your Instructor block and choose Configure Your Instructor block. Note: If your block is named something different, the Configure option will include the name of the block.
- In the Content textbox, edit your contact information.
- Scroll to the bottom and click Save changes.
- Repeat steps 3-5 to adjust the formatting as needed. Note that some formatting will depend on the size of the screen the student is viewing your course from.
Available Blocks
The most commonly used blocks are listed below. Please follow the link for more information on the block.
- Activities
- Activity Results
- Calendar
- Comments
- Course Completion Status
- Course/Site Summary
- Courses
- HTML
- Latest Badges
- Latest News
- Logged In User
- Online Users
- Pearson MyLab & Mastering (Block)
- People
- Random Glossary Entry
- Recent Activity
- Remote RSS Feeds
- Search Forums
- Self Completion
- Upcoming Events
View Course as Student
This feature allows instructors to see the course home page and activities as if they were a student.
Instructions
- After logging in to Moodle, enter the course you'd like to view as a student.
- Click the down arrow to the right of your profile picture in the upper right corner and choose Switch role to...
- Click Student
- You can now view your course from the perspective of a student. This is visually indicated by the blue word student under your username.
- To return to your normal role, click the down arrow to the right of your profile picture in the upper right corner and choose Return to my normal role.
- Note that the view is not a perfect replication of some items like viewing grades. For a completely accurate student view, please use a sample student account.
Course Organization Tips
Having an organized Moodle course site can go a long way in helping students succeed in online learning. Some things to consider:
- Use sections to organize your course in Moodle rather than having one long list. Think of these sections like file folders -- all the materials for one lesson (or week, depending on how you're organizing your course) should go in a section.
- Number your assignments to help students locate them and keep track of what they've done. Then, if there are handouts, direction pages, or other parts that go with an assignment, label them similarly. For example, in week 1, you might have assignment 1.1 that goes with handout 1.1a.
- Put due dates at the end of the assignment name in Moodle so students can quickly see what's due each day without having to open everything.
- Create a checklist of what students are expected to do for each lesson or week.
- Add a discussion forum for questions to your class for students to post questions in. This will help reduce your email volume, let students check for questions that have already been asked, and let students answer each other's questions.
- If you have lots of files, consider setting up folders to hold related files.
Fixing Orphaned Content
Orphaned content can appear when the number of sections in a current course does not match the number of sections from an imported course. To fix this, follow the directions below to change the number of sections in the course.
Interactive Tutorial
9 STEPS
1. The first step is to open your course and click to turn on Edit mode
2. Scroll and click Close all. This will make scrolling to the bottom of the page faster.
3. Scroll down to the bottom and find the last orphaned section. In this example, it's section 10. Remember this number.
4. Click Settings
5. Scroll and click to expand Course format
6. Scroll down and click the dropdown menu next to Number of sections
7. Select the number of sections you made note of in the previous step. For this example, choose 10
8. Scroll down and click Save and display
9. That's it. You're done.
Showing Hidden Content
Hidden content cannot be seen by students. Content needs to be made visible before students can see it.
Instructions
- Log into Moodle and enter your course site.
- Click the gear in the upper right corner and choose Turn editing on.
- Locate the hidden item you wish to make visible.
- Click the Edit menu to the right of the item.
- Choose Show.
- The item will now be shown to students. There is no save button.
Using Master Copies
Master Copies of courses are used in both the undergraduate and graduate programs to help keep track of the most current course content and also facilitate sharing content without compromising student data. They are similar to a backline master used to make worksheet copies, except for a whole course. The following information will help you successfully navigate and work with your course master copy.
- You should have one master copy for each course you teach and each way that you teach it. For example, someone might teach EDU0001 during a regular semester and also online during a summer semester. Each of those courses will have a unique master copy.
- Master copies should be updated prior to the semester starting, with the exception of due dates. Currently, due dates do not transfer well and should be changed after the course import.
- Master copies are not linked to semester copies, so changes that get made do not get transferred automatically. You can make needed updates throughout the semester or if significant changes have been made that you'd like to retain, fill out this form so the support team can assist.
- Master copies will never be removed, while semester copies will be regularly removed after a set period of time.
- If you need to share your course with another instructor for review, collaboration, or other purposes, please share the master copy. This protects student data.
Activities
Activity Types
Activities are things that you want the students to do in your online classroom. Unlike Resources, which are how instructors giving information to students, Activities are typically students giving information/feedback/etc. to the instructor.
The activities below are available to all instructors. Some activity blocks, like EdPuzzle or Perusall, are dependent on the resources used in your course.
Assignment
Allows students to turn in digital assignments, like documents, images, or media.
Big Blue Button
An online video conferencing option to support synchronous classroom activities. You can watch the training on how to use BBB at MLC here.
Chat
Allows for synchronous text-based chatting within the online classroom.
Choice
Posts a single multiple-choice question for students to answer.
Database
The instructor creates a database framework that students can add entries to.
EdPuzzle
Allows linking of EdPuzzle activities from the EdPuzzle website.
External Tool
Used with some external websites and curricular tools. This is also how you can use Google Assignments in Moodle.
Feedback
A way to collect student feedback on a lesson or other learning experience.
Forum
Supports asynchronous discussions among students and instructor. Forums can include text, audio, video, and other media.
Glossary
Students can collaborate on a list of definitions or other resources.
H5P
Used to create interactive activities and resources, including flashcards and interactive videos.
Lesson
A combination of content and assessments that can be differentiated and graded.
Pearson MyLab & Mastering Link
Used with some textbooks from Pearson Publishing.
Perusall
Quiz
Create a quiz or test with a variety of question types. Objective questions can be automatically graded by Moodle.
SCORM Package
Used with SCORM learning objects.
Survey
Choose from a pre-defined list of surveys related to student reaction to learning.
Wiki
Build a class wiki.
Workshop
Facilitate peer review of documents.
Explanation of Activity Options
General
Assignment Name
-
- The title that students will see on the course page. This is a required field.
Description
-
- Put directions or other information here. The description will only appear on the course page if you check the box under the text box.
Additional Files
-
- Attach templates or other files needed for the assignment here.
Availability
Allow Submissions From
-
- If a date is chosen, students will not be able to submit until then. Click Enable to set a date and time.
Due Date
-
- If a date is chosen, students will see the due date on their course. Submissions will still be allowed after the due date but will be marked as late. Click Enable to set a date and time.
Cut-off Date
-
- If a date is chosen, students will not be able to submit after this date. Click Enable to set a date and time.
Resources
Resource Types
Resources are how you give students access to information on your Moodle course page. You can also use resources to add organizational and visual elements to your Moodle course page. The resource options below are available to all instructors.
Book
Create multi-page resources organized like a book in chapters, subchapters, and pages. Book pages can contain both text and media elements.
File
Allows you to add a file, like a PDF, slide presentation, or Word document, from your computer to the course page for students to download, view, and edit. Students will need the appropriate software to work with the file.
Folder
Used when you want to add several files to a course page that can be grouped together. Using a folder instead of listing the files on your course page takes up less visual space and reduces scrolling on the course page.
IMS Content Package
Sometimes used for content that comes from a textbook publisher.
Label
Used to add words, images, or videos to your main course page. A label can be as simple as a line to visually separate course page elements.
Page
Creates a separate page for content, which can include text, media, and links. Often used for lesson guides.
URL
Inserts a link to an external website on your course page. This can also be used to share access to Google documents.
File Resource
PDFs, Word Documents, Images, Spreadsheets, and more can be added to the course page for students to download and view.
Add a New File
- Log into Moodle and enter your course site.
- Click on the gear in the upper right corner and select Turn editing on.
- If you're using sections, scroll to the section where you want to add the file.
- Click Add an activity or resource underneath the section where you want to add the file.
- Scroll down under the Resources heading and select File.
- Click Add.
- On the next screen, enter the Name that students to see on the course page. The Description is optional.
- Under Select files, click the Add files
 button.
 - In the resulting window, choose Upload a file on the left and click the Choose File button.
- Locate the file on your computer and click Open.
- Click the blue Upload this file button.
- Scroll to the bottom of the page and choose either of the blue Save buttons.
- The file should now appear on your course page. If it is not in the exact location that you want, follow these instructions to reorder the course items.

Update an Existing File
- Log into Moodle and enter your course site.
- Click on the gear in the upper right corner and select Turn editing on.
- To the right of the menu item you want to update, click Edit and choose Edit Settings.
- On the next screen, next to Select files, click on the existing file.
- A window should appear. Click the grey Delete button near the top of the window.
- Follow steps 8-12 above to add the new file.
Moodle Assignments
Asssignment Overview
The assignment activity is how students can turn in a variety of files to be graded. There are a variety of settings that impact how a student can upload files and how the assignment is assessed. Please view the rest of this chapter to learn how assignments function in Moodle.
Chapter Contents
- Moodle Assignment Settings
- Adding Moodle Assignments
- File Submission Types
- Grading Moodle Assignments
- Uploading a Google Doc to a Moodle Assignment
Moodle Docs
Moodle Assignment Settings
When adding a new assignment activity to a Moodle course, there are a variety of settings that impact how the activity looks and functions. These settings can also be adjusted after the assignment is created by turning editing on in the course and choosing Edit settings from the Edit menu to the right of the assignment. Below is an explanation of what the settings do and how they impact the assignment.
General
Assignment Name
-
-
- This is the name that will be displayed on the course page. Some instructors find it helpful to number the assignments so they are easier to refer to in directions. This is a required field.
-
Description
-
-
- Assignment instructions and other information can go here. Images and links can also be included. Click the down arrow on the left side of the text box toolbar for more formatting options.
- This information can be displayed on the course main page if the checkbox below the text box is checked, but this can lead to a cluttered course page.
-
Additional Files
-
-
- Here you can upload any files that the student might need to complete the assignment, including templates or cover pages.
-
Availability
Allow Submissions From
-
-
- If a date is set here, students will only be able to submit their assignment after the chosen date. Click the Enable checkbox to choose a date. This option is disabled by default.
-
Due Date
-
-
- If a date is set here, students will see the due date within the Moodle assignment and on their Moodle calendar. Click the Enable checkbox to choose a date. Students can still turn in assignments after the set date, but Moodle will indicate it was turned in late. This option is disabled by default.
-
Cut-off Date
-
-
- If a date is set here, students will not be able to turn in anything after this date unless the instructor grants an extension within the assignment. Click the Enable checkbox to choose a date. This option is disabled by default.
-
Remind Me to Grade By
-
-
- If a date is set here, you as the instructor will receive a reminder in Moodle to grade the assignment. Click the Enable checkbox to choose a date. This option is enabled by default.
-
Always Show Description
-
-
- If this box is checked, the students will always be able to see whatever has been entered in the description textbox above. If it is unchecked, the description will only be visible after the allow submissions from date.
- Note that this option is not available unless a allow submissions from date is chosen.
-
Submission Types
Submission Types
-
-
- If a checkbox is checked, the students will be able to use the corresponding method to submit their assignment.
- File submissions allow for any type of file upload. The file type can be further specified in a different setting. This option is the default option.
- Online text gives the students a textbox to type their response within Moodle. Note that students will not be able to format their response with this tool in the same way that they could using Word or Google Docs.
- PDF submission only allows students to submit a file with the .PDF extension.
-
Maximum Number of Uploaded Files
-
-
- This number indicates how many files a student can attach to their submission. The default number is set to 20.
-
Accepted File Types
-
-
- If file submission is chosen above, this option further defines what kinds of files a student can turn in. Click the choose button to indicate the kinds of files you will accept for the assignment.
-
Word Limit
-
-
- If online text is chosen above, this option can place a limit on the number of words a student can type in their online response. Click the enable checkbox to enter a number.
-
Maximum Number of Uploaded PDFs
-
-
- This number indicates how many PDFs a student can submit with their assignment. The default number is set to 8.
-
Maximum Submission Size
-
-
- This number indicates how large the total size of the files submitted can be. The default is set to 20MB. If students are uploading video or media projects, this number may need to be increased.
-
Coversheet to Attach
-
-
- You can also add a coversheet for the assignment here.
-
Coversheet Template
-
-
- If you use coversheets frequently, you can upload templates to be reused within multiple assignments.
-
Feedback Types
Feedback Types
-
-
- These options indicate the types of feedback the instructor can give in the assignment. Checking or unchecking these boxes will change what options are available when grading the assignment.
- Feedback comments: The grader will get a textbox to enter text, audio, or video comments. This is checked by default.
- Annotate PDF: The grader will be able to annotate on top of some assignment types with the annotation tools within the Moodle grading screen. This is checked by default.
- Feedback files: The grader can upload an external file for feedback. This can be useful when using the commenting function in Word or filling out an external rubric.
- Offline grading worksheet: The grader can download a worksheet to enter grades without internet access and then later upload the grades later. This can be helpful when an instructor wants to grade assignments in a location that does not have reliable internet access.
- PDF feedback: The grader will be able to annotate on top of PDFs submitted via the PDF submission type.
-
Comment Inline
-
-
- This works with the online text submission type. The student's submission is automatically copied into the feedback textbox so the grader can add comments within the submission. The default setting is no.
-
Submission Settings
Require Students to Click the Submit Button
-
-
- If enabled, students must click a separate submit button to finalize their submission. This allows students to save a draft version of their submission within Moodle. The default setting is no.
-
Require that Students Accept the Submission Statement
-
-
- MLC does not currently use a submission statement, so do not change this option.
-
Attempts Reopened
-
-
- This option changes what happens when students try to reopen an assignment after it has been submitted.
- Never: Students cannot reopen their assignment.
- Manually: Teachers can reopen attempts on an individual basis.
- Automatically: If the student does not receive a passing grade as set in the grade options, the attempt is automatically opened until the student passes.
-
Group Submission Settings
Students Submit in Groups
-
-
- This allows a group of students to submit one assignment. All students in the group can see the assignment grade and feedback.
- Groups need to be set in Moodle to use this option.
- The default setting is no. If yes is chosen, additional options appear.
-
Require Group to Make Submission
-
-
- If yes is chosen, students who are not a member of a group will not be able to submit anything in the assignment. The default setting is no.
-
Require All Group Members Submit
-
-
- If yes is chosen, all students in a group must click submit in their account before the assignment is actually submitted.
- If no is chosen, only one student needs to click submit for the assignment to be submitted.
-
Grouping for Student Groups
-
-
- If groupings are being used in the course, this indicates which grouping will be used in the assignment.
-
Notifications
-
- These settings apply to the notifications for the individual assignment. Notifications can also be enabled or disabled in your Moodle profile.
- If you are using groups in the course, you also need to be a member of the group(s) to receive notifications.
Notify Graders About Submissions
-
-
- If yes is chosen, the graders in the course (usually the instructor, but can also include a TA) will receive a notification when an assignment is submitted. The default setting is no.
-
Notify Graders About Late Submissions
-
-
- If yes is chosen, the graders in the course (usually the instructor, but can also include a TA) will receive a notification when an assignment is submitted after the due date previously set. The default setting is no.
-
Default Setting for "Notify Students"
-
-
- This changes the default for the notify students checkbox on the grading screen. The default setting is yes.
-
Grade
Grade
-
-
- This changes the type of grading that will be used for the assignment.
- Point: This is the traditional grading method that gives points to the assignment. If using strict percentages, you can leave the maximum grade at 100. If using a variety of point values, indicate the number of points the assignment is worth underneath maximum grade. This is the default setting.
- None: If chosen, you will not be able to grade the assignment.
- Scale: This will allow for grading an assignment using a scale like ESNU. You can use the pre-set scales or define your own scale.
-
Grading Method
-
-
- This sets the method the grader will use while assessing.
- Simple Direct Grading: Graders will be able to assign a point value and give feedback based on the options set above. This is the default option.
- Grading Guide: Graders can use a grading guide when assessing.
- Rubric: Graders can use a rubric when assessing.
-
Grade Category
-
-
- If you are using categories in your overall grading scheme, choose the correct category for the assignment here.
-
Grade to Pass
-
-
- The minimum grade that is considered passing in the assignment. This can be used when attempts are automatically reopened or for activity completion.
-
Blind Grading
-
-
- If yes is chosen, student names will be hidden from the grader when grading (unless the student puts their name on what they submit). The default setting is no.
-
Hide Grader Identity from Students
-
-
- When multiple individuals are grading assignments, such as with co-teaching or using a TA, students will not be able to see which individual graded their assignment. The default setting is no.
-
Use Grading Workflow
-
-
- Allows graders to use the grading workflow while assessing. The default setting is no.
-
Common Module Settings
Availability
-
-
- Show on course page: The assignment will be visible to the students on the course page. This is the default setting.
- Hide from students: The assignment will be hidden from the students.
-
ID Number
-
-
- This is used for some custom reporting options. Do not enter anything here.
-
Group Mode
Grouping
-
-
- If groups are chosen, you can also indicate which grouping the assignment should use.
-
Add Group/Grouping Access Restriction
-
-
- If clicked, a group or grouping restriction will appear in the restrict access settings below.
-
Restrict Access
-
- Restrictions allow you to set a variety of criteria that must be met before the students can access the assignment.
- You can indicate if students must or must not meet all or any of the restrictions.
- Click Add restriction... to access and set the different types of restrictions.
- After setting a restriction, a grey eye icon appears either to the left of the restriction or to the left of the word student if numerous restrictions are set. If the icon is a solid grey, students who do not match the set requirements will see the assignment on their course page, but it will be greyed out so they cannot access it. If the icon has a line through it, students will not be able to see the assignment if they do not match the requirements. Click the icon to toggle between these settings.
Date
-
-
- The assignment is available either from a certain date or until a certain date.
-
Grade
-
-
- The assignment is available based on the grade a student achieves in another assignment, based on the overall course grade, or based on the grade in a specified category.
-
Group
-
-
- The assignment is only available to students within a specified group.
-
Grouping
-
-
- The assignment is only available to groups within a specified grouping.
-
User Profile
-
-
- The assignment is available to students based on a variety of fields that the student has set within their profile. Note that not all students have filled out every field in their Moodle profile.
-
Restriction Set
-
-
- This allows you to nest multiple restrictions.
-
Activity Completion
-
- Activity completion helps students keep track of which course activities they have completed.
- Activity completion needs to be turned on in the course settings for this option to appear.
Completion Tracking
-
-
- Do Not Indicate Activity Completion: Activity completion will not be utilized for this assignment.
-
Students Can Manually Mark the Activity as Completed: A grey checkbox will appear to the right of the assignment on the course home page. Students can check the box when they believe they have completed the activity.
- Expect completed on: If enabled, the students will see a date they are expected to complete the activity by.
-
Show Activity Complete When Conditions Are Met: You can set certain criteria for activity completion. The activity will automatically be marked as completed when those criteria have been met.
- Require View: The activity will be marked complete when the student views it. Note that it cannot measure if the student actually reads it.
- Require Grade: The activity will be marked complete after it is graded.
- Require Submit: The activity will be marked complete after the student submits it. This is the default option.
- Expect completed on: If enabled, the students will see a date they are expected to complete the activity by.
-
Tags
-
- Assignments can be tagged with keywords. Tags can be used to organize or compile items with similar keywords.
Adding Moodle Assignments
- Follow the instructions for adding course content.
- In step 3, choose Assignment.
- Enter the information for the assignment. See the Moodle Assignment Settings page for explanations of the various options.
- Scroll to the bottom of the screen and click Save and return to course or Save and display.
You can also view this video from Moodle for more information. Please note that the version of Moodle in the video looks slightly different than ours, but the options are the same.
File Submission Types
Instructors can limit the file types that a student is allowed to submit for an assignment. This setting helps instructors ensure that they can open the files that students submit and that students are using the desired file format.
- File submission types can be chosen from the assignment settings of a specific assignment.
- Accepted file types can be chosen by category or by individual file extension. Click Expand within each category to choose individual file types.
- Choosing the acceptable file type by category will be sufficient for most activities.
Commonly Used File Types
Document Files
- .gdoc - Google Doc
- .epub - ebook
- .odt - Open Office document
- .pdf - Portable Document Format
- .rtf - Rich Text Format
- .docx - Word Document from 2007+
- .doc - Word Document prior to 2007
Presentation Files
- .gslides - Google Slides
- .pptx - Powerpoint from 2007+
- .ppt - Powerpoint prior to 2007
- .pub - Microsoft Publisher
Grading Moodle Assignments
Using Feedback Files
When this option is enabled in an assignment, instructors can upload a completed rubric, a document with comments, or some other file to provide feedback to students.
- Enable Feedback Files from the Edit Settings menu of the assignment by checking Feedback files under the Feedback types section.
- Click on the assignment from the course home page and click Grade.
- A Feedback files section will be visible near the bottom of the right column.
- Drag and drop the file into the box with the arrow or click the Add button to locate and attach the file.
- After the file has been uploaded, click Save and show next to proceed to the next student.
- Students will be able to download and view the feedback file when they view their grade.
Uploading a Google Doc to a Moodle Assignment
A very useful feature in Moodle Assignments is the ability for students to upload a Google Doc directly into Moodle. The instructor can have all the documents and grading materials (rubric, grading scale, comment boxes, etc) all on one screen. The grade is added to the Moodle gradebook automatically.
Using Google Docs Commenting for Grading Within Moodle
The commenting and editing features within Google Docs can sometimes be more user-friendly than the Moodle interface. There are two main ways to utilize the Google Docs interface while still keeping your work within Moodle.
1 - Using a Regular Assignment and Online Text
-
- For this approach, create an assignment like you typically would, but under Submission Types, make sure to only check Online Text. Then, instruct your students to get a sharable link to their document (this works for docs, slides, sheets, and anything stored in Google Drive) and paste it into the online textbox. To make it even easier for you, show them how to make it a clickable link.
- When you grade the assignment, right click the link (or copy/paste) to open it in a new browser tab and add your comments. Then go back to the Moodle tab to enter the grade and save changes.
Considerations when using this approach:
2 - Using The External Google Assignment Tool
Adding an Assignment
-
- Start by entering your course and turning editing on.
- Click Add an Activity or Resource at the bottom of the section where you'd like the assignment to appear.
- Choose External Tool. It has a green puzzle piece icon.
- Name your assignment.
- From the Preconfigured Tool dropdown, choose Google CourseKit Assignments.
- Click Grade and enter the proper number of points. (While you can go back and edit this later, it does need to be done before you start grading, or things get messy.)
- Adjust the other settings as needed and click one of the blue Save buttons on the bottom.
Turning In an Assignment
-
- Students click on the assignment within Moodle. If it's their first time using this method, it will ask them to log into their Google Account. It's important that they use their MLC accounts.
- Once students have connected their MLC account with Google CourseKit in Moodle, they'll be able to choose their file from their Google Drive. This is not limited to Google Docs -- it works with any file that is saved in their Drive. Note: Students must be the owner of the document to be able to turn it in.
- Once a student submits it, the document is shared with you as the instructor and they can no longer edit the assignment. They are able to unsubmit the assignment, edit it, and turn it in again, but you will see the new submission date/time within Moodle.
Grading an Assignment
-
- Click on the assignment activity to open it.
- Before you grade anything, make sure the points are set correctly in Moodle by clicking the gear in the upper right corner of the assignment screen and choosing Edit Settings.
- If it's the first time opening an assignment like this, it will ask you to log into your Google account. Be sure to use your MLC account.
- Set the number of points at the top of the Google assignment window -- make sure this number matches what has been entered in Moodle.
- Click the name of the student you want to assess.
- The student's document will open in a window that looks very similar to Google Docs. You can use the commenting and editing features like you would with regular Google Docs. On the right side, enter the grade and any general comments in the comment box.
- Move to the next student by using the arrows in the upper left corner of the window. You can also pick a specific student with the dropdown menu.
- When you're done (either with one student, or with everyone), click the blue Return button. This gives editing access back to the student and makes a copy of the document within your Google Drive that you retain control of if needed for future reference.
Considerations when using this approach:
-
- If you don't have the points set the way you want them prior to grading the assignments, it is very difficult, and sometimes impossible, to change the point value. This can be worked around in the gradebook, but it's easier to set it the first time :)
- Your Google Drive will get "cluttered" with lots of copies of documents. These are best left wherever Google puts them within your Drive and then ignored unless needed for future reference.
- Whatever the student wants to turn in must be in their Google Drive.
- You cannot give a grade to a student who hasn't submitted something -- you need to override the grade from the Moodle gradebook.
Google has more information on CourseKit here.
Moodle Discussion Forums
Discussion Forum Settings
An explanation of the various settings that can be utilized in a Moodle discussion forum. These settings can be accessed when first adding a discussion forum to the course page or by turning editing on in the course page, clicking edit next to the discussion forum, and choosing edit settings.
General
Forum Name
- This is the title that will appear on the Moodle course page. It is a required field.
Description
- Directions for the discussion forum can go here. If using a standard forum, the discussion prompt can go here as well. If using a Q and A Forum, the discussion prompt goes elsewhere. Images and links can also be included. Click the down arrow on the left side of the text box toolbar for more formatting options.
- This information can be displayed on the course main page if the checkbox below the text box is checked, but this can lead to a cluttered course page.
Forum Type
- This setting impacts how the instructor and students will interact with the forum. The two most common types are Standard forum for general use and Q and A Forum. Please see the page on Forum Types for more information.
Availability
Due Date
- If a date is set here, students will see the due date within the Moodle discussion forum and on their Moodle calendar. Click the Enable checkbox to choose a date. Students can still post in the forum after the set date, but Moodle will indicate it was turned in late. This option is disabled by default.
Cut-off Date
- If a date is set here, students will not be able to post anything after this date. Click the Enable checkbox to choose a date. This option is disabled by default.
Attachments and Word Count
Maximum Attachment Size
- The largest file size that a student can attach to a discussion post. This is set to 1 GB by default.
Maximum Number of Attachments
- The largest number of files that a student can attach to a discussion post. This is set to 1 by default.
Display Word Count
- If enabled, students and instructors can see the word count of posts. This is set to no by default.
Subscription and Tracking
Subscription Mode
- Sets the type of notification options that forum participants will have for this forum. If a participant is subscribed to a forum, then they will receive notifications for that forum based on their notification settings in their profile.
- Optional Subscription: participants can choose if they want to subscribe.
- Forced Subscription: participants are all subscribed and cannot unsubscribe. This is the default setting.
- Auto Subscription: participants are all subscribed but can choose to unsubscribe.
- Subscription Disabled: subscribing is not an option for this forum
Read Tracking
- Allows participants and instructors to track which posts they have read.
- Optional: participants can decide if they want unread posts highlighted. This is the default setting.
- Off: unread posts cannot be tracked.
Discussion Locking
Lock Discussions After Period of Inactivity
- If enabled, participants cannot post to the forum after it is locked.
- Do not lock discussions: inactivity never locks the forum. This is the default setting.
- 1 day, 1 week, 2 weeks,etc.: the discussion forum is locked after no one posts for the specified period of time.
Post Threshold for Blocking
Time Period for Blocking
- If enabled, participants can only post a certain amount of times within a set period of time.
- Don't block: participants are not blocked from posting no matter how many times they post. This is the default setting.
- 1 day, 1 week, 2 weeks,etc.: participants are blocked from posting based on the numbers set below
Post Threshold for Blocking
- The maximum number of posts a participant can make within the time period set above. This setting is only visible if a time period is chosen above.
Post Threshold for Warning
- Students will be warned they are reaching the posting threshold after the number set here. This setting is only visible if a time period is chosen above.
Ratings
Roles with Permission to Rate
- Identifies which roles are able to rate discussion posts. A participant needs to have one of the listed roles in the course in order to rate a discussion forum.
Aggregate Type
- Sets how Moodle will calculate the rating for the discussion forum entries.
- No ratings: the entries cannot be rated. This is the default setting.
- Average of ratings: the final grade will be the mathematical average of all rated entries for an individual student.
- Count of ratings: the final grade will be the total number of entries that a student makes.
- Sum of ratings: the final grade will be the mathematical sum of all rated entries for an individual student. This is the most commonly used aggregate type.
- Maximum rating: the final grade will be the highest rating a student received out of all the rated entries.
- Minimum rating: the final grade will be the lowest rating a student received out of all the rated entries.
Scale
- The rating scale that will be used for the discussion forum.
- None: no scale will be used. This is the default setting.
- Points: numerical points can be awarded to entries. This is the most commonly used setting.
- Scale: one of the pre-defined grading scales can be used in the discussion forum.
Restrict Rating to Items with Dates in this Range
- If checked, only entries that fall within the dates set below can be rated.
- From: the earliest entries that can be rated.
- To: the latest entries that can be rated.
Common Module Settings
Availability
- Show on course page: The assignment will be visible to the students on the course page. This is the default setting.
- Hide from students: The assignment will be hidden from the students.
ID Number
- This is used for some custom reporting options. Do not enter anything here.
Group Mode
Grouping
- If groups are chosen, you can also indicate which grouping the assignment should use.
Add Group/Grouping Access Restriction
- If clicked, a group or grouping restriction will appear in the restrict access settings below.
Restrict Access
- Restrictions allow you to set a variety of criteria that must be met before the students can access the discussion forum.
- You can indicate if students must or must not meet all or any of the restrictions.
- Click Add restriction... to access and set the different types of restrictions.
- After setting a restriction, a grey eye icon appears either to the left of the restriction or to the left of the word student if numerous restrictions are set. If the icon is a solid grey, students who do not match the set requirements will see the assignment on their course page, but it will be greyed out so they cannot access it. If the icon has a line through it, students will not be able to see the assignment if they do not match the requirements. Click the icon to toggle between these settings.
Date
- The discussion forum is available either from a certain date or until a certain date.
Grade
- The discussion forum is available based on the grade a student achieves in another discussion forum, based on the overall course grade, or based on the grade in a specified category.
Group
- The discussion forum is only available to students within a specified group.
Grouping
- The discussion forum is only available to groups within a specified grouping.
User Profile
- The discussion forum is available to students based on a variety of fields that the student has set within their profile. Note that not all students have filled out every field in their Moodle profile.
Restriction Set
- This allows you to nest multiple restrictions.
Activity Completion
- Activity completion helps students keep track of which course activities they have completed.
- Activity completion needs to be turned on in the course settings for this option to appear.
Completion Tracking
- Do Not Indicate Activity Completion: Activity completion will not be utilized for this discussion forum.
-
Students Can Manually Mark the Activity as Completed: A grey checkbox will appear to the right of the discussion forum on the course home page. Students can check the box when they believe they have completed the activity.
- Expect completed on: If enabled, the students will see a date they are expected to complete the activity by.
-
Show Activity Complete When Conditions Are Met: You can set certain criteria for activity completion. The activity will automatically be marked as completed when those criteria have been met. More than one criterion can be enabled.
- Require View: The activity will be marked complete when the student views it. Note that it cannot measure if the student actually reads it.
- Require Grade: The activity will be marked complete after it is graded.
- Require Posts: The activity will be marked complete after the student has posted in the forum the number of times indicated. This is the default option.
- Require Discussions: The activity will be marked complete after the student has created the number of discussions indicated.
- Require Replies: The activity will be marked complete after the student has posted the number of replies indicated.
- Expect completed on: If enabled, the students will see a date they are expected to complete the activity by.
Tags
- Activities can be tagged with keywords. Tags can be used to organize or compile items with similar keywords.
Q and A Forums
Question and Answer forums can be used when you don't want students to see the responses of others before they respond to the discussion prompt. The setup for these forums is slightly different than a typical discussion forum.
Adding a Q and A Forum to a Course
- Enter your course and turn editing on.
- Click Add an activity or resource, choose Forum and click Add.
- Give your forum a name. You can also include a description or instructions for the forum. Unlike regular discussion forums, do not put your discussion prompt in the description area.
- Next to Forum type, choose Q and A forum.
- Adjust the discussion forum options as needed.
- Click Save and display.
- On the resulting page, click Add a new question. If you do not add a question, students will not be able to post in this forum.
- Two textboxes will appear for a subject and message. This is where you can put the discussion forum prompt that you want students to respond to.
- Enter a subject for the discussion prompt. This is what students will see on the main page of the discussion forum.
- Enter the discussion prompt in the message box. You can add files or edit group settings by clicking the advanced button. Note that if you are using groups, you need to select the option to copy the question into each group.
- Click Post to forum.
- You can add additional questions to the forum by clicking Add a new question and repeating the above steps.
Replying to a Q and A Forum
The process for replying to a Q and A Forum is different for students than a standard forum. It can be helpful to share the directions below with your students when first using a Q and A forum. Instructions can be found here - https://help.mlc-wels.edu/books/moodle-for-students/page/replying-to-q-and-a-forums. You can also share the link with your students.
Discussion Forum Overview
Discussion forums allow students to interact with each other asynchronously. There are a variety of settings that impact how students and instructors use discussion forums. Please view the rest of this chapter to learn how discussion forums function in Moodle.
Chapter Contents
- Discussion Forum Types
- Moodle Discussion Forum Settings
- Adding Moodle Discussion Forums
Moodle Docs
Discussion Forum Types
There are five types of discussion forums to support participant collaboration and learning. Each type is described below and further explained on the Moodle Forum Activity page.
Standard Forum for General Use
- Instructions and discussion prompts should be put in the forum description.
- Students are able to add a new discussion thread or threads to the forum.
- This is the most typically used forum. It is also the default option.
Standard Forum Displayed in a Blog-like Format
- Identical to a Standard Forum for General Use except that students will see the first post from each discussion thread displayed on the discussion forum's main page.
Q and A Forum
- Instructions should be put in the forum description.
- Discussion prompts (questions) are posted by the instructor after the forum is created.
- Students can only reply to the instructor's questions. They cannot start a new discussion thread.
- Students cannot see the replies of their classmates until after they have posted.
- Because this type of forum behaves differently for both instructors and students, please read the page on Q and A forums carefully before using it in your course.
Each Person Posts One Discussion
- Instructions and discussion prompts should be put in the forum description.
- Students are able to add a new discussion thread to the forum. They can only add one new thread.
Single Simple Discussion
- Instructions and discussion prompts should be put in the forum description.
- Students can only reply to the initial prompt. They cannot start a new discussion thread.
Moodle Quizzes
Types of Quiz Questions
Multiple Choice
-
- Students pick correct answer from a list. Question can have one or multiple correct answers.
Matching
-
- Students match one set of information to another.
True/False
-
- The only answer options are true or false.
Essay
-
- For an essay question. Teachers can provide students with a template for scaffolding their answers.
Calculated
-
- Makes use of variables to give each student a unique question in the quiz. Questions must be numerical.
Calculated Multichoice
-
- Similar to calculated questions, but formulas can be included in the answers.
Calculated Simple
-
- The same as the calculated question type, but with a simpler creation interface.
Drag and Drop Into Text
-
- Students drag missing words into sentences/paragraphs.
Drag and Drop Markers
-
- Students drag markers onto an image.
Drag and Drop Onto Image
-
- Students drag labels or images onto an image.
Embedded Answers (Cloze)
-
- A paragraph of text with various question types within the paragraph.
Gapfill
-
- Fill in the blank questions with drag and drop or dropdown options.
Numerical
-
- Like a short-answer question, but allows for numerical answers with an accepted margin of error.
Ordering
-
- Students drag words, phrases, or sentences into the correct order.
Random Short-Answer Matching
-
- Like a matching question, but questions are drawn from a category.
Select Missing Words
-
- Like the drag and drop into text question, but uses drop-down options instead of dragging.
Short Answer
-
- Students can enter a word or phrase for their answer.
Essay (Auto-Grade)
-
- Like a regular essay question, but teachers can have Moodle grade the answer based on a variety of characteristics.
Description
-
- Not actually a question. Allows for text or images to a quiz. For example, a paragraph or picture that students need to refer to for subsequent questions. If using a label in this way, do not shuffle the question order.
Adding a Google Form to Moodle
1. Create your Google Form or Google Forms Quiz
2. Click the purple Share button in the upper right corner of your quiz.
3. If not already checked, check Collect email addresses so you know whose answers are whose.
4. Next to Send via, click the icon of the link to the right of the envelope.
5. Click Copy in the bottom right corner of the window to copy the link to the form.
6. Follow the instructions for adding a link to a webpage in your Moodle course.
Communication Tools
Class Announcements Forum
The Announcement forum is available by default in all courses. It has some unique features.
- Only teachers can post in it.
- All students are automatically subscribed to it, meaning they will get an email whenever you post something.
- Students cannot reply to announcements, only view. The benefit to this over email is that they can easily come back to review what was sent and you don’t have to copy all their email addresses.
Instructions
- Log into Moodle and enter your course.
- Click on Announcements
- Click Add a new topic
- The next screen is very similar to an email window. Put a subject in the subject line and your information in the message textbox.
- Click the blue Post to forum button.
- In 15 minutes, your post will be visible to students and sent to them via email. In that 15 minute window, you can change the announcement if needed.
Video Conferencing - Big Blue Button
You can find some information at the EdTech blog in the post titled BigBlueButton Basics.
Video Conferencing - Google Meet
Recording Video in Moodle
Anywhere that instructors or students have a textbox to enter text, they can also record audio or video. This can be used for students to introduce themselves or explain their learning, or for instructors to give project directions or assignment feedback. You need a webcam and microphone to use this feature. Most recent laptops have these.
Instructions
- Enter the activity where you want to record the video. Examples of this include a discussion forum post or assignment.
- In the textbox, click the video camera icon. Note that if you are in a discussion forum, you might need click advanced for that option to appear.
- After you click the icon, a window should appear with a red Start recording box. Click that box.
- If prompted by your browser, allow Moodle to access your webcam and microphone.
- After you click Start recording, a screen showing what you are recording will appear. Below that screen is the Stop recording button and a countdown timer. The timer indicates how much time you have left in the recording.
- When you are finished with your recording, click Stop recording.
- If you want to start the video over without saving what you've done, click the x in the upper right corner of the window.
- After you click Stop recording, a preview of your video will appear if you want to watch it. If you want to redo the recording, click Record again. Otherwise, click Attach recording to insert the video in the activity.
- Depending on the length of the video, it might take a while to process and appear in the textbox. When it does, submit the assignment or feedback like you usually would.
![]()
Troubleshooting
- Check that your webcam/microphone are properly configured on your computer.
- Check your browser settings to make sure it is allowing the use of the webcam/microphone.
Grading
Initial Gradebook Setup
Gradebook Overview
Categories
Weights
Moving Items
Grade Scale
Aggregations
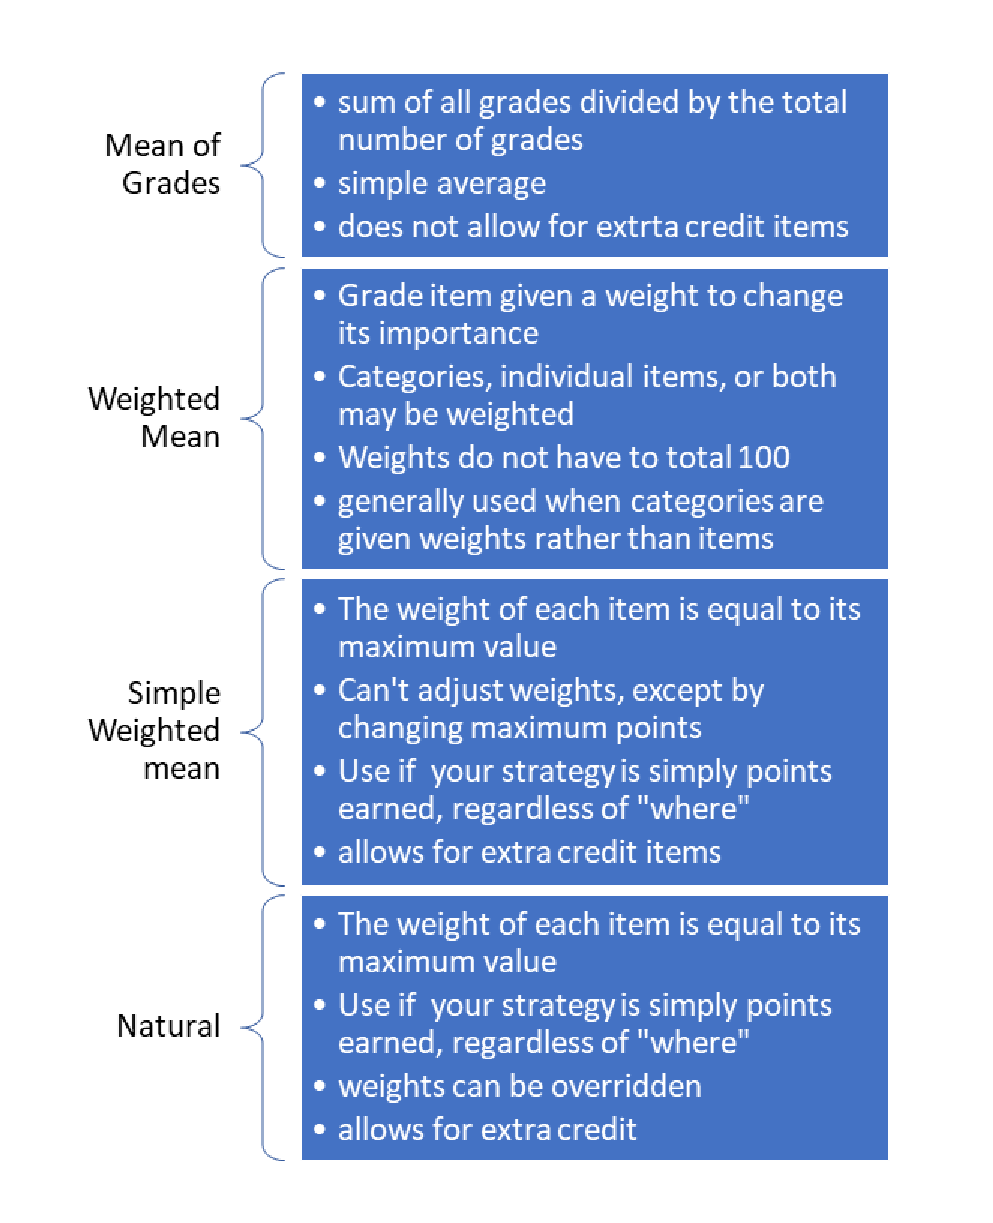
Moodle allows you to aggregate your grades in different ways, depending on how you want your grades calculated. There is a detailed list of aggregation strategies accompanied by the examples and the mathematics used to calculate grades. Whether an instructor employs the Moodle grade book or not, having a clear understanding of exactly how a grade is calculated is essential to assigning grades. Moodle allows for granular control of categories and weights in aggregating grades. Moodle's documentation goes into detail.
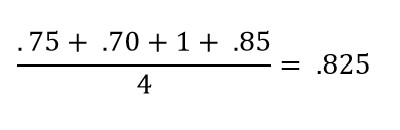
Example Calculations
|
|
Raw Scores |
Normalized Score |
|
Assign 1 |
75/100 |
.75 |
|
Assign 2 |
35/50 |
.70 |
|
Assign 3 |
10/10 |
1 |
|
Assign 4 |
85/100 |
.85 |
All raw scores are first normalized to a value between 0 and 1:
 Mean of Grades
Simple average of normalized grades:
Simple Weighted Mean
Normalized grade multiplied by weight, divided by sum of weights:

This is equivalent to:
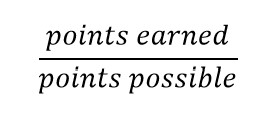
Natural
If the weights are not adjusted, the default weight for each item is the maximum points possible, and the calculations are identical to Simple Weighted Mean. Natural aggregation allows for weights to be overridden.
Weighted Mean
Sample Grades
|
Category |
Percentage |
Weight |
Category Subtotal |
|
Daily Work |
90% |
30% |
.90 * 30 = 27 |
|
Participation |
25% |
10% |
.25 * 10 = 2.5 |
|
Tests |
75% |
50% |
.75 * 50 = 37.5 |
|
Final |
65% |
10% |
.65 * 10 = 6.5 |
First, Moodle calculates the percentage score in each category. You may select whichever aggregation method you prefer for each category. Categories may have different aggregation methods, which may be different from the overall aggregation method.
Final Calculation:

The calculation may seem redundant because the weights add up to 100. Moodle does not require that weights add up to 100 in this method:
|
Category |
Percentage |
Weight |
Category Subtotal |
|
Daily Work |
90% |
1 |
.90 * 1 = .9 |
|
Participation |
25% |
1 |
.25 * 1 = .25 |
|
Tests |
75% |
3 |
.75 * 3 = 2.25 |
|
Final |
65% |
2 |
.65 * 10 = 1.3 |

(Note: there was no attempt to use equivalent weights between the two examples)
Student View of Grades
Showing Letter Grades
1. The first step is to open Course: ASL8001 01: American Sign Language and ... and click Grades
2. Click Grader report
3. Select Course grade settings
4. Click Default (Real)
5. Select Letter (percentage)
6. Scroll down and click Save changes
7. That's it. You're done.
Here's an interactive tutorial
** Best experienced in Full Screen (click the icon in the top right corner before you begin) **
Grading Moodle Assignments
Grading Moodle Quizzes
Grading Moodle Discussion Forums
![]()
A Moodle Discussion forum can be graded within Moodle. The grades are automatically entered into the Moodle grade book. Students are able to view their grades and can receive individual feedback. There are two main ways of grading a discussion forum; whole forum grading and ratings. Whole forum grading allows you to see all of a student's contributions (posts and replies) to the discussion forum on one page and assign them a single grade. When the ratings option is used, each individual contribution is graded and then those grades are used to calculate a grade for the whole forum.
Whole Forum Grading
Adding Whole Forum Grading to a Forum
- Log into Moodle, enter your course, and turn editing on.
- Open the section where you want the discussion forum, click Add an activity or resource, choose Forum and click Add.
- You can also add whole forum grading to an existing forum. Click Edit to the right of the forum name and choose Edit settings.
- Enter the information for the forum as needed (forum name, description, etc.), scroll down, and click Whole forum grading.
- Click the menu next to Type and choose Point.
- In the maximum grade box, enter the number of points the activity is worth. Or, if using percentages, leave it at 100.
- Leave Grading method at Simple direct grading.
- If you'd like help with using a grading guide or rubric in a forum, please contact support.
- In Grade category, choose which category in your grade book the forum should be in. If you have not yet set up categories (or are not using categories) leave this at the default.
- Leave Grade to pass empty.
- Change Default setting for "Notify students" to Yes
- Change any other settings you need to in the discussion forum, scroll down, and choose one of the blue Save options.
Grading a Forum using Whole Forum Grading
- Log into Moodle and enter your course.
- Click on the discussion forum title that you want to grade.
- Click Grade users to the right of the blue Add a new discussion topic button.
- If you do not see this button, follow the steps above to add whole forum grading to the discussion forum.
- The grading screen (pictured below) will appear.
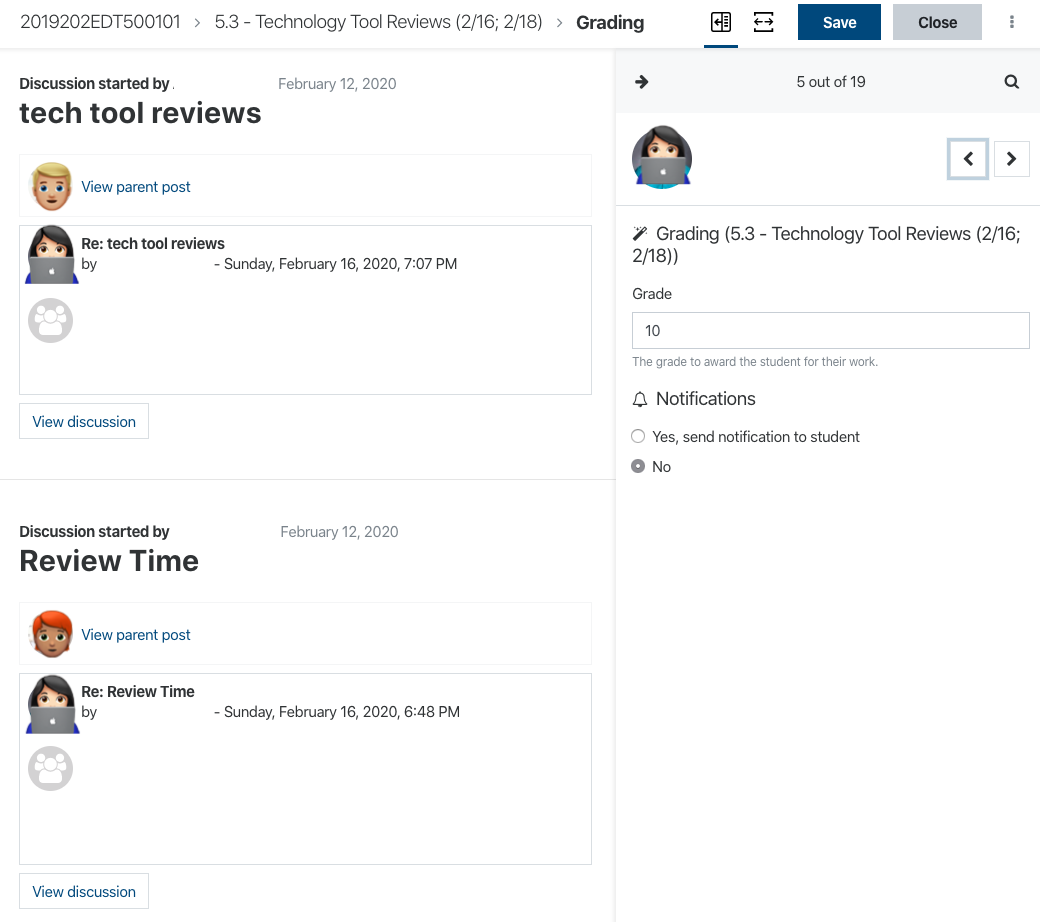
Ratings
Adding Ratings to a Forum
- Log into Moodle, enter your course, and turn editing on.
- Open the section where you want the discussion forum, click Add an activity or resource, choose Forum and click Add.
- You can also add whole forum grading to an existing forum. Click Edit to the right of the forum name and choose Edit settings.
- Enter the information for the forum as needed (forum name, description, etc.), scroll down, and click Ratings.
- Next to Aggregate type, choose how you'd like Moodle to calculate the discussion forum grade from one of the following options:
- Average of ratings: the mean of all ratings.
- Count of ratings: the number of rated items becomes the final grade. Note that the total cannot exceed the maximum grade for the activity.
- Maximum: the highest rating becomes the final grade.
- Minimum: the smallest rating becomes the final grade.
- Sum: All ratings are added together. Note that the total cannot exceed the maximum grade for the activity. This is the most common option.
- Note that in all of these options the ratings that will be considered for calculating are both initial discussion posts and replies.
- Click the menu next to Type and choose Point.
- In the maximum grade box, enter the number of points the activity is worth. Or, if using percentages, leave it at 100.
- In Grade category, choose which category in your grade book the forum should be in. If you have not yet set up categories (or are not using categories) leave this at the default.
- Leave Grade to pass empty.
- Change any other settings you need to in the discussion forum, scroll down, and choose one of the blue Save options.
Other Grade Items
You can also add your own entries to the gradebook that aren't linked to a Moodle activity like an assignment or discussion forum. This could include in-class activities for face-to-face classes or other activities completed outside of Moodle.
Adding Other Grade Items
- Log into Moodle and enter your course site.
- Click Grades
 from the menu on the left.
- If the menu is not visible, click
 in the upper left corner.
- If the menu is not visible, click
- Choose Gradebook setup from the dropdown menu on the Grades page.
- Scroll to the bottom of the page and choose Add grade item.
- Fill in the following information:
-
Grade item
- Item Name: how the entry will appear in the gradebook. This will be visible to you and the students.
-
Grade type: value is the default choice. Click the
 for information about the other options.
 - Scale: this option is only active when using the scale grade type.
- Maximum grade: the largest number of points the item is worth.
- Minimum grade: the smallest number of points the item is worth.
- Hidden: if checked, the grade item will not be visible to students.
- Locked: this option does not apply to this type of grade item. Do not check it.
-
Parent category
- Item weight: this only applies if you are using weighted grades and categories.
- Grade category: this only applies if you are using categories in your gradebook. Choose the category the grade item should be in.
- Click Save changes
- The item will appear in your gradebook. Follow the instructions for reordering gradebook items if needed.
-
Grade item
Grading Other Grade Items
- Log into Moodle and enter your course site.
- Click Grades from the menu on the left.
- If the menu is not visible, click in the upper left corner.
- If the menu is not visible, click
- Choose Single view from the dropdown menu on the Grades page.
- Choose the gradebook item you want to enter from the dropdown titled Select grade item (#1).
- Enter the numerical grade for each student (#2).
- To insert the same grade for multiple students, see Bulk Insert Grades below.
- Enter any feedback you might want to leave for the student (#3).
- Click Save and then Continue.
Bulk Insert Grades
- Log into Moodle and enter your course site.
- Click Grades from the menu on the left.
- If the menu is not visible, click in the upper left corner.
- If the menu is not visible, click
- Choose Single view from the dropdown menu on the Grades page.
- Choose the gradebook item you want to enter from the dropdown titled Select grade item (#1).
- Scroll to the bottom and check the box next to Perform bulk insert (#4).
- From the dropdown, choose either Empty grades or All grades.
- Use Empty grades if you have already entered some grades and want to give all the rest of the students the same grade while keeping the grades that are already there.
- Use All grades if you haven't already entered other grades and want to give all students the same grade, or if you have already entered other grades but want to overwrite the existing grades.
- Type the grade you want to be entered next to Insert value.
- Click Save and then Continue.
Grading Methods
Detailed View
Quick Grading
Feedback
audio/video feedback
Grading Guides
Rubrics
Feedback Files
Grading Workflow
Overriding Existing Grades
Excluding Individual Grade
Exporting Grades
Importing Final Grades to Portal from Moodle
- Log in to Moodle and enter your course site.
- Click Grades in the top menu.
- From the dropdown menu, click Export.
- On the next screen, from the "Export as" menu, choose MLC Portal.

- Click Export Grades.
- A new tab will open with the Portal website. If prompted, log into Portal using your MLC username and password.
- The listing of students will be populated with letter grades based on their grade in Moodle. You can make adjustments to the grades as needed.
- Click Submit on the bottom of the page.
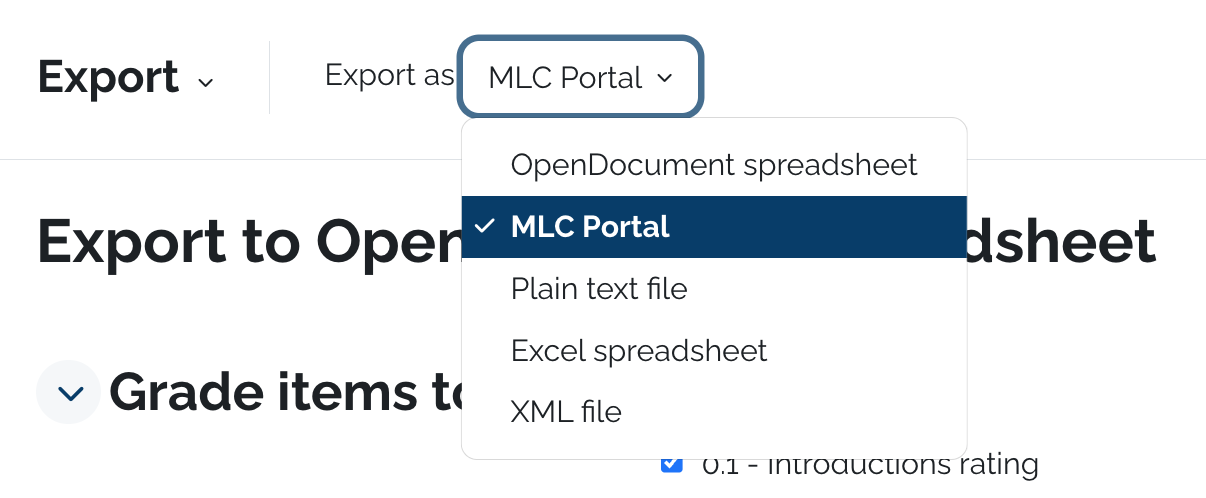
** This method will use the Letter Grade scale that's set for your course in Moodle to translate percentages into letter grades. To check or edit that scale, please follow these instructions.
Reordering Gradebook Items
When viewing the gradebook, items are listed in chronological order, based on when the assignment or activity was added to the course site. This order might be different than the order the activities appear on the course site and/or the order you'd like them to appear in the gradebook. If a course uses categories for grading, this method can also be used to put assignments into the proper grading category.
Instructions
- Log into Moodle and enter the course you want to adjust.
- Click Grades in the left menu. If that menu is not visible, click the three lines in the upper left corner to make it appear.
- Click the dropdown menu and choose Gradebook setup.
- Click the up/down arrow to the left of the item you want to move.
- The screen will change, showing numerous checkboxes indicating where the item can be moved.
- Click the checkbox that corresponds to the location you'd like the item to be.
- Repeat steps 4-6 until all the items are in the desired order.
- Note: If you are using categories, make sure to keep each gradebook item within the proper category.
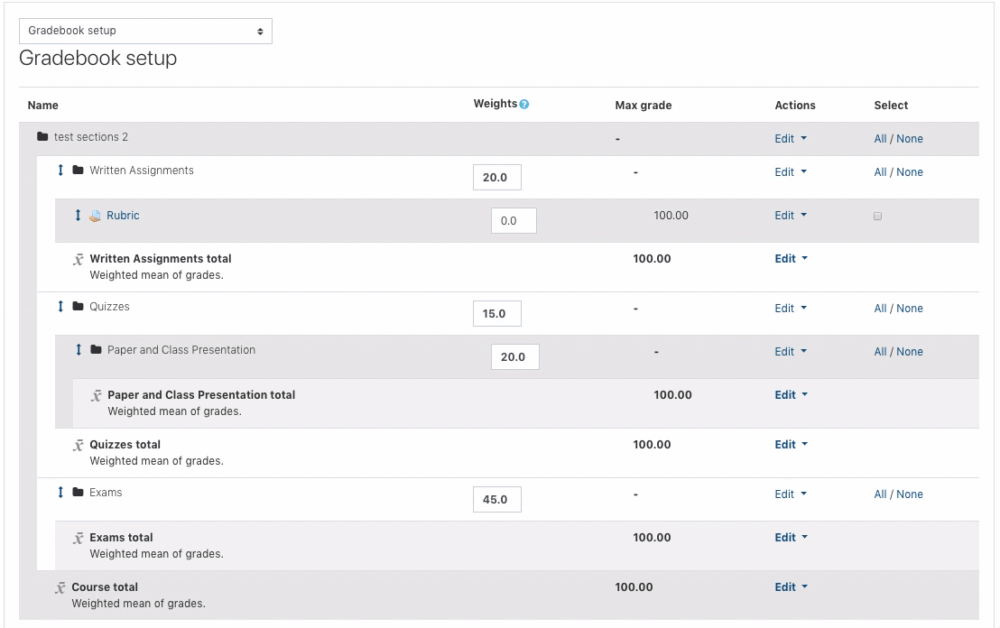
Using Grading Guides
Beginner's Guide to Moodle Gradebook
If you haven't used Moodle Gradebook before, this would be a great time to try it out. Some benefits include:
- graded Moodle activities are automatically imported into the Moodle gradebook
- students can log in and see their grades at any time
- at the end of the semester, final grades can be sent to Portal with a few clicks.
If you'd like to get started, please follow the instructions and links below.
Setting Up Your Gradebook
- Make sure your grade scale in Moodle matches the grade scale for your course.
- Decide if you want to do weighted categories in your gradebook or not.
- If you're using weighted categories, set up the categories and put existing assignments into the correct categories.
- Grade your assignments.
Setting the Grading Scale
The grading scale is how Moodle translates percentages into letter grades. It is also the scale that is used when exporting grades from Moodle into Portal. The default grading scale can be changed in your course to match the grading scale in your syllabus. Grading scales to transfer with other course material when importing a course from a previous semester, but it is still wise to check this grading scale for accuracy at the beginning of each semester.
Checking the Current Grading Scale
-
- Log into Moodle and enter the course where you'd like to check the grading scale.
- Click on Grades in the top menu.
- From the drop-down menu (which likely says Grader Report), scroll down and click Grade Letters.
- The grading scale currently set for the course will be shown.
- If the grading scale that is shown is not the grading scale you want to use for your course, click the blue Edit button and follow the directions below, starting at the *.
Changing the Course Grading Scale
- Log into Moodle and enter the course where you'd like to check the grading scale.
- Click on Grades in the top menu.
- From the drop-down menu (which likely says Grader Report), scroll down and click Grade Letters.
- Click the blue Edit button.
- * If it is not already selected, check the box to Override site defaults.
- Edit the numbers and/or letters to match the grading scale for your course.
- Scroll to the bottom and click Save changes.
Default Grading Scale
| A | 95-100 |
| A- | 93-94 |
| B+ | 91-92 |
| B | 87-90 |
| B- | 85-86 |
| C+ | 83-84 |
| C | 79-82 |
| C- | 77-78 |
| D+ | 75-76 |
| D | 72-74 |
| D- | 70-71 |
| F | 0-69 |
Adding Extra Credit
Extra credit can be added to the Moodle gradebook as a gradebook item that adds points to the student's number of accumulated points, but not to the point total for the course. This ability is dependent on some settings in your gradebook. For additional help with this, please contact support.
Instructions
- Log into Moodle and enter your course site.
- Click Grades in the left side menu.
- From the dropdown menu, choose Gradebook setup.
- Scroll to the bottom of the gradebook page and click Add grade item.
- On the next page, underneath Grade item, give the item a name and a total number of points in the maximum grade box.
- Underneath Parent category, choose the grade category for the item (if applicable) and change the weight to 1.0.
- If you don't have the option to change the weight of the item, your gradebook will not work with this method of extra credit.
- Click Save changes.
- The item should now appear on the list of grade items. An underlined plus sign
 will appear to the right of the item point total, indicating that the item will be calculated as extra credit.
 - Follow the instructions for grading other grade items to enter the extra credit points.
Rubrics in Moodle
How to Use Rubrics in Moodle
Set Up Rubric in Moodle
This screencast shows the user how to set up a rubric in Moodle.
Grading a Moodle Assignment Using a Rubric
This screencast shows how to grade an assignment onecethe rubric has been established.
Re-Using a Rubric in Moodle
This screencast shows how to use a rubric established for one assignment in another without retyping the whole thing.
Groups
Group Types
No Groups
Groups will not be used for this activity. This is the default setting.
Separate Groups
Groups will be used for this activity. Students can only see the content of their own group. The other groups and their content are not visible to them.
Visible Groups
Groups will be used for this activity. Students can see the content of their group and all the other groups, but can only interact with the content from their own group.
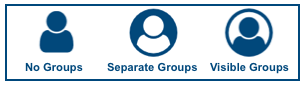
Setting Up a Group
In Moodle, groups are set up for the whole course, but only impact those activities that are set to use groups. Groups can be changed throughout the course as needed.
Instructions
- Log in to Moodle and enter your course site.
- Click Participants on the top green menu.
- Click the Enrolled users menu near the upper left corner of the Participants window and choose Groups.
- From here you have two choices; to auto-create groups or manually create them.
Auto-Create Groups
- Click Auto-create groups near the bottom of the screen.
- Fill out the options for your groups:
- General
- Naming Scheme: This is how your groups will be named. You can use @ to create letter name groups or # to create numbered groups. Click the blue question mark next to the text box for more information.
- Auto create based on:
- Number of groups: you specify how many groups you want
- Members per group: you specify how many students you want in each group
- Group/member count: how many groups or members per group you want, based on your choice above
- Group messaging: allow or prohibit group members to use the Moodle messenger to communicate with their whole group.
- Group Members
- Select members with role: typically you should choose student.
- Select members from group: only use if you want to create a group within a group.
- Allocate members: choose how the groups will be divided
- Prevent last small group: if checked, no group will be smaller than the number you set above, but might be larger.
- Ignore users in groups: if checked, the group will contain only users that are not already in another group.
- Include only active enrollments: if checked, any students with suspended accounts will not be included in the groups.
- Grouping
- Grouping of auto-created groups: allows you to put all newly created groups into a grouping
- Grouping name: the name for the new grouping
- General
- Click Preview if you want to look at the groups before creating them, or Submit to simply create them.
Create Group
- Click Create Group near the bottom of the screen.
- Fill out the options for your group:
- General
- Group name: How the group will be identified in Moodle.
- Group ID number: Leave this blank.
- Group description: optional
- Enrollment key: behaves like a password for students to access groups. Typically not used.
- Group messaging: allow or prohibit group members to use the Moodle messenger to communicate with their whole group.
- Hide picture: if a picture is uploaded below, choose to show or hide the group picture.
- New picture: allows you to upload a group picture/icon to identify the groups.
- Click Save changes. The group will then appear in the list of groups on the next screen.
- Click the name of the group in the list.
- Click add/remove users to put students into the group you created.
- On the next screen, click the name of a student you want to add to the group and click Add. Repeat as necessary for all desired group members.
- Click Back to groups.
- General
Adding or Removing an Individual Student from a Pre-Existing Group
Adding a Student
- Log in to Moodle and enter your Moodle course.
- Click on Participants on the left-side column.
- Click the Gear Menu on the right side near the top and choose Groups.
- Select the group you want to add the student to from the list of groups.
- Click Add/Remove Users on the right.
- On the resulting screen, find the student in the Potential Members list on the right and click to select them.
- If your course has lots of students, they might not appear in the list. Use the search box below the box.
- Click Add.
- Repeat as necessary to add additional students.
- Click Back to Groups at the bottom of the page.
Removing a Student
- Follow steps 1-5 above.
- Locate the student in the Group Members list on the left and click to select them.
-
- If your course has lots of students, they might not appear in the list. Use the search box below the box.
-
- Click Remove.
- Repeat as necessary to remove additional students.
- Click Back to Groups at the bottom of the page.
Moodle Profile
Update Your Moodle Profile
Your Moodle profile shares biographical and contact information with other Moodle users. Please follow the instructions below to add new information or update the existing information in your profile.
Instructions
- Log into Moodle.
- In the top right corner of the screen, click the down arrow to the right of your name and profile picture.
- Choose Profile.
- In the User details box, choose Edit profile.
- Scroll down to see the information you can edit. Sections with a red exclamation mark are required.
- First Name/Last Name: This is the name that will appear in Moodle. It is automatically populated and cannot be changed.
- Email address: By default, this is set to your MLC account. This is the address that will be used for all notifications within Moodle. It is suggested that you leave the email address set to your MLC address, but it is possible to set it to some other preferred email address.
- Email display: By default, this is set to Allow only other course members to see my email address. This means that others in your courses can see your email address, but Moodle users outside of your courses cannot. It is suggested that you do not change this option.
- City/town and Country: Please update to indicate your geographical location.
- Timezone: Please leave this set to Server timezone (American/Chicago).
- Description: You can fill in a short description of your position at your school, congregation, or place of work. It does not need to be a long description, as courses will have an introductory activity to share more about yourself.
- User picture: See the page on Moodle Profile Pictures.
- Additional names: Phonetic spellings or nicknames can be added in this section.
- Interests and Option: You do not need to add anything in these sections.
Moodle Profile Picture
Your Moodle profile picture is visible to Moodle users you interact with, helping to put a face with a name. Please follow the directions below to add or update your profile picture.
Instructions
- Access your Moodle profile by following these instructions.
To add a new profile picture:
- Locate an ID-type picture of yourself (not a picture of your family, pet, logo, etc.) on your computer. JPG or PNG files are recommended.
- Next to New picture, either drag and drop the picture into the upload box, or click the Add button in the upper left corner of the upload box to add a new picture.
- If you choose the Add button, a file picker window will appear.
- Choose Upload a file on the left side of the window.
- Note: If your picture will not upload, it is likely too large. Please resize the picture and try uploading it again.
- Click Browse.
- Locate the picture you would like to upload and click Open.
- Click Upload this file at the bottom of the window.
- Click Update profile at the bottom of the page to save the changes.
To edit an existing profile picture:
- Check the Delete picture box underneath your existing profile picture.
- Click Update profile at the bottom of the page.
- Click Edit profile and follow the directions above to add a new picture.
How Do I?
Activate My Course
Courses need to be activated before they appear in Moodle. You may activate any course that you are listed as the instructor for.
Instructions
- Visit portal.mlc-wels.edu
- Log in to your MLC account by clicking the Login button in the top right corner. Use the same username and password as you do for Moodle.
- From the Scheduling tab, choose Moodle Courses.
- Click the Activate button next to the name of the course you'd like to activate.
- The Activate button will disappear and a message indicating the course has been activated will take its place.
- Activated courses are deployed to Moodle on a schedule and may take up to 24 hours to appear in your Moodle course list.
- If your course does not appear after 24 hours, please contact Rachel Feld.
See Moodle as a Student
Requesting a Sample Student
- Contact Rachel Feld to request a sample student account.
Enrolling a Sample Student
Uploading a File from Google Drive
Set Course to Hide
At the conclusion of a course or the semester, courses should be hidden from student view to protect copywritten material.
Instructions
- Log into Moodle and click on the course that you'd like to make viewable.
- From the course homepage, click on the gear menu in the upper right corner and choose Edit Settings.
- Under the General heading, locate the dropdown menu to the right of Course visibility.
- Choose Hide.
- Scroll to the bottom of the page and choose Save and display.
Import Course Content
Course content from previous offerings can be imported for reuse. The entire course can be imported or just selected parts.
Importing a Whole Course
If something is not appearing correctly in your course, please do not import your course again. This will create a duplicate of everything in your course. First, try adjusting your course section numbers. If that doesn't fix the problem, please contact support.
Here's an interactive tutorial
12 STEPS
1. The first step is to open your Moodle Dashboard and click on the course for the current semester (the one you want to import content into)
2. Click More
3. Click Course reuse
4. Click Import
5. Scroll and click Search courses
6. Type the course number of the course you want to import
7. Click Search
8. Scroll and click to select the course you want to import
9. Click Continue
10. If you want to import all of the course content, scroll and click Jump to final step
If you only want to import part of the content, follow the other tutorial
11. Click Continue
You can safely ignore all technical information and warnings
12. That's it. You're done.
Important Notes
- An extra Announcements discussion forum will appear that should be deleted.
- If orphaned sections appear, please adjust the number of sections in the course.
Importing Specific Items
1. Follow steps 1-9 above.
2. After the proper course has been chosen in step 9, use the checkboxes to mark what kind of material you'd like to import into the course. Include activities and resources is the most common option.
3. Use the checkboxes on the next page to indicate which specific materials you want to import. By default, all the materials are checked. Use the Select All/None options at the top to quickly check or uncheck the boxes. Then choose the individual items to import.
* If you are not able to click on a specific box, look above it for a category header in bold. Check that category header to choose the items underneath it.
4. Click Next.
5. Confirm your choices on the next screen. If they are correct, choose Perform import. You can also choose Previous to go back and choose different items.
6. Continue with steps 8 and 9 above.
Remove Course Sections from a Meta-Site
Meta-courses can be reused from one semester or year to the next by removing the sections that are attached from the previous semester and then attaching the sections for the new semester.
Instructions
- If you have not previously used a meta-site, please see these instructions.
- Log into Moodle and enter the meta-site.
- Click on the Participants tab on the left menu.
- Click on the Gear in the upper right corner and choose Enrollment methods.
- From the resulting list, locate the section names from previous semesters.
- Click the trash can to the right of the course section you want to remove.
- On the resulting page, verify you have chosen the correct section and click the blue Continue button.
- Repeat steps 5-7 until all previous sections have been removed. Do not remove Manual enrollments or Guest access.
How Students Can Contribute Files or Links
If you wish to have students contribute to your Moodle site, it is possible, but not very intuitive. This method allows students to post files and links without altering access rights and permissions.
Adding a Link to a Webpage in your Moodle Course
Nearly anything with a web link can be shared to your Moodle course page.
Instructions
- Log into Moodle and enter your course site.
- Click the Gear in the upper right corner and choose Turn Editing On.
- Scroll to the course section where you want the link to be. Click Add an activity or resource.
- On the pop-up window, scroll to the bottom of the list. Choose URL and click Add.
- On the next screen, you'll see a few text boxes. You must fill in the top two.
- Name: what students will see on the Moodle course page.
- External URL: the link you want students to visit. It is easiest to copy and paste this.
- Scroll to the bottom and click Save and return to course.
Use Groups in a Discussion Forum
Groups can be used in a Discussion Forum to limit the number of posts an individual student interacts with. This can be especially helpful in courses with a large number of students.
Using Separate or Visible Groups
Instructions
- First, you need to set up groups within the course.
- After groups have been set up, you need to set the discussion forum to use groups. This can be done either from the Discussion Settings or the course home page.
Method #1 - Discussion Settings
- Either add a new discussion forum or turn editing on and choose Edit settings from the forum's edit menu to edit an existing forum.
- From the settings page, scroll down to Common module settings. Click the title to expand the menu if the options are not visible.
- Next to Group mode, choose the group setting you want for the forum.
- If you have set groupings in your course, an option for choosing the grouping will appear.
- After you have chosen the group settings, scroll to the bottom of the page and click one of the Save buttons.
Method #2 - Course Home Page
- Turn editing on within the course.
- Next to each discussion forum, a small person icon should appear. Hovering the mouse over the icon will indicate which group mode the forum is currently set to.
- Click the icon to cycle through the 3 group settings. See the image below for what each icon represents.
Removing Groups
If a student is unable to post to a discussion forum and gets an error about not being in a group, likely groups have inadvertently been set within the discussion forum. Follow these instructions to remove the group setting from the discussion forum. This can be done either from the Discussion Settings or the course home page.
Method #1 - Discussion Settings
- Turn editing on in your course and choose Edit settings from the forum's edit menu.
- From the settings page, scroll down to Common module settings. Click the title to expand the menu if the options are not visible.
- Next to Group mode, choose No groups.
- After you have chosen the group settings, scroll to the bottom of the page and click one of the blue Save buttons.
Method #2 - Course Home Page
- Turn editing on within the course.
- Next to each discussion forum, a small person icon should appear. Hovering the mouse over the icon will indicate which group mode the forum is currently set to.
- Click the icon to cycle through the 3 group settings. See the image below for what each icon represents.
Turning In Grades
At the end of each semester, grades need to be reported for each student. Grades are reported on Portal by following one of the methods below.
Manually Submitting Grades
- Visit portal.mlc-wels.edu and log in with your MLC username and password.
- Select Grades from the top menu and click on Enter Grades.
- Click on the name of the course you want to enter grades for and a listing of your students should appear.
- Next to each student's name, select the appropriate letter grade.
- Click Submit on the bottom of the page.
Importing Final Grades to Portal from Moodle
- Log in to Moodle and enter your course site.
- Click Grades in the top menu.
- From the dropdown menu, click Export.

- On the next screen, from the "Export as" menu, choose MLC Portal.
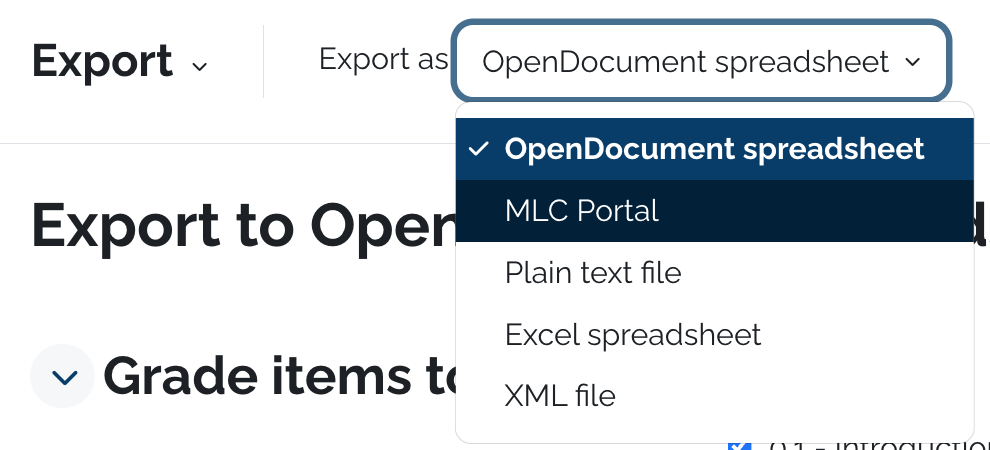
- Click Export Grades.
- A new tab will open with the Portal website. If prompted, log into Portal using your MLC username and password.
- The listing of students will be populated with letter grades based on their grade in Moodle. You can make adjustments to the grades as needed.
- Be sure to check that Moodle has rounded the way you want to round. Moodle calculates to more decimal places than are shown by default, which can impact which letter grade is imported to Portal.
- Click Submit on the bottom of the page.
Other Information
- Grades are due by the date listed on the MLC faculty/staff calendar or the Graduate Faculty Handbook.
- You do not need to enter all grades at the same time.
- Once you submit a grade for a student, you cannot change it yourself. Instead, you need to fill out a Change of Grade Form and send it to the MLC Records office. If you have any questions about this, please contact the MLC Records Office at (507)-354-8221.
- After you have submitted grades, you can inform your students that they can view their final grade on Portal. They should follow these instructions to view their grade.
Exporting the Gradebook
- It is a good idea to export your gradebook from Moodle to an Excel spreadsheet so that the data is saved in case you decide to delete the course site.
- To export the gradebook, please do the following:
- Enter your course site.
- Click Grades from the left menu.
- From the dropdown menu, choose Export to Excel Spreadsheet.
- Scroll to the bottom and click Download.
- Move the downloaded gradebook file from your download folder to another folder on your computer.
Adding a TA
A Teachers' Assistant (TA) can be added to courses to assist with various instructional duties.
Instructions
10 STEPS
1. The first step is to open the course and click Participants
2. Click Enrol users
3. Click Select users
4. Type the username/email address of your TA
5. Click the student's name
Note: Many students have similar names. Please be careful when choosing the student. The email address is the best unique identifier.
6. Click to the side to close the search box
7. Click in the Assign role drop-down menu
8. Select Teaching Assistant - Grading or Teaching Assistant - Editing
Grading allows your TA to enter grades, but not adjust course content. Editing gives your TA the same course content editing options that you have as the instructor.
9. Click Enrol users
10. That's it. You're done.
Important Notes
- You can view and edit your TA's role from the Participants list. Click the pencil to edit or remove their role.
- Follow the steps above for each additional course your TA needs access to.
- If working with separate groups within your course, make sure your TA is also a member of those groups.
Permanently Deleting Old Courses
Most online instructors do not want to delete a course site right after they have taught it since they might want to refer back to it the next time they teach the course. However, after teaching a course several times, several previous course sites will have accumulated, and it is appreciated if you mark the oldest ones for deletion.
Instructions
- Access your course in Moodle.
- Select Edit settings from the gear icon in the upper-right (or the Administration block if available) to open the Edit Course Settings window.
- In the Course full name box, add the word Delete in front of the course number so Delete is the first thing in the box.
- i.e. Delete EDT1001 01: Digital Literacy (201617 2)
- Scroll to the bottom and select Save and display.
Rachel Feld will periodically search in Moodle for courses that begin with the word Delete and will permanently delete them from Moodle. You can also email Rachel and let her know you've marked some courses for deletion so that they're removed more quickly.
Caution: Once a course is deleted, it is erased and cannot be retrieved.
Course Surveys
A common end-of-course survey is conducted at the conclusion of all online courses in order to gather valuable feedback for course improvement. The survey instructions are sent out to your students by Rachel Feld via the Announcement Forum in your course. The survey is conducted via the MLC Portal, where you will be able to view a compilation of the survey results.
Accessing Results
- Use this link to access the survey area of MLC's Portal.
- Log in to the Portal with your Moodle username and password.
- If you’re not prompted to log in, the login area is in the upper right.
- Select the survey for your course and the results should appear.
Additional Notes
- It can be helpful for you to add additional encouragement to your students to complete the survey.
- Once the survey is completed, the results are shared with the appropriate person(s) in the MLC administration and are available for the instructor to view via the MLC Portal.
- The survey questions were shared with all online instructors at some point in time. If you would like a new copy of the survey, simply contact Rachel Feld.
- You are welcome to create your own survey and administer it in addition to the common survey.
Set Course to Hide/View
By default, all courses are initially hidden from student view. Courses are automatically made visible to students 1 week prior to the beginning of the semester. If you wish for your course to be hidden after the 1-week mark, follow the instructions below.
Instructions
4 STEPS
1. The first step is to open your course and click Settings
2. Next to Course visibility, choose show or hide.
If show is selected, all students, instructors, and TAs can see the course on their Moodle dashboard. If hide is selected, only instructors can see the course on their Moodle dashboard.
3. Scroll down and click Save and display
4. That's it. You're done.
Notes
- You can check if your course is hidden or shown by looking at your dashboard. Courses that are hidden say that they are hidden underneath the course name.
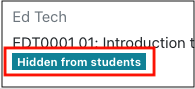
- After setting your course to view, you might end up with orphaned activities, making it look like content has disappeared. See Fixing Orphaned Activities to remedy this issue.
- Online instructors are encouraged to make their courses visible to students a few days prior to the start of the semester so that students can become familiar with the course layout and content.
- At the end of the semester, courses should be hidden from student view to protect copywritten material.
View Class Roster
Class rosters are available to view prior to the semester via Portal or during the semester via Portal or Moodle.
Instructions for Viewing the Roster in Portal
- Visit the MLC Portal by clicking Portal in the top menu of your Moodle page or by going to portal.mlc-wels.edu.
- If you are not automatically logged in, click the Login button near the top right corner and use your Moodle username and password to log in.
- After logging in, click Scheduling and choose Schedule Browser.
- Click your name.
- Scroll down below the course schedule and click the blue people icon
 to the left of the course name.
- If you do not see any courses in the schedule, you likely need to switch the semester being shown. Click the semester name on the right side underneath the gear menu and choose a different semester.
- The summer semester is semester 3.
- If you do not see any courses in the schedule, you likely need to switch the semester being shown. Click the semester name on the right side underneath the gear menu and choose a different semester.
- Your course roster will be displayed on the resulting page.
- For further directions on emailing your students, please see Initial Communication with Students.
Instructions for Viewing the Roster in Moodle
- After logging into Moodle, click on the course whose roster you want to view.
- From the menu on the top, click Participants.
- If the resulting list is blank, the course has not yet been populated with students. Courses are typically populated with students 4 weeks prior to the start of the course. This process is automatic.
-
- Both the Portal and Moodle rosters will be updated as new students enroll in the course.
- If a student drops a course, that change takes place once the information is changed in the database, and the database syncs with Moodle.
Moodle Enrollment Process
- When students enroll in an MLC course, they are automatically enrolled in the corresponding Moodle course. Instructors and students do not need anything to enroll in Moodle courses.
- Enrollments appear in Moodle 4 weeks prior to the start of the semester. Any enrollment changes made after the 4-week mark will appear in Moodle the next time the database and Moodle sync, which happens numerous times a day.
- If a student drops a course via the MLC Records Office, the roster change will automatically take place in Moodle.
- Enrollment changes are not instantaneous. They can take up to 24 hours to appear. For the most accurate enrollment, view your course roster in Portal.
Initial Communication with Students
For online courses, please contact your students about two weeks prior to the start of the semester, following the guidelines below.
Initial Email Communication
- Access your course roster in Portal.
- Click the blue Email all (Personal) link. Your email program should open with the student-preferred email addresses populated in the BCC box.
- For information on how to make Gmail your default email handler in Google Chrome, please see this MLC Knowledge Base article.
- If you have difficulty accessing your course roster and/or email addresses, please let the MLC Office of Continuing Education know at continuinged@mlc-wels.edu.
- In your initial email, please:
- Welcome your students to the course
- Mention the date when the course will begin.
- Attach a copy of the course syllabus.
- Mention the required textbook information, and any other information you think they would like to know.
- Inform them when you will make your course visible in Moodle so they can look around at the preliminary course information.
- Ask them to reply to your email message so that you know they received it.
- If you have some students that have not responded after several days, please contact them by phone to make sure they are receiving the information. Online students appreciate personal contact from the course instructor. If you still do not receive a response, please contact the Office of Continuing Education.
Notes
- When viewing the class roster, you can also click on individual students to view their address, phone number, etc.
- Emailing (messaging) students directly from within Moodle uses whatever email address is currently listed in their Moodle profile, which might not yet be their preferred email address. Students are instructed to update their email address in their Moodle profile during the online orientation for new students.
Here's an interactive tutorial
1. The first step is to go to portal.mlc-wels.edu and click Login
2. Enter your Username
3. Enter your Password
4. Click Login
5. Click Scheduling
6. Click Schedule Browser
7. Click Your Name
8. Scroll down to the bottom of your schedule and click the blue people icon.
9. Click E-mail All (Personal)
10. The email addresses should populate into a new email from whatever email client you typically use.
If it's not the right email address (i.e. it's not your MLC email address), copy and paste the email addresses into a new email from your MLC account.
Fixing Orphaned Activities
After importing and opening up a course, sometimes activities appear as orphaned. Please follow these directions to fix the issue.
Instructions
- Log in to Moodle as usual and click on the course.
- Click on the gear in the upper right corner and choose Edit Settings.
- Scroll down and click on the blue heading Course Format.
- Next to the second option, Number of sections, choose a number bigger than what is currently there. Many courses have 8 topics, but it depends on how you have organized your content. If you remember how many sections your course had, choose that number. If not, take your best guess -- the number can be changed again if needed.
- Number of sections refers to the number of topics in your course. Depending on how your course is designed, this is likely the number of weeks in the semester or units in your class.
- Scroll to the bottom of the page and choose Save and display.
- Check to see that all your course content is displayed/no longer orphaned. If not, the course likely had more sections. Repeat steps 2-5 as necessary.
Here's an interactive tutorial
7 STEPS
1. The first step is to open your course and click the gear icon.
2. Click Edit settings
3. Scroll down and click Course format
4. Scroll down and click the dropdown by Number of Sections.
5. Select a number larger than what is currently highlighted.
6. Scroll down and click Save and display
7. Check to see if all of your course sections are visible. If not, repeat the process with a bigger number.
Next step

Using a Meta-Course
Some MLC courses have several sections of the same course. These can be combined into a single course, called a meta-course. Using a meta-course eliminates the need for posting/creating content in multiple locations for multiple sections.
Instructions
- Request a meta-course through this form.
- That's it :)
- The individual sections will still appear on your dashboard, but you can safely ignore them. Do all updating, grading, etc. in the meta-course.
- Meta-courses cannot be created until the single sections are created in Moodle through the database. This happens approximately 6 weeks before the start of each semester.
Add Course Sections to a Meta-Site
Meta-courses can be reused from one semester or year to the next by removing the sections that are attached from the previous semester and then attaching the sections for the new semester.
Instructions
- If you have not previously used a meta-site, please see these instructions.
- If you are reusing a meta-site from a previous semester, please remove the existing course sections before continuing.
- Activate each course section via the MLC Portal. Continue with the next steps once the sections appear in Moodle. This can take up to 24 hours.
- Log into Moodle and enter the meta-site.
- Click on the Participants tab on the left menu.
- Click on the Gear in the upper right corner and choose Enrollment methods.
- From the Add method dropdown menu, choose Course meta link.
- From the top Link course dropdown menu, search for the course name of the first section you want to add. Pay careful attention to the section, school year, and semester to ensure you choose the right section. If the search window won't disappear after you select the proper course, press the Escape button.
- From the bottom Add to group dropdown menu, choose Create new group. This will allow you to separate some assignments and activities by section.
- Click the blue Add method at the bottom.
- Repeat steps 5-10 until you've added all your sections to the meta-site.
Edit Multiple Due Dates
The Edit Dates report lets you review and update due dates, cut-off dates, and other timed events for multiple assignments, activities, or resources all on one screen. This feature is especially helpful if you’re reusing a previous course.
Instructions
-
- Log into Moodle and select your course from the Dashboard.
- Click Reports on the top green menu.
- Click Dates on the resulting screen.
- Click the drop down menu by Activity Type to filter your view by activity.
- Click your course sections to expand the content of each section, or click Expand All to view everything.
- The date options for each course item will be displayed under each item. Make adjustments as needed.
- When you’re done adjusting the date, click the blue Save changes button.
Open a Course for One Student
In general, courses should be hidden after they are completed. Sometimes, a student might need access to a closed course if they have an incomplete or are studying for their comprehensive exam. Instead of setting the course to view, which opens it up for all students, follow the directions below to open the course for an individual student. The access should be removed when the student no longer needs the content.
Instructions
Opening the Course
-
-
- Log into Moodle and click on the course you want to make visible to the student.
- From the course home page, click on Participants in the left hand menu.
- In the list, locate the student who needs access to the course.
- In the Roles column, click the pencil icon next to "Student".
- Click the down arrow to see the drop-down menu choices and choose Single Viewer.
- Click the save icon

-
Closing the Course
-
-
- Log into Moodle and click on the course you want to make visible to the student.
- From the course home page, click on Participants in the left hand menu.
- In the list, locate the student who needs access to the course removed.
- In the Roles column, click the pencil icon next to "Student".
- Click the x next to Single Viewer.
- Click the save icon
-
Fix the "Not part of a Group" Error
In discussion forums, sometimes a student will get an error that says they cannot post because they are not part of a group. There are two ways to address this problem.
If the Discussion Forum IS Using Groups
-
- Add the student to one of the groups being used in the discussion forum by following these instructions.
If the Discussion Forum is NOT Using Groups
-
- Turn on editing in your course if it isn't already turned on.
- Check the small blue icon next to the forum's edit button. Make sure that it's a solid blue person icon without a circle. This is the "No Groups" icon in the image below.
- If it is a different icon, either the "Separate Groups" or "Visible Groups" icon in the image below, click the icon until it is a solid blue person.
Show/Hide Course Content
When content is not ready for students to view, you can hide whole sections or individual items from student view. You can also use the bulk edit feature to hide course content.
Instructions
10 STEPS
1. The first step is to open your course and click to turn on Edit mode
2. Scroll to the item you want to hide/show and click the three dots
3. Click Hide on course page to hide the item or Show on course page to show the item
4. Once hidden, you can also adjust the availability by clicking Hidden from students and choosing Show on course page
5. To change availability for multiple items, click Bulk actions near the top of the page
6. Click the boxes to Select the items you want to show/hide
7. After you've selected the items you want, click Availability at the bottom of the page
8. Click Hide or Show, depending on what you want to do
9. Click Apply
10. That's it. You're done.
Glossary
Course Short Name
-
The course short name is unique to every course.
-
It can be helpful to know the course short name when searching for a specific course.
-
Typically the course short name starts with the school year the course was offered, followed by the course number and the section number.
-
The course name can also be located in the breadcrumbs listing on the course site underneath the name.

Course Name
All courses are named following a standard convention.
- Official Course Number: This begins with a prefix indicating the course subject followed by a four-digit number. Each course has a unique number.
- Section Number
- Official Course Name
- School Year
- Semester (the summer semester is semester 3)
For example, EDT0001: 01 Introduction to Online Learning (201718 2) indicates that this is the first section of edtech course 0001, being taught in the second semester of the 2017-2018 school year.
Semester Checklists
Beginning of Semester: Online Course
Please use the following checklist to help get your online Moodle course up and running.
-
Edit Course Content
- Please make all edits, with the exception of due dates, in your master copy. Due dates should be set in your semester course after the content is imported.
Beginning of Semester: On-Campus Course
Please use the following checklist to help get your On-Campus Moodle site up and running.
-
Locate your course for the coming semester
- Course sections are created 6 weeks before the start of the semester.
-
Request a Meta-Course (if needed)
-
Import Course Content
-
Edit Course Content
-
Add a TA (if needed)
-
Check your Course Roster
-
Make your Course Visible
End of Semester: Online Course
Please use the following checklist to help guide you through the end of your online course.
End of Semester: On-Campus Course
Please use the following checklist to help guide you through the end of your on-campus course.
Course Workflow for Online Courses - Updated February 2021
Summary of Changes
-
You will see a course appear in your Moodle list that starts with MASTER COURSE, followed by the course number and your last name. This is where you will make your course edits going forward.
-
If you’re teaching this summer, you should see your master course by the end of the week. If you are teaching in future semesters, it will be a little longer.
-
By having a master course, you’ll be able to make edits at any time, even if the new semester hasn’t been set up yet. You can also make adjustments to the master course while you’re teaching if you find things that need to be edited.
-
Having a master course also makes it much easier for us to update any support links (like library information) for your course.
-
The master course also allows for sharing between instructors without compromising student information and makes it easier to know which course you should/shouldn’t mark for deletion.
-
-
In addition to the content from the most recent offering of your course, you’ll also see some additions and changes to the course layout. (If you do not see these changes to your master course right away, they’ll be coming over the next few months.)
-
A course banner has been added to the top of the course page. It also will appear on the student dashboard. If you notice any errors in your course banner, please let me know! They have been designed to show different locations at MLC -- a small way to give them a feel for the campus.
-
A “Course Resources” topic has been added to your course with links to program-specific information, Moodle, and Library resources. You may add to this topic if you’d like, but please do not delete anything from it without contacting me first. If you have any questions or suggestions regarding the topic, please let me know.
-
An “Advanced Notifications” block has been added to the right-side menu. This is where course survey announcements and any planned Moodle outages will be posted.
-
A “Your Instructor” block has been added with your information. If you need help editing it, please let me know.
-
In a few cases, course content has been rearranged to accommodate these changes. All previous courses are still intact if you want to refer to them. If you have any questions about what was moved, please let me know.
-
New Workflow Steps
-
Make your course edits in the master course. This includes any edits to content, updating the syllabus, etc. The only thing you will not be able to do is to assign specific students to groups and set due dates.
-
Approximately 1 week before the start of the semester, copy course content to the current semester’s course page and set the page to view. At this time, you’ll be able to assign specific students to groups if needed. Assistance will be provided for this step.
-
Teach the course! Throughout the semester, continue to update the master course as needed. Please note that changes to the master course will not appear automatically on the current semester’s course page.
-
Repeat.
Helping Students Succeed
Monitoring Activity Using Course Blocks
What are "Blocks?"
Blocks are part of the Moodle Course Page. These areas give the user information at a glance. Courses are created with a default set of blocks enabled. There are additional blocks available. Blocks can be repositioned on the course page, or they may be deleted.
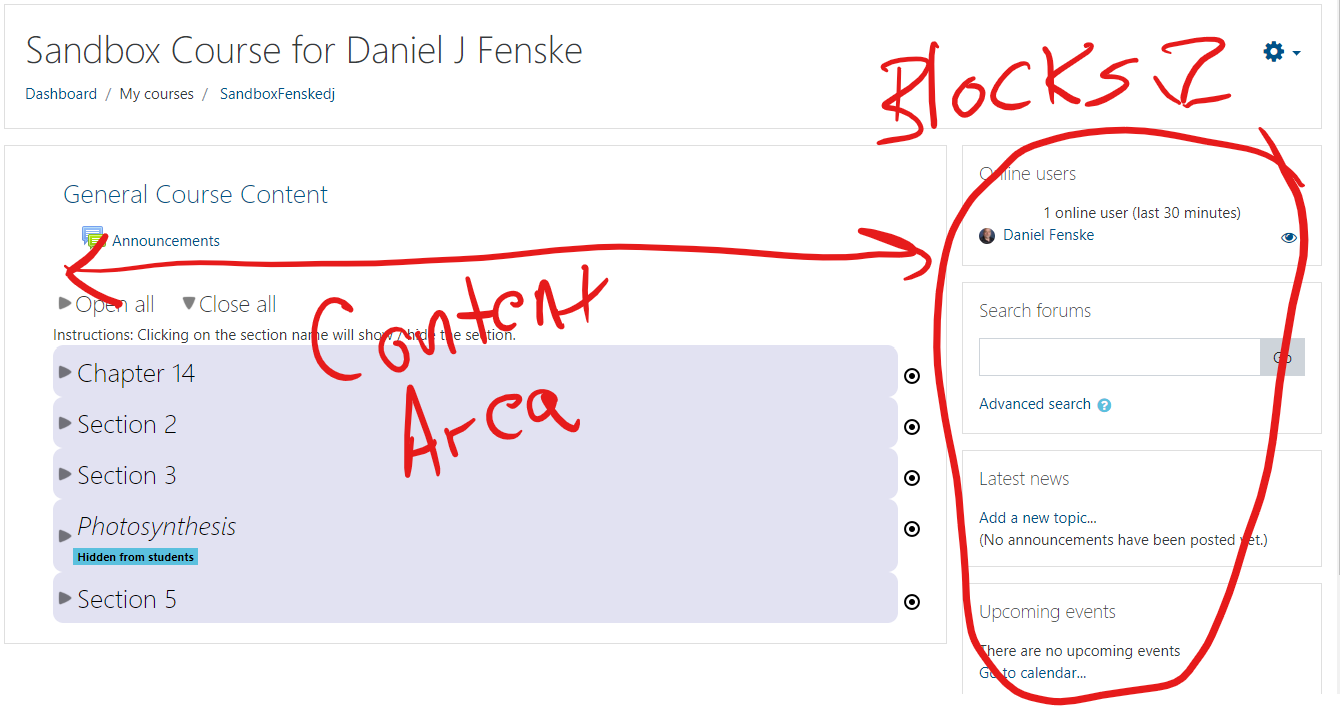
There are two Blocks that are very useful for monitoring what is going on in your course. Those Blocks are the recent Activity Block and the Online Users Block. Recent Activity is displayed by default. As things happen in the course, this block will display that for you. You can also get a report by clicking on the link that appears in the Block "Full report of recent activity...".
The Online Users block displays a list of students who are currently logged in to your course. This Block must be added if you wish to make use of it. The instructions for adding this Block follow.
Add a Block
| 1. Navigate to your Course Page. Turn Editing on. |  |
| 2. At the upper left corner of the page, find the 3 horizontal line button (the "hamburger"). Click on that button to expand the left side pane. |  |
|
3. When the left side pane opens, scroll to the very bottom of the pane. You will see a box, "Add a Block". Select that button. |
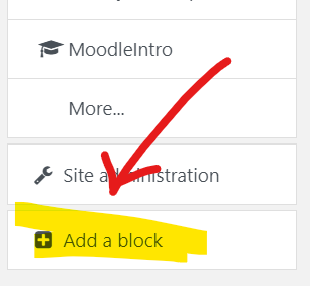 |
| 4. For our purposes, we'll add a Block that tells us which users are currently logged in to our course. Scroll down the list of Blocks to find "Online users". Select that Block. | 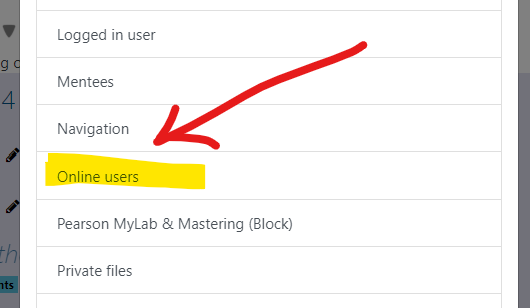 |
| 5. The Block will appear in the right pane of your course. You can change the position (up or down in the pane) by clicking and holding on the crossed arrow icon. Your cursor changes to the crossed arrow. You can drag the Block up or down to your desired position. | 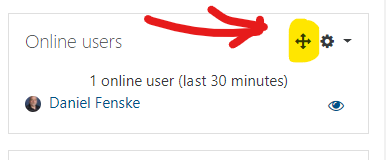 |
| Turn your editing off, your block is in place. |
Delete a Block
You may decide that you do not wish to use a Block, and want to remove it from the Course Page. Directions follow:
1. Turn Editing on (refer to step 1 of the directions above).
2. Locate the Block you wish to delete. Click on the "gear" icon. From the menu, select the last item "Delete ___ block".
3. Accept the confirmation dialog that appears. The Block is deleted. It may be re-added at any time.
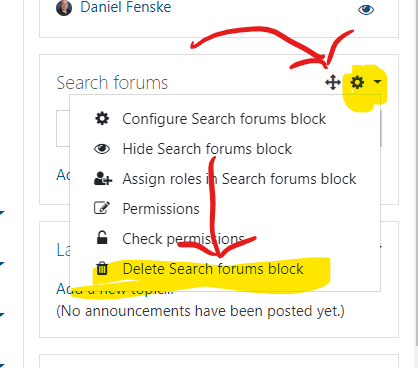
Tracking Student Activity Using Reports
Reports
Moodle provides several tools for giving you feedback about student activity. Moodle's Reports offers some useful information about student activity. Directions to access the Reports follows (clicking on an image will bring up a larger view in a new tab):
| 1. In your Course page, select the small arrow next to your picture. From the drop-down menu, select "More". | 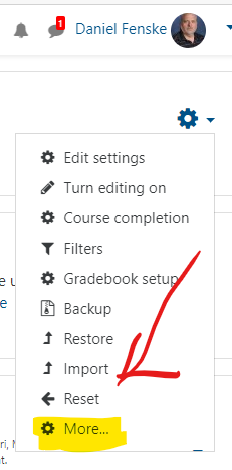 |
| 2. The Course Administration page appears. Note that the middle section has the Reports options. | 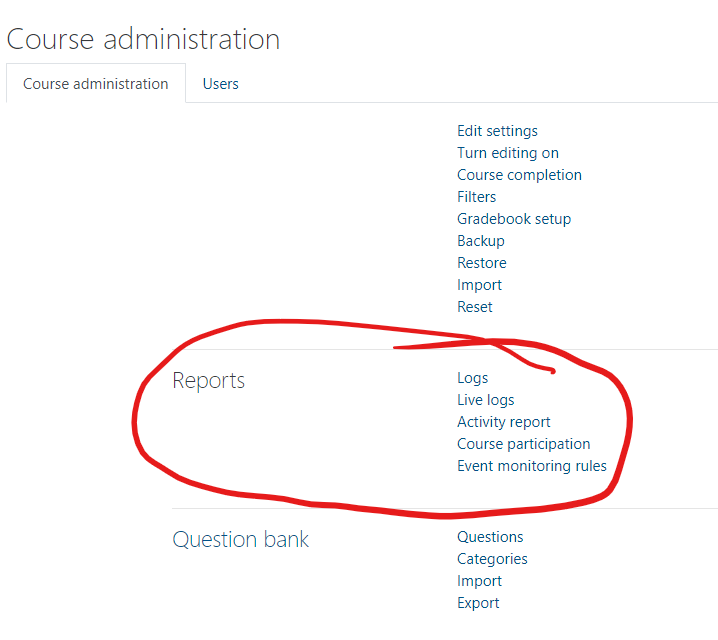 |
| 3. Selecting "Activity Report" brings up a Report of all activity on every item in your course. This report may take a few minutes to generate. It allows you to see which items are accessed. You have the option to Filter the Report by date range. | 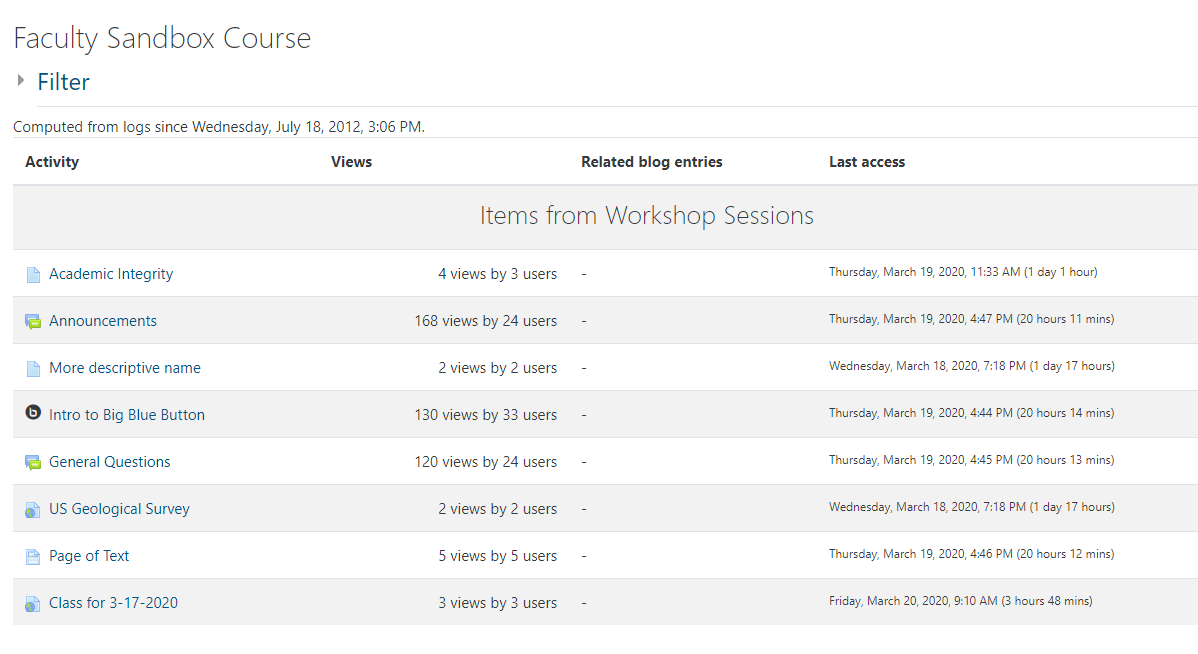 |
| 4. Selecting "Course Participation" allows you a very detailed report about activity in your course. You select which Activity you are interested in, how far back to look, and which actions you are interested in. When you click "Go," Moodle displays the requested information. | 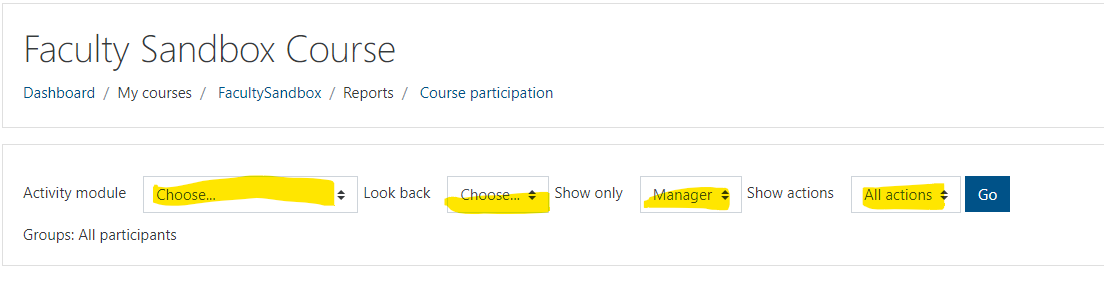 |
| 5. In this example, the Announcements Forum is selected, for the last 4 days, by Students, and All actions. The result is displayed. One user accessed this activity, some did not. | 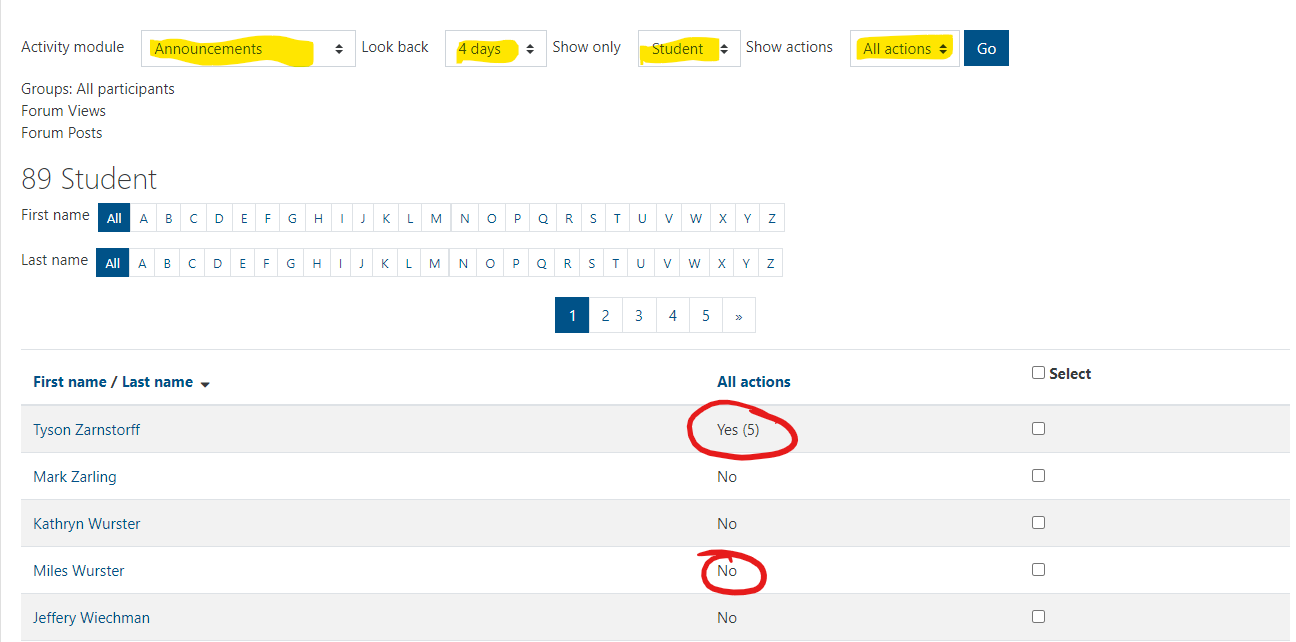 |
Logs
Moodle keeps logs of all activity in your course. You can view these logs. Logs enable you to see very granular information, and you have many options for viewing logs. Generally, the logs are used when you want information about a specific student for a specific reason. Directions:
1. Select Logs from the Reports section (refer to the directions above.)
2. You will see a dialog box where you have quite a few options. Note all the menus to select from. Make your selections. You will never hurt anything by viewing logs. However, Moodle will take more time to process logs when you leave selection criteria broad.
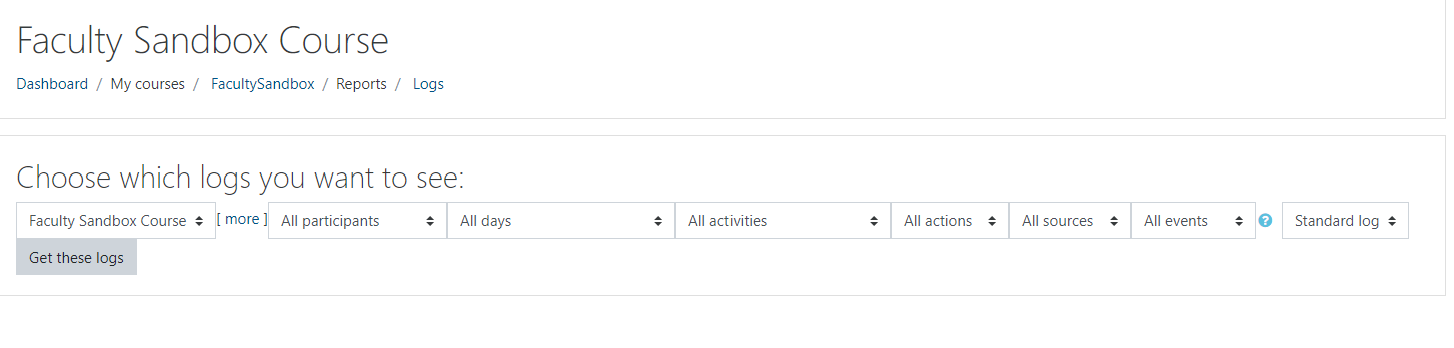
Class "Attendance" in Moodle
It may be useful to know when a student last accessed your course. Moodle keeps track of that for you. Directions follow (click on an image to open a larger view in a new window):
| 1. In your Course page, look to the upper left corner to find the button with three horizontal lines (the "hamburger). Clicking the button will open the left pane. | |
| In the left pane, select "Participants." | 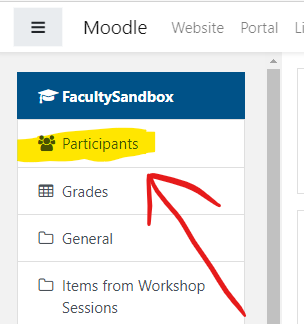 |
| A list of all the course participants will appear. You can view when each participant last accessed the course. | |
| If you have a large roster, you can apply a filter to search for a specific participant. |  |
Enabling Student Access to Logs and Reports
You can allow students to access logs and activity reports. Steps:
Log in to the course. Select "Edit Settings" from the gear icon:

Expand the "Appearance" tab. Set "Show activity reports" to Yes:
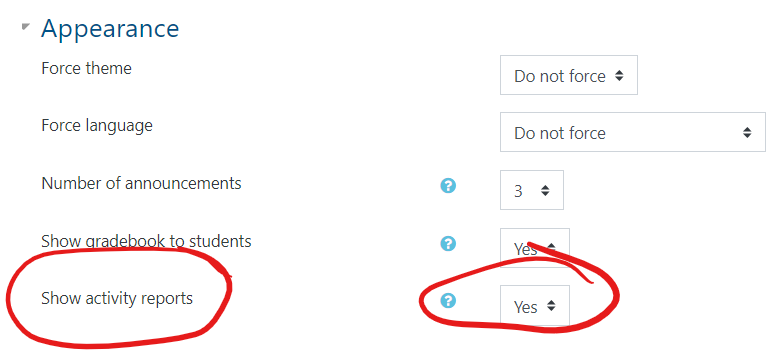
Regular & Substantive Interactions: Online Faculty Guidance
High impact and best practices in teaching and learning encourage meaningful interactions between instructors and students. MLC has long advocated for robust learning experiences across all modalities. Recent guidance by the federal government requires that institutions receiving Title IV funding demonstrate that their courses include regular and substantive interactions between instructors and students. These interactions occur when faculty meet with students at specific times, present information, solicit student feedback, and answer student questions within a predictable timeframe.
The U.S. Department of Education defines both regular and substantive interactions.
Regular interaction between students and their instructor in asynchronous online instruction must be intentionally planned and initiated by the instructor. Regular interaction includes BOTH
- Providing the opportunity for substantive interactions with students on a predictable and scheduled basis commensurate with the length of time and the amount of content in the course or competency; AND
- Monitoring the students’ academic engagement and success and ensuring substantive interaction with the student when needed as indicated by such monitoring or upon request by the student.
Substantive interaction involves engaging students in teaching, learning, and assessment consistent with the content under discussion, and also AT LEAST TWO of the following:
- Providing direct instruction (synchronous only);
- Assessing or providing feedback on a student’s coursework;
- Providing information or responding to questions about the content of a course or competency;
- Facilitating a group discussion regarding the content of a course or competency; or
- Other instructional activities as approved by the institutional or programmatic accrediting agency.
Martin Luther College expects its faculty to provide regular and substantive interactions with students in each online course in a uniform manner. To that end, each faculty member follows these practices and publishes them in their course syllabus:
- Respond to student questions communicated via email, Moodle messenger, or an open forum within 24 hours.
- Give substantive feedback and scores to students in discussion forums within 72 hours of the forum’s due date.
- Evaluate student assignments with instructive comments within 7 days of the assignment due date.
- Schedule, publish, and attend virtual office hours at least once monthly so students can consult with the instructor in real-time using convenient electronic means (phone, video conference, text messaging).
Finding a Course
Courses in Moodle can be found on your Moodle Dashboard and on the Site Home page. Use the following tips to quickly find the course you're looking for.
- You can save your frequently used courses to the Starred Courses section of your dashboard by starring them. This will add them to the very top section of your dashboard. Courses can be starred and unstarred as the semesters change.
- The Recently accessed courses section of your dashboard automatically populates with the courses you use most often. You can use the arrows at the top right of the section to see additional courses.
- The Course Overview section shows all the courses that you're enrolled in as an instructor or student. Make sure the filter in the top left corner is set to All if you're looking for a course you've not accessed previously. There are arrows in the bottom right corner of this section to see all the pages.
- If you click Site Home from the menu on the left side of the page, there's a search bar that can be used to find courses that, for whatever reason, are not appearing on your Dashboard. The course number (i.e. EDT0001) is the most efficient search term for locating a course.
Adding Library Resources to a Reading List
How to add articles and other library resources to a reading list.
How to add articles from library databases to Moodle reading lists
The basics: To add an article from a library database to a Moodle reading list, use its persistent link.
The reason: If you copy the address-bar URL of an article, it may "break" when you try to use it the next time. Persistent URLs are stable and will lead your students to the article along with login options if needed for off-campus access.
If you have existing Curriculum Builder reading lists in Moodle, see the instructions below for moving them to permalinks.
Steps for adding individual articles to Moodle reading lists
In Moodle:
In Discovery:
- Search for an article, ebook, or other digital content.
- Click on the title of an item you'd like to add.
- Find the permalink for the information. In Discovery, it will be in the sidebar menu on the right side of the page.
-
Click on the permalink button.

- Find the link near the top of the page. Highlight the entire permalink and copy it (Ctrl-C).


Option: Link several articles in a Google doc. (Video demo)
- Create a new Google doc.
- Search for the article in Discovery.
- Click on the title of the article.
- On the right side of the page, click the Save icon.
- Adjust options (if wanted) and click the Save button.
- Copy the title, author, etc. and paste it into your Google doc.
- Go back to the article, and right-click on the persistent link, then click Copy Link Address.
- In your Google doc, highlight the article title, then click the link button and paste the link address.
Option: Add your Google doc to Moodle. (Video demo)
You may find permalinks on publisher article pages, but they may not contain the information that gives your students access to the article.
For example, https://www.jstor.org/stable/26695431 (found by going directly to JSTOR) may result in a "paywall" for access to the article.
https://emil.mlc-wels.edu/login?url=https://search.ebscohost.com/login.aspx?direct=true&AuthType=ip,url,cookie&db=edsjsr&AN=edsjsr.26695431&site=eds-live&scope=site (found by clicking on the article title in a Discovery results list) has all of the information needed to give our students access whether they are on- or off-campus. emil.mlc-wels.edu is the key piece.
Permalinks may also be called "persistent links," "stable URLs," or something similar.
Students may still have to find the "full text" button on the listing to get to the actual article content.
Move existing Curriculum Builder articles to permalinks (easy method):
Video demo
Move existing Curriculum Builder articles to permalinks (alternative method):
- Open a reading list that was built by Curriculum Builder. (You may have to click See Current Reading List.)
-
Click on the title of an article to go to the expanded information screen.
- On the left side, choose one of the full-text links and hover over it. Don't click anything yet!
- While hovering over the link, look at the URL in the bottom left-hand corner of the screen.
-
If the URL has emil.mlc-wels.edu as part of it (usually near the beginning), right-click on the link and choose Copy link address.
- If the URL does not have emil-mlc-wels.edu within it, look for another link to the article on the page. If there is none, the article may no longer be available through the library. Please contact library staff for assistance. An article beginning with https://curriculumbuilder.ebscohost.com may not work for your students.
- Repeat for each article in the reading list.
*These instructions supersede the use of Curriculum Builder, which has been discontinued.