Navigation and Features
- Moodle Dashboard
- Course Navigation
- Communicating in Moodle
- Text Editor Features
- Viewing Reports and Logs
- Accessing Your Course
Moodle Dashboard
After logging into Moodle, the Dashboard is the first screen that you will see. The dashboard will show all the visible classes that you're currently enrolled in. The dashboard is also customizable so you can quickly access your current courses and other information.
Dashboard Overview
The following is based on the default view of the Dashboard and does not reflect any customizations you might have made.
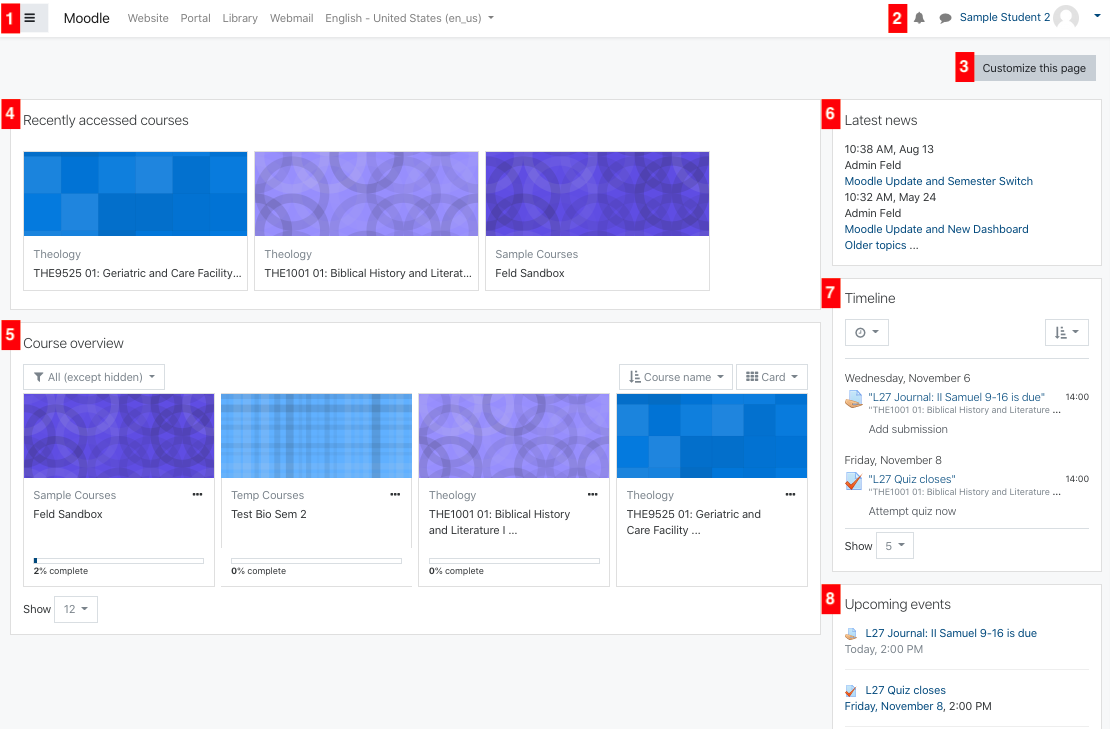
1. Top Left Toolbar
-
 : shows/hides the left-hand menu.
 - Moodle: click to go back to your Dashboard from any other Moodle page.
- Website: click to go to the MLC Website.
- Portal: click to go to the MLC Portal.
- Library: click to go to the MLC Library section of the MLC Website.
- English: click to quickly change your displayed language.
2. Top Right Toolbar
-
 : click to see your notifications.
 -
 : click to access Moodle Messenger.
 - Your Name/Photo: click to get back to the Dashboard, edit your profile, view your grades, access Moodle Messenger, adjust your preferences, or log out of Moodle.
3. Customize This Page
- Click here to customize your dashboard.
4. Recently Accessed Courses
- Shows the courses that you have recently accessed. This list is automatically populated.
5. Course Overview
- Shows all the visible courses that you're currently enrolled in.
- Only courses that instructors have made available are visible here. See the FAQs for more information.
-
 : click to adjust the filter for the course overview section.
- All (except hidden): shows all courses except for those that either you or your instructor have hidden from view.
- In Progress: shows all visible courses in the current semester.
- Future: shows all visible courses in future semesters. Note that due to current MLC practice, you likely will not see any courses in this view.
- Past: shows all visible courses from past semesters. Note that due to copyright concerns, instructors typically hide courses a few weeks after the end of the semester.
- Starred: shows all courses that you have marked with a star.
- Hidden: shows all courses that you have hidden.
-
 : click to adjust how courses are sorted in the course overview section.
- Course Name: sorts courses alphabetically by the name of the course.
- Last Accessed: sorts courses based on the last time you accessed the course.
-
 : click to adjust how the courses are displayed in the course overview section.
 - Show: click to adjust how many courses are shown on the page. If you have more courses than the chosen number, either choose a bigger number to show more courses or use the arrows that will be in the bottom right corner of the Couse Overview section to see the next page of courses.
6. Latest News
- Shows news posts from the Moodle administrator. Check here for information about scheduled Moodle maintenance, updates, and new features.
7. Timeline
- If your courses have items with dates attached to them, the timeline shows the upcoming items for all of your courses.
-
 : click to change which items are visible based on their due date.
 -
: click to sort by date or by course.
- Show: click to adjust how many items are visible in the list.
8. Upcoming Events
- Shows the calendar events for all of your courses. This is only populated if your course utilizes the course calendar.
Customize Your Dashboard
Editing Existing Blocks
- To begin customizing your dashboard, click Customize this page (#3 in the image above) after logging into Moodle.
- After you click, two additional icons will appear within each page block.
-
 : click or click and drag to rearrange the block on the dashboard. Blocks can be located in the main center area or in the smaller column on the right. On a narrow browser window or mobile device, the right column blocks will appear at the bottom of the page.
 -
 : click to access the settings for the individual block.
- Configure block: brings you to the options specific to the block.
- Hide block: hides the block from your Dashboard.
- Delete block: removes the block from your Dashboard.
- When you're finished customizing your Dashboard, click Stop customizing this page in the top right corner. The customization icons will disappear.
- To reset the Dashboard to the settings shown in the image above, click Reset page to default.
-
Adding New Blocks
- To add a new block to your dashboard, click Customize this page (#3 in the image above) after logging into Moodle.
- If the left menu is hidden, click to make it visible.
- Click Add a block at the bottom of the left menu.
- Choose the type of block you'd like to add from the resulting list.
- See this list for explanations of the available blocks. Note that not all of the blocks listed are available for student use.
- After you click on the name of the block you'd like to add, it will appear at the top of the column on the right. Rearrange the blocks and edit the block's settings using the directions above.
Course Cards
The following is what a course card looks like if the Dashboard is set to show Cards. Similar features are available in the List or Summary views.
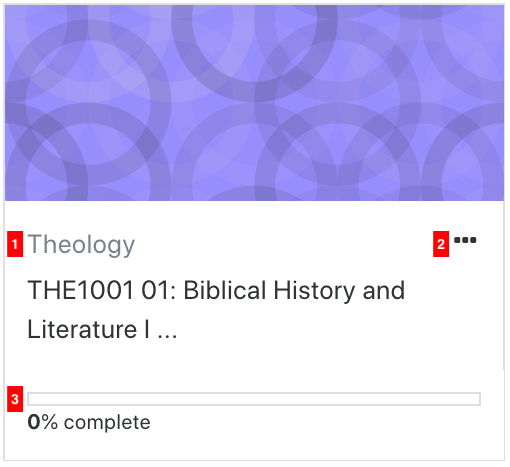
- The name and department of the course. To view the full course name, choose the List or Summary views.
- Click here for options to Star or Hide the course. Starred and hidden courses can then be filtered.
- If course completion is enabled, this shows the percentage of course activities that you've completed.
Course Navigation
After you click on a course in your Moodle Dashboard, you will be taken to the course home page. The content of each course home page will vary depending on how your instructor has designed the course, but the following features are typical of each course.
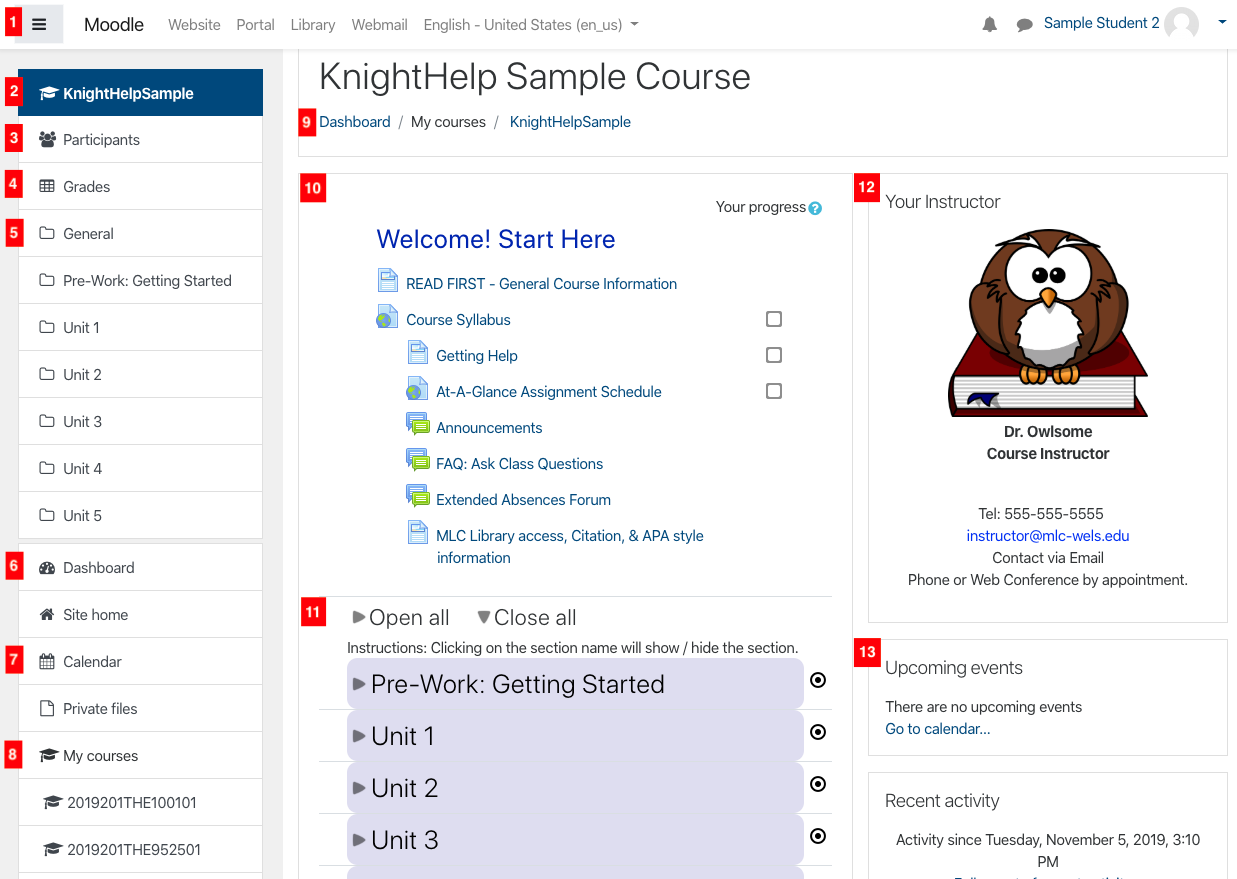
1. Moodle Toolbar: this toolbar remains the same on any Moodle page. Its features are described on the Moodle Dashboard page.
2. ![]() : the course short name will appear here. You can click here from any course page or activity to return to the course home page.
: the course short name will appear here. You can click here from any course page or activity to return to the course home page.
3. ![]() : click here to view a list of your classmates and instructor for this course.
: click here to view a list of your classmates and instructor for this course.
4. ![]() : click here to view your grades for this class. Visit the page on Checking Grades and Feedback for more information about this section.
: click here to view your grades for this class. Visit the page on Checking Grades and Feedback for more information about this section.
5. ![]() : each section in the course will be listed here. Instructors often organize their courses by topic, lesson, or unit.
: each section in the course will be listed here. Instructors often organize their courses by topic, lesson, or unit.
6. ![]() : click here to go back to your Moodle Dashboard.
: click here to go back to your Moodle Dashboard.
7. ![]() : click here to view your Moodle Calendar.
: click here to view your Moodle Calendar.
8. ![]() : the rest of your current courses will appear here. Click the course short name to quickly switch between course pages.
: the rest of your current courses will appear here. Click the course short name to quickly switch between course pages.
10. Course Information: this section typically contains overall course information like the syllabus and announcement forum. The content will vary for each course.
11. Course Sections: each course section contains the resources for that topic, lesson, or unit. Click the arrow to expand the section and see its contents. See the Common Moodle Tasks chapter for more information.
13. Instructor Information: many online courses will have instructor information on the course page. Use this information if you need to contact your instructor.
14. Course Blocks: Additional course blocks will appear here depending on what the instructor has included in the course.
Communicating in Moodle
There are a variety of ways to communicate with your classmates and instructor in MLC courses. Please be sure to check the course syllabus to find your instructor's preferred method of communication.
Moodle Messenger
- Moodle Messenger is an instant messaging system within Moodle that can be used to communicate with instructors and classmates.
- Access Moodle Messenger by clicking the in the top toolbar from anywhere in Moodle.
- After opening the Moodle Messenger window, use the search box to find the person you wish to message. Note that you will only be able to contact Moodle users who are in your classes.
- Once a conversation has been started, you can star the conversation or add the user to your contacts so you can access the conversation quickly. You can also block or mute the user.
- Note that not every instructor or student checks Moodle Messenger frequently. Refer to the course syllabus for the most effective way to communicate with your classmates and instructor.
Text Editor Features
Nearly every text box in Moodle has a wide variety of formatting and editing features. Use the icons in the toolbar to access these features.

- Expands the toolbar to show the second row of icons.
- Changes the style of the text. These styles are predetermined by the Moodle administrator.
- Bold
- Italic
- Bulleted List
- Numbered List
- Insert Link
- Remove Link
- Add Image
- Add Media
- Record Audio
- Record Video
- Manage Embedded Files
- Underline
- Strikethrough
- Subscript
- Superscript
- Text Color
- Font Type
- Size
- Left/Center/Right Justify
- Decrease/Increase Indent
- Equation Editor
- Insert Special Characters
- Insert Table
- Clear Formatting
- Undo/Redo
- Accessibility Checker
- Screenreader Helper
- HTML View
- Fullscreen View
Viewing Reports and Logs
If your instructor has enabled this feature, you can get detailed reports about your activity in a Moodle course. Steps:
1. Log in to Moodle. Right from your Dashboard, before you enter the course, locate your User icon in the upper right corner. Use the down-arrow to select your Profile.

2. From your Profile page, locate your courses in the lower-left corner. Select the course for which you wish to view reports.
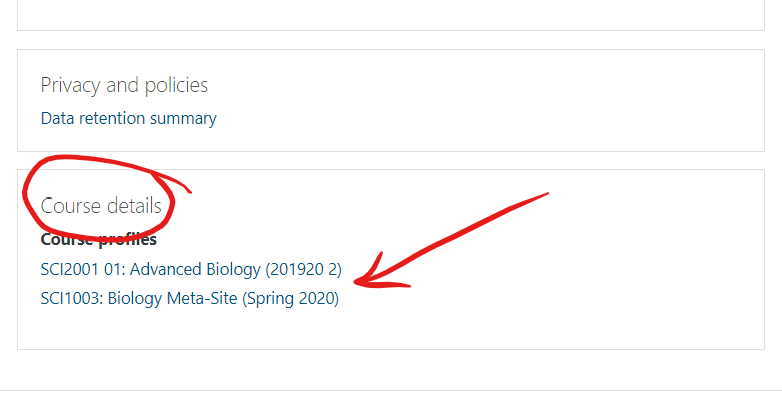
3. Once the new page has loaded, look for the Reports pane, in the right-center pane.

4. Selecting "Today's logs" will show you all of your activity for the day in a table format:
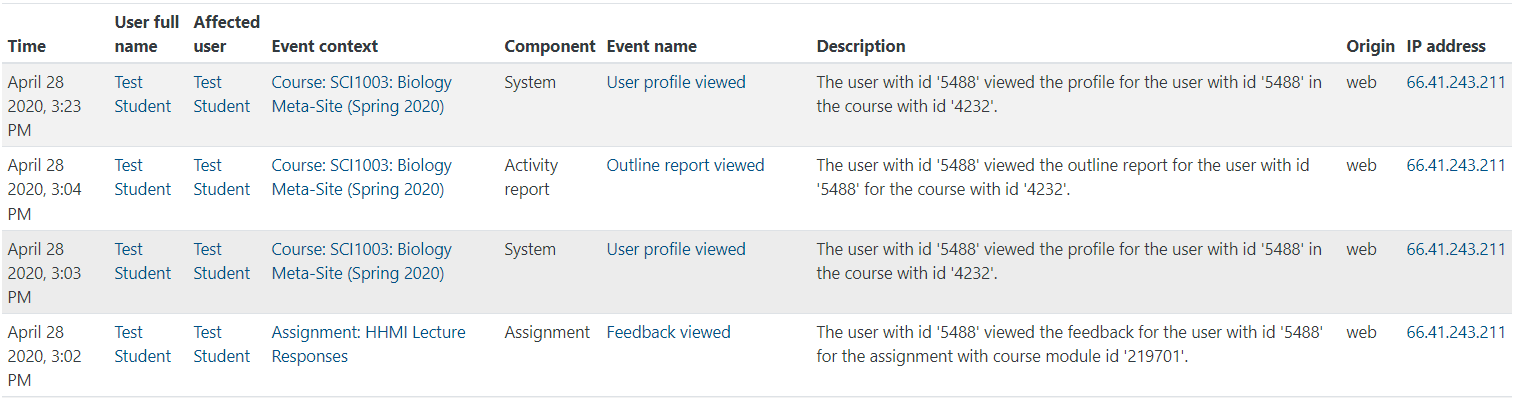
5. Selecting "All logs" will show you the activities for the entire term. (The view is identical to the one above, but with more data shown.)
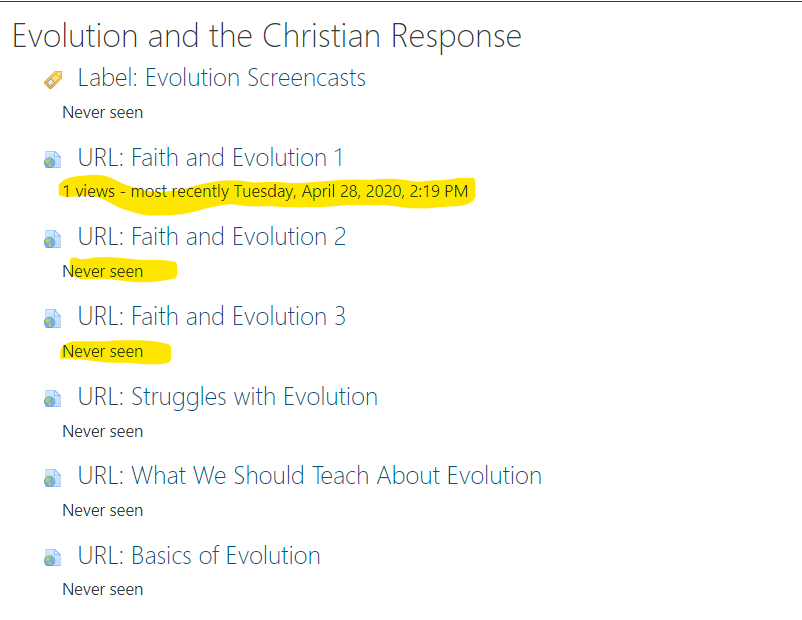
6. Selecting "Outline report" will give you a snapshot of activity, organized according to the course organization.
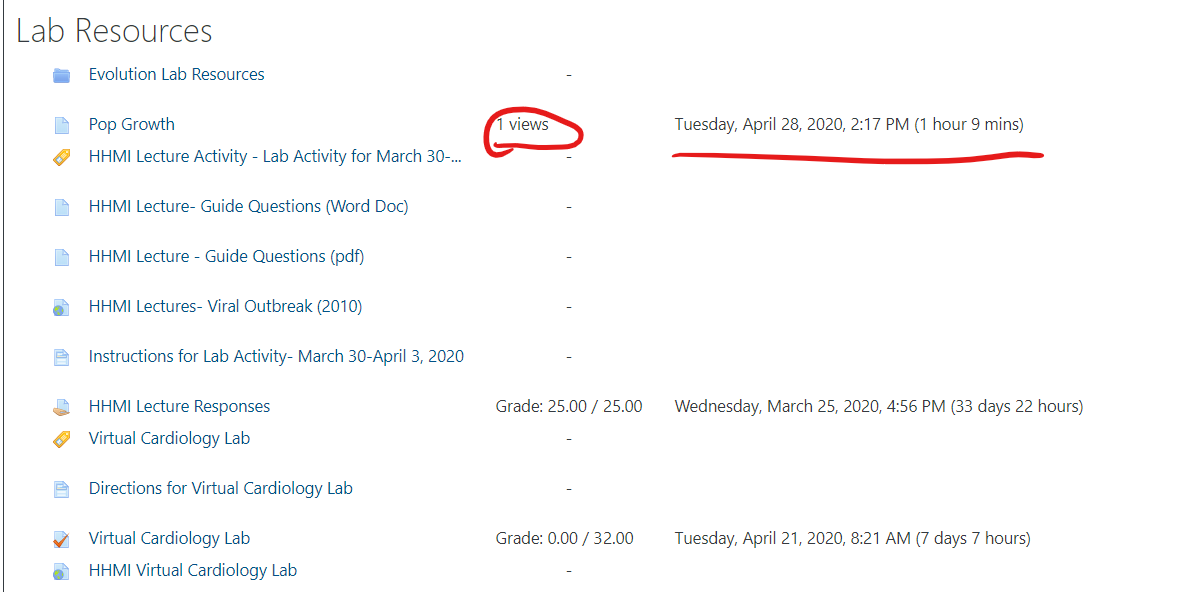
7. Selecting "Complete report" will show ALL of the items in the course (including items that don't require attention, like labels) and what activity has taken place:
8. You can also access your Gradebook, for any of your courses, from this page.
Accessing Your Course
To access your online courses in Moodle, you need to log in to the Moodle website by doing the following:
Instructions
- From an internet browser (Chrome or Firefox are recommended) go to moodle.mlc-wels.edu.
- A screen requesting your username and password should appear similar to the one shown below.
- Your Moodle username and password are the same as your MLC Portal username and password. Please see the Getting Started page if you need assistance with this information.
- Once you have entered your username and password, click Log in.
- Your Moodle Dashboard will appear, along with a list of the courses you're enrolled in. Please see the rest of Navigation and Features for more information about navigating in Moodle.
- If you run into any issues, please visit the Moodle Help page for contact information.
