Moodle for Students
Tips and instructions for students using Moodle in online and face-to-face courses at MLC.
- Moodle Overview
- Your Moodle Account
- Accessing Moodle
- Navigation and Features
- Moodle Dashboard
- Course Navigation
- Communicating in Moodle
- Text Editor Features
- Viewing Reports and Logs
- Accessing Your Course
- Common Moodle Tasks
- Downloading Course Content
- Participating in Discussion Forums
- Replying to Q and A Forums
- Submitting an Assignment
- Checking Grades and Feedback
- Viewing Final Grades
- Frequently Asked Questions
- Why can't I see my course?
- Why can't I get into Moodle?
- What email address does Moodle use?
- How do I know if my instructor received my assignment?
- How do I check my grades?
- Why can't I reply to the discussion forum?
- Can I use Google Docs?
- What is the difference between a discussion forum and an assignment?
- How do I contact my instructor?
- Who do I ask for Moodle help?
- How do I fill out my course survey?
- What do I do if the area to turn in my Google assignment on Moodle is too tiny to click?
Moodle Overview
Moodle is the learning management system (LMS) used at Martin Luther College. Graduate, Continuing Education, and other online students will utilize Moodle to access course content, submit assignments, communicate with classmates, view grades, and more. Moodle can also be used in undergraduate and face to face courses at the discretion of the instructor.
MLC KnightHelp contains documents and instructions for the most commonly used features of Moodle. If you need additional help, please contact your course instructor first. If they are not able to solve the issue, please contact MLC IT Services at support@mlc-wels.edu.
Your Moodle Account
Account Creation
A Moodle account is automatically created for everyone who enrolls at MLC. Account information will be sent to the email address you provided after your registration has been processed. Your Moodle username and password are the same as the username and password used for Portal. Please see the Getting Started page for more information.
Updating Your Profile
Your Moodle Profile allows your classmates and instructors to know more about you.
Accessing Your Profile Page
- Visit moodle.mlc-wels.edu and enter your username and password.
- Click the arrow in the top right corner of the screen next to your username and photo or photo placeholder and choose Profile.
User Details
- This section shows the user information that is currently in your profile.
- Click Edit profile to edit the information in your profile.
- Continue reading below for more information about each of the profile sections.
- The settings in the Additional names, Interests, and Optional sections do not need to be adjusted.
- When you are finished updating your profile, scroll to the bottom of the screen and click Update profile.
General
-
-
- First Name/Last Name: This information is populated from the MLC database upon student registration. If you would like to add a nickname or a pronunciation of your name, please scroll down to the Additional names section.
-
Email address: Moodle will use this email address for all notifications and announcements. The default setting is your MLC email account.
- If you are a first-time student, please see these instructions to activate your MLC email account.
- Email Display: By default, this is set to Allow only other course members to see my email address. It is suggested that you keep this setting.
- City/Town: Fill in with the city and state where you are located.
- Timezone: Leave this set to Server timezone (America/Chicago), which is the timezone for MLC.
- Description: You may fill in a short description of your professional work history or education. Please do not write a paragraph of biography information here. All online courses should have a separate introductory activity where you will share more information about yourself.
-
User (Profile) Picture
-
-
- If this section is not already expanded, click the words User picture to expand it.
- Please only use ID-style pictures in this section, not pets, logos, etc.
-
To Add/Edit Your Profile Picture:
- Locate an ID-style picture of yourself on your computer. For best results, make sure the image is less than 2000 x 2000 pixels. The file size cannot be larger than 2MB.
- If you have an existing picture you wish to replace, check the Delete picture box underneath your existing picture.
-

-
-
-
- To upload a new picture, either drag and drop the file into the box with the blue arrow or click the Add
 icon.
icon. - If you click the Add icon, a file picker window will appear. Select Upload a file, then Choose File, locate the picture you would like to upload, and click Open. The path to the picture will appear in the Attachment box. Select the blue Upload this file button at the bottom.
- To upload a new picture, either drag and drop the file into the box with the blue arrow or click the Add
-
-

-
-
-
- The new picture should appear in the New Picture area.
-
-
Miscellaneous
- This section is a quick way to view all of your blog entries, forum posts, or forum discussions across all of the classes you're currently enrolled in.
Reports
- Grades Overview: Shows the current grades across all of the classes you're currently enrolled in.
Mobile App
- Provides a link to the Moodle mobile app. For more information on using that app, please see this page.
Setting Your Preferences
Setting your preferences allows you to control a variety of notification and viewing options. Changes made to your preferences will impact every course that you're enrolled in.
Accessing Your Preferences
- Visit moodle.mlc-wels.edu and enter your username and password.
- Click the arrow in the top right corner of the screen next to your username and photo or photo placeholder and choose Preferences.
- There are four different sections of preferences. Keep reading below for more information about each section.
User Account
Edit Profile
- Takes you to the page to edit your personal information. See this page for more information.
Change Password
- This link will redirect you to the MLC Portal. Follow the prompts on the screen to change your password.
- Note that changing this password will change it for both Portal and Moodle.
Preferred Language
- Changing this option will change all Moodle headers and options to the chosen language. It will not translate course content into a different language.
Forum Preferences
- Changing these preferences will change your emails and tracking for most discussion forums.
- Some discussion forums have default subscription and tracking options that cannot be changed by users.
-
Email digest type: chooses how emails about discussion forum posts will be sent. This applies only to discussion forums that you subscribe to.
- No digest: You will receive an individual email notification for each discussion post.
- Complete: You will receive one email daily (per discussion forum) with the full text of the posts within the email.
- Subjects: You will receive one email daily (per discussion forum) with only the subjects of the discussion posts.
- Forum auto-subscribe: if yes is chosen, you will automatically be subscribed to a forum when you post to it.
- Forum tracking: if yes is chosen, Moodle will highlight those posts you have not yet read each time you enter a discussion forum.
- When sending forum post notifications: if yes is chosen, posts will be marked read when you read the notifications.
Editor Preferences
- Allows you to change the text editor options you will have in discussion forums and other online text areas. The default editor contains all the tools you should need for your course.
Course Preferences
- Changes the activity chooser option. This only applies to instructors and other course creators.
Calendar Preferences
- Time display format: Switch between 12 and 24 hour time. The default will match the chosen language.
- First day of the week: Whichever day is chosen here will be displayed first in your Moodle calendar.
- Maximum upcoming events: Adjusts the number of events shown in the upcoming events box in a course. Using a large number could take up a lot of screen space.
- Remember filter settings: if yes is chosen, Moodle will keep the same event filter settings between each use.
Message Preferences
- Unlike other preferences, these settings appear in a toolbar on the right side of the screen.
- Privacy: Choose if you want classmates and contacts or only contacts to contact you via Moodle messenger.
- Notification Preferences: If email is enabled, you will receive email notifications for message.
- General: If Use enter to send is enabled, typing enter will send the message instead of having to click the send button.
Notification Preferences
- This area lets you choose how you want to receive notifications for a variety of events on Moodle.
- For each event, there are two main types of notifications, Web and Email.
- Web: Notifications are sent within the Moodle website or app. Notifications will be indicated by a red number next to the bell in the upper right corner of the screen.
-
Email: Notifications are sent to the email address that is listed in your Moodle profile.
- Clicking the Gear in the email column allows you to switch between Plain text and HTML emails.
- Each notification type is also divided between Online and Offline.
- Online: How you receive notifications when you are logged in to Moodle.
- Offline: How you receive notifications when you are not logged in to Moodle.
- For each event, click the red/green off/on buttons to toggle between the settings.
- If you only want to receive email notifications: set all the buttons in the Web column to Off and all the buttons in the Email column to On.
- If you only want to receive notifications within Moodle: set all the buttons in the Web column to On and all the buttons in the Email column to Off.
- If you want to receive email notifications when you're not logged in and Moodle notifications when you are: set all the buttons in the Web Online column to On, the Web Offline column to Off, the Email Online column to Off, and the Email Offline column to On.
- Each event can have its own setting.
- You can turn all the notifications to Off by clicking the Disable notifications checkbox, but it is recommended that you do not do so.
Accessing Moodle
Using a Computer
MLC's Moodle site is available from any device with an internet browser and internet connection. If you are using a mobile device (tablet or smartphone) you can access Moodle from the browser or from the Moodle App.
Instructions
- Open the internet browser on your computer. It is recommended that you use the latest version of Chrome, Firefox, Microsoft Edge, or Safari.
- Navigate to moodle.mlc-wels.edu
- Log in using your MLC account.
- If you already know your username and password, enter them in the appropriate boxes and click Log in.
- If you do not, please see the section on Initial MLC Account Credentials.
- If you had a username and password previously, but have forgotten one or both, please see this section.
- If you need additional assistance, please contact MLC IT Services.
- Use your Moodle Dashboard to navigate to your courses and Moodle profile.
Mobile Device
Moodle offers a mobile app that allows students to view course content and complete many course activities from a mobile device. The app is available from Google Play and the Apple Store.
Instructions
- Download and install the app for your device. Visit the Moodle App Download page or search your device's app store.
- Visit the Moodle App Documentation page for tips and features.
- The first time you open the app, it will ask you for the URL or site address of your Moodle site. Enter moodle.mlc-wels.edu/moodle
- Enter your Moodle username and password.
For additional help with the Moodle App, please see this FAQ page.
Navigation and Features
Moodle Dashboard
After logging into Moodle, the Dashboard is the first screen that you will see. The dashboard will show all the visible classes that you're currently enrolled in. The dashboard is also customizable so you can quickly access your current courses and other information.
Dashboard Overview
The following is based on the default view of the Dashboard and does not reflect any customizations you might have made.
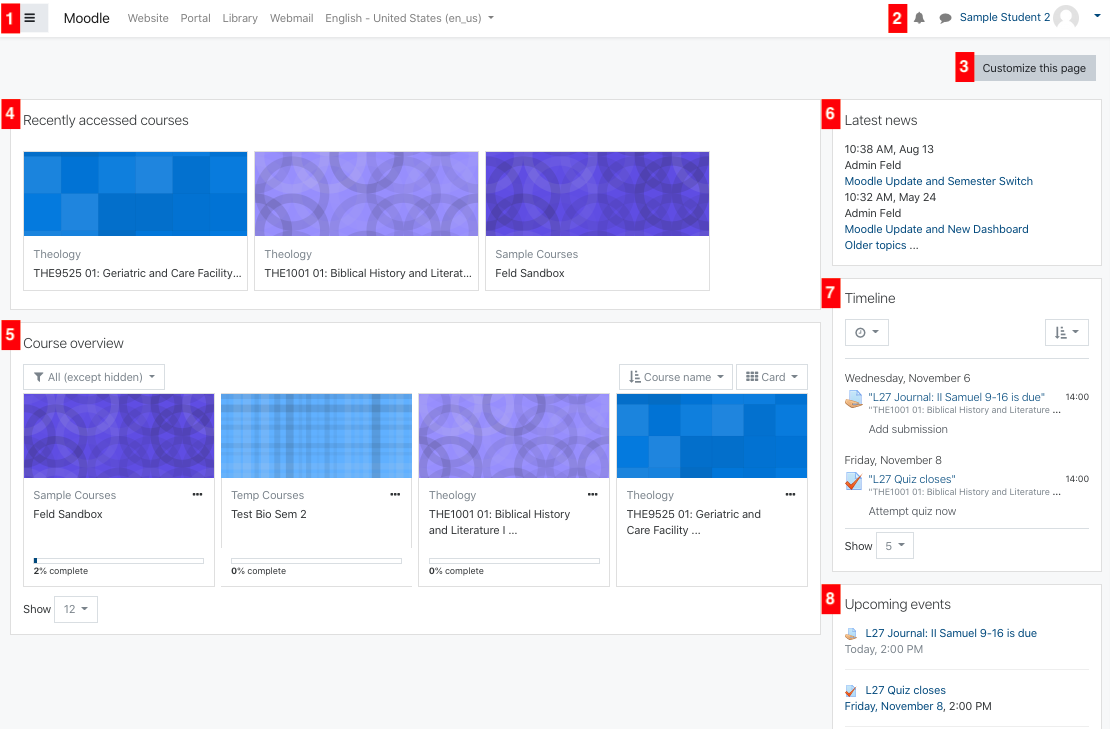
1. Top Left Toolbar
-
 : shows/hides the left-hand menu.
 - Moodle: click to go back to your Dashboard from any other Moodle page.
- Website: click to go to the MLC Website.
- Portal: click to go to the MLC Portal.
- Library: click to go to the MLC Library section of the MLC Website.
- English: click to quickly change your displayed language.
2. Top Right Toolbar
-
 : click to see your notifications.
 -
 : click to access Moodle Messenger.
 - Your Name/Photo: click to get back to the Dashboard, edit your profile, view your grades, access Moodle Messenger, adjust your preferences, or log out of Moodle.
3. Customize This Page
- Click here to customize your dashboard.
4. Recently Accessed Courses
- Shows the courses that you have recently accessed. This list is automatically populated.
5. Course Overview
- Shows all the visible courses that you're currently enrolled in.
- Only courses that instructors have made available are visible here. See the FAQs for more information.
-
 : click to adjust the filter for the course overview section.
- All (except hidden): shows all courses except for those that either you or your instructor have hidden from view.
- In Progress: shows all visible courses in the current semester.
- Future: shows all visible courses in future semesters. Note that due to current MLC practice, you likely will not see any courses in this view.
- Past: shows all visible courses from past semesters. Note that due to copyright concerns, instructors typically hide courses a few weeks after the end of the semester.
- Starred: shows all courses that you have marked with a star.
- Hidden: shows all courses that you have hidden.
-
 : click to adjust how courses are sorted in the course overview section.
- Course Name: sorts courses alphabetically by the name of the course.
- Last Accessed: sorts courses based on the last time you accessed the course.
-
 : click to adjust how the courses are displayed in the course overview section.
 - Show: click to adjust how many courses are shown on the page. If you have more courses than the chosen number, either choose a bigger number to show more courses or use the arrows that will be in the bottom right corner of the Couse Overview section to see the next page of courses.
6. Latest News
- Shows news posts from the Moodle administrator. Check here for information about scheduled Moodle maintenance, updates, and new features.
7. Timeline
- If your courses have items with dates attached to them, the timeline shows the upcoming items for all of your courses.
-
 : click to change which items are visible based on their due date.
 -
: click to sort by date or by course.
- Show: click to adjust how many items are visible in the list.
8. Upcoming Events
- Shows the calendar events for all of your courses. This is only populated if your course utilizes the course calendar.
Customize Your Dashboard
Editing Existing Blocks
- To begin customizing your dashboard, click Customize this page (#3 in the image above) after logging into Moodle.
- After you click, two additional icons will appear within each page block.
-
 : click or click and drag to rearrange the block on the dashboard. Blocks can be located in the main center area or in the smaller column on the right. On a narrow browser window or mobile device, the right column blocks will appear at the bottom of the page.
 -
 : click to access the settings for the individual block.
- Configure block: brings you to the options specific to the block.
- Hide block: hides the block from your Dashboard.
- Delete block: removes the block from your Dashboard.
- When you're finished customizing your Dashboard, click Stop customizing this page in the top right corner. The customization icons will disappear.
- To reset the Dashboard to the settings shown in the image above, click Reset page to default.
-
Adding New Blocks
- To add a new block to your dashboard, click Customize this page (#3 in the image above) after logging into Moodle.
- If the left menu is hidden, click to make it visible.
- Click Add a block at the bottom of the left menu.
- Choose the type of block you'd like to add from the resulting list.
- See this list for explanations of the available blocks. Note that not all of the blocks listed are available for student use.
- After you click on the name of the block you'd like to add, it will appear at the top of the column on the right. Rearrange the blocks and edit the block's settings using the directions above.
Course Cards
The following is what a course card looks like if the Dashboard is set to show Cards. Similar features are available in the List or Summary views.
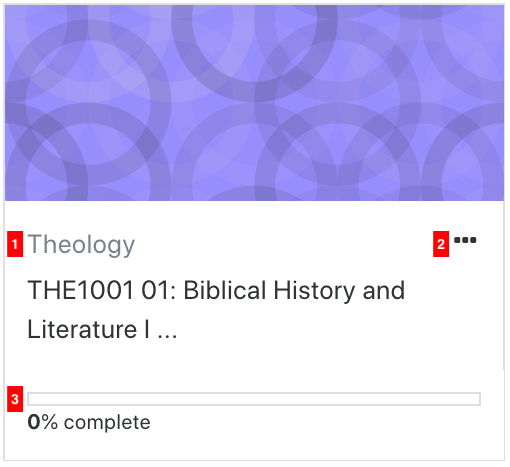
- The name and department of the course. To view the full course name, choose the List or Summary views.
- Click here for options to Star or Hide the course. Starred and hidden courses can then be filtered.
- If course completion is enabled, this shows the percentage of course activities that you've completed.
Course Navigation
After you click on a course in your Moodle Dashboard, you will be taken to the course home page. The content of each course home page will vary depending on how your instructor has designed the course, but the following features are typical of each course.
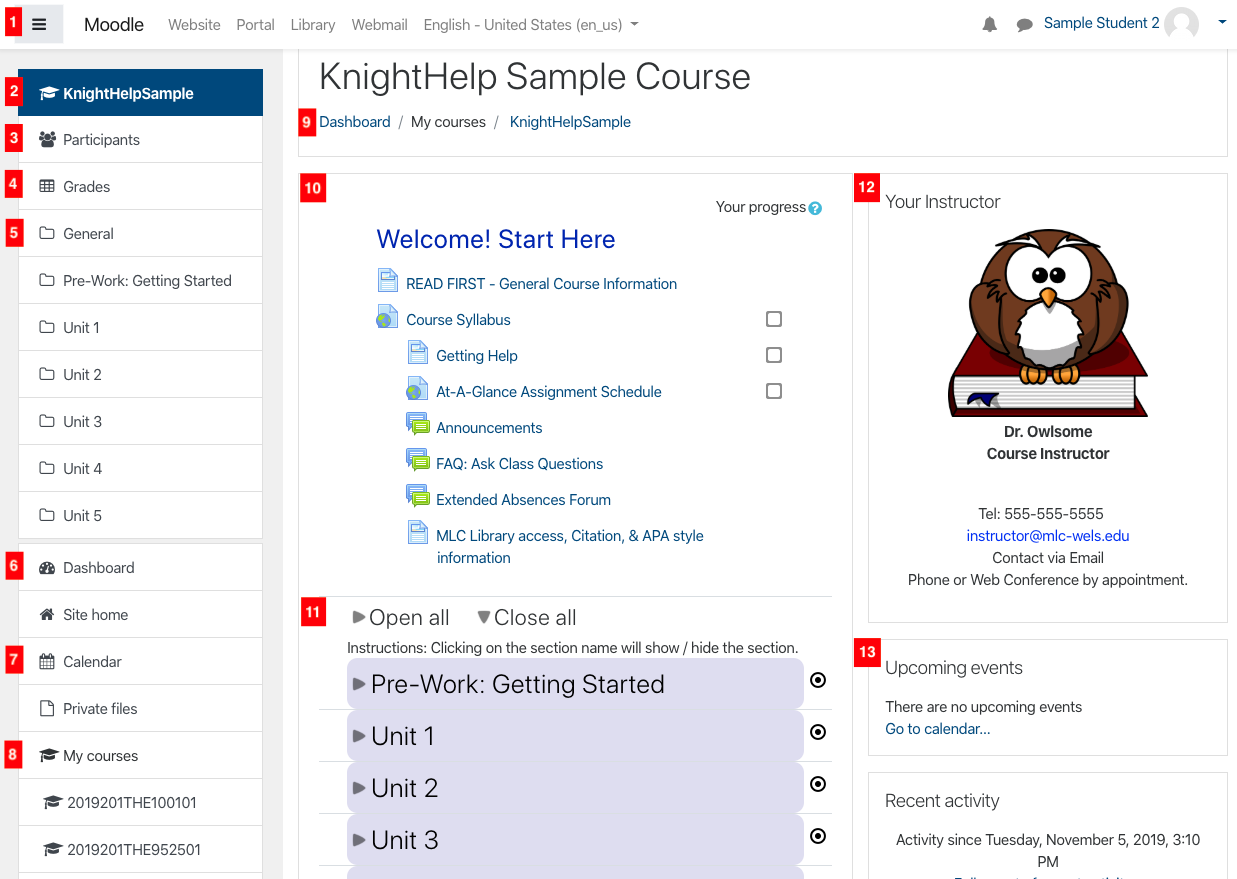
1. Moodle Toolbar: this toolbar remains the same on any Moodle page. Its features are described on the Moodle Dashboard page.
2. ![]() : the course short name will appear here. You can click here from any course page or activity to return to the course home page.
: the course short name will appear here. You can click here from any course page or activity to return to the course home page.
3. ![]() : click here to view a list of your classmates and instructor for this course.
: click here to view a list of your classmates and instructor for this course.
4. ![]() : click here to view your grades for this class. Visit the page on Checking Grades and Feedback for more information about this section.
: click here to view your grades for this class. Visit the page on Checking Grades and Feedback for more information about this section.
5. ![]() : each section in the course will be listed here. Instructors often organize their courses by topic, lesson, or unit.
: each section in the course will be listed here. Instructors often organize their courses by topic, lesson, or unit.
6. ![]() : click here to go back to your Moodle Dashboard.
: click here to go back to your Moodle Dashboard.
7. ![]() : click here to view your Moodle Calendar.
: click here to view your Moodle Calendar.
8. ![]() : the rest of your current courses will appear here. Click the course short name to quickly switch between course pages.
: the rest of your current courses will appear here. Click the course short name to quickly switch between course pages.
10. Course Information: this section typically contains overall course information like the syllabus and announcement forum. The content will vary for each course.
11. Course Sections: each course section contains the resources for that topic, lesson, or unit. Click the arrow to expand the section and see its contents. See the Common Moodle Tasks chapter for more information.
13. Instructor Information: many online courses will have instructor information on the course page. Use this information if you need to contact your instructor.
14. Course Blocks: Additional course blocks will appear here depending on what the instructor has included in the course.
Communicating in Moodle
There are a variety of ways to communicate with your classmates and instructor in MLC courses. Please be sure to check the course syllabus to find your instructor's preferred method of communication.
Moodle Messenger
- Moodle Messenger is an instant messaging system within Moodle that can be used to communicate with instructors and classmates.
- Access Moodle Messenger by clicking the in the top toolbar from anywhere in Moodle.
- After opening the Moodle Messenger window, use the search box to find the person you wish to message. Note that you will only be able to contact Moodle users who are in your classes.
- Once a conversation has been started, you can star the conversation or add the user to your contacts so you can access the conversation quickly. You can also block or mute the user.
- Note that not every instructor or student checks Moodle Messenger frequently. Refer to the course syllabus for the most effective way to communicate with your classmates and instructor.
Text Editor Features
Nearly every text box in Moodle has a wide variety of formatting and editing features. Use the icons in the toolbar to access these features.

- Expands the toolbar to show the second row of icons.
- Changes the style of the text. These styles are predetermined by the Moodle administrator.
- Bold
- Italic
- Bulleted List
- Numbered List
- Insert Link
- Remove Link
- Add Image
- Add Media
- Record Audio
- Record Video
- Manage Embedded Files
- Underline
- Strikethrough
- Subscript
- Superscript
- Text Color
- Font Type
- Size
- Left/Center/Right Justify
- Decrease/Increase Indent
- Equation Editor
- Insert Special Characters
- Insert Table
- Clear Formatting
- Undo/Redo
- Accessibility Checker
- Screenreader Helper
- HTML View
- Fullscreen View
Viewing Reports and Logs
If your instructor has enabled this feature, you can get detailed reports about your activity in a Moodle course. Steps:
1. Log in to Moodle. Right from your Dashboard, before you enter the course, locate your User icon in the upper right corner. Use the down-arrow to select your Profile.

2. From your Profile page, locate your courses in the lower-left corner. Select the course for which you wish to view reports.
3. Once the new page has loaded, look for the Reports pane, in the right-center pane.

4. Selecting "Today's logs" will show you all of your activity for the day in a table format:
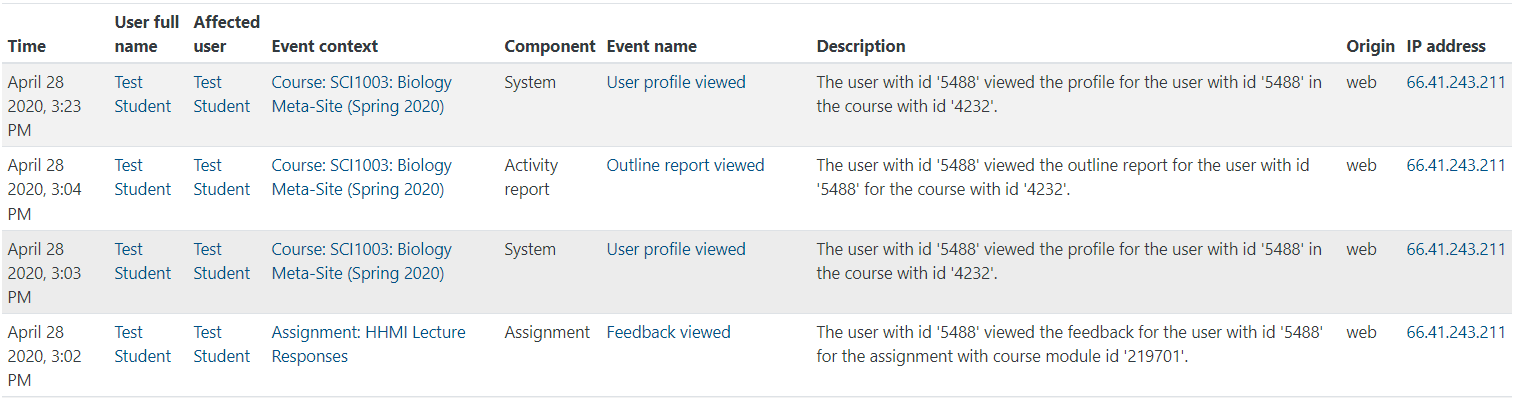
5. Selecting "All logs" will show you the activities for the entire term. (The view is identical to the one above, but with more data shown.)
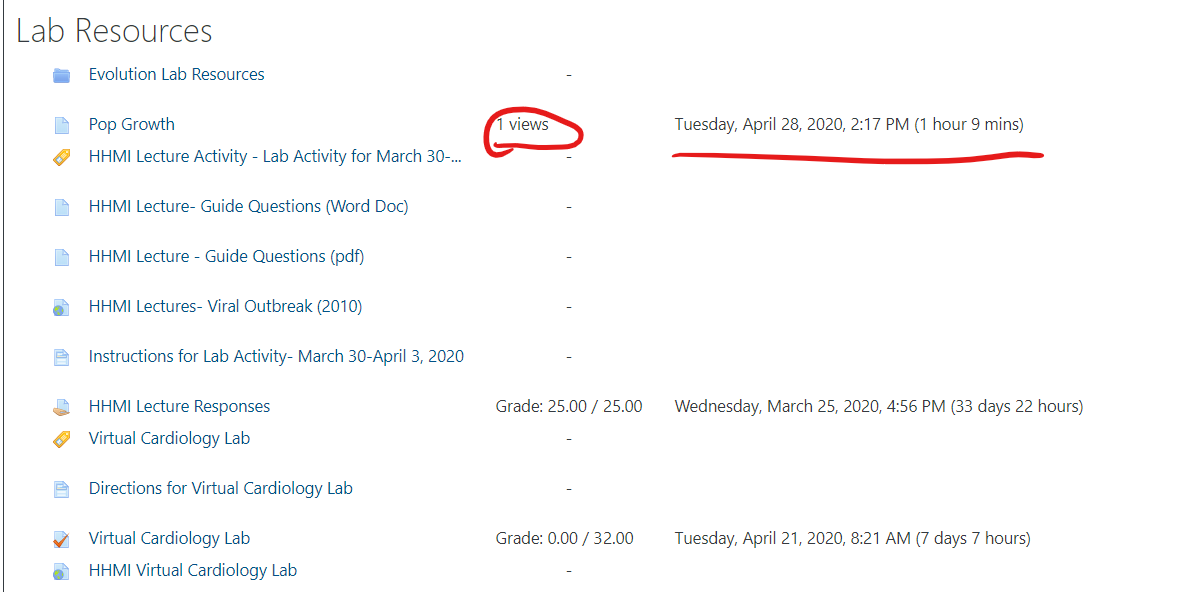
6. Selecting "Outline report" will give you a snapshot of activity, organized according to the course organization.
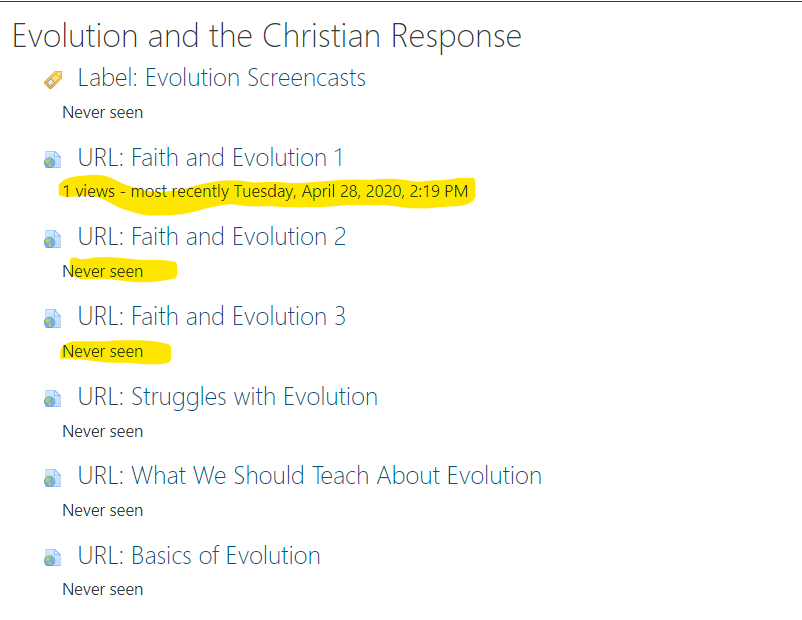
7. Selecting "Complete report" will show ALL of the items in the course (including items that don't require attention, like labels) and what activity has taken place:
8. You can also access your Gradebook, for any of your courses, from this page.
Accessing Your Course
To access your online courses in Moodle, you need to log in to the Moodle website by doing the following:
Instructions
- From an internet browser (Chrome or Firefox are recommended) go to moodle.mlc-wels.edu.
- A screen requesting your username and password should appear similar to the one shown below.
- Your Moodle username and password are the same as your MLC Portal username and password. Please see the Getting Started page if you need assistance with this information.
- Once you have entered your username and password, click Log in.
- Your Moodle Dashboard will appear, along with a list of the courses you're enrolled in. Please see the rest of Navigation and Features for more information about navigating in Moodle.
- If you run into any issues, please visit the Moodle Help page for contact information.

Common Moodle Tasks
Downloading Course Content
Instructors often provide course content to students in the form of PDFs, Word Documents, or PowerPoint presentations that can be downloaded and viewed. Please use the following instructions to download course content.
- Log into Moodle and enter your course site.
- Downloadable content can be identified by the icon to the left of the name. Some commonly seen icons are:
-
 - Microsoft Word Document
 -
 - Microsoft PowerPoint Presentation
 -
 - PDF
- PDF
-
- Click the icon or the name of the file to download the content to your computer.
- Depending on your computer settings, the file might automatically download to your downloads folder. You might also get a pop-up window asking where you'd like the file saved. Follow whatever process you normally use to download files to your computer.
- Locate where the file has been saved and use the appropriate program (i.e. Word or Adobe Acrobat Reader) to view the file.
- If you are unsure of what type of program should be used to open the file, check the icon next to the title on the Moodle Course page. If this does not help, contact your course instructor.
Participating in Discussion Forums
Discussion forums are often used by instructors to facilitate discussion about course topics or provide course announcements. Please read below to participate in a discussion forum.
Discussion Forum Overview
- Discussion forums are indicated by the speech bubble
 icon.
icon. - Online courses typically have several standard discussion forums.
- Announcements: A one-way forum for the instructor to make announcements to the whole class. You cannot post in this forum. You will receive an email of all announcements posted to this forum.
- Instructor's Office: Many course instructors use this discussion forum for students to post questions about the course that may apply to the whole class. See the course syllabus and Moodle course page for specific information about how the instructor wants questions communicated.
- Extended Absences: Many course instructors will ask you to post in this forum if you are going to be away from the course site for a longer period of time. See the course syllabus and Moodle course page for specific information about how the instructor wants absences communicated.
- Instructions for other course-specific discussion forums will be found within the course content.
Posting in a Discussion Forum
- Log in to Moodle and enter your course site.
- Click on the discussion forum you want to post in.
- Instructions for what to post will often appear on the resulting page. You may also find posting instructions on the unit lesson page or course syllabus. If you are not sure about what to post, first check the course content and then contact your instructor.
- When you are ready to post in the forum, click Add a new discussion topic.
- If you do not see this option, it might be a Q&A Forum.
- On the next page, enter a subject for your discussion post in the top text box. The subject will appear on the discussion's main page.
- The main body of your post should go in the Message box underneath the subject. Please see the Text Editor Features page for more information about entering text.
- Please note that your Moodle account will time out after two hours of inactivity. If you feel it might take you longer than two hours to post, or if you need to leave your post and come back to it later, copy your post into a text document (Word or Google Docs) to save it and then paste it back in Moodle when you're ready to post.
- If you need to attach a file to your post, click Advanced and follow the instructions for adding a file.
- When you're done, click Post to forum.
- You will have 15 minutes before your post is finalized. If you want to edit your post, click the subject of your post and click Edit in the bottom right corner of your post. Once the 15 minutes are up, the edit option will no longer appear.
Posting Audio/Video in a Discussion Forum
- Follow the directions above to start your discussion post.
- In the Message box, click either the microphone or video camera icon to begin your recording.
- Please note that you need to have a microphone and webcam (for video) to use this feature. Most recent laptops come with both.
- Click the red Start Recording box.
- Your audio/video will start recording. If recording a video, you should see a camera preview in the box. The timer counts down the amount of time you have left.
- When you're finished, or if you need to start over, click Stop Recording.
- You can preview your recording if desired. If you wish to try again, click Record Again and follow the same process.
- Once you are satisfied with your recording, click Attach Recording.
- Your audio/video will start uploading to the discussion forum. Depending on the length of the media and internet connection speed, it could take some time.
- You can also add text or images to your discussion post.
- When you're done, click Post to forum.
- You will have 15 minutes before your post is finalized. If you want to edit your post, click the subject of your post and click Edit in the bottom right corner of your post. Once the 15 minutes are up, the edit option will no longer appear.
Replying in a Discussion Forum
- Log in to Moodle and enter your course site.
- Click on the discussion forum's name.
- Click on the subject of the discussion post you want to reply to.
- After you have read the post, click on the Reply button in the bottom right corner of the post.
- A text box will appear underneath the post. Write your reply in the box and click Submit.
- If you want more text formatting options, click Advanced.
- You will have 15 minutes before your reply is finalized. If you want to edit your reply, click the subject of the post and click Edit in the bottom right corner of your reply. Once the 15 minutes are up, the edit option will no longer appear.
Other Discussion Forum Options
- You can subscribe to most discussion forums by clicking the gear in the upper right corner and choosing Subscribe to this forum. You will then receive emails when people have posted to this forum, based on your preferences in your Moodle profile. Note that your instructor can override these settings in individual forums. You are automatically subscribed to the course announcement forum.
- Clicking the star to the left of a discussion subject will star the discussion thread. This can be useful when tracking which posts you've replied to.
- There are several options for how the post and replies are organized. You can set your preference by clicking the subject of a discussion post and using the dropdown menu at the top of the post. See the Moodle Docs about display options for more information.
- Moodle will track how many unread posts and replies you have in each forum. You can turn this off by clicking the gear in the upper right corner and choosing Don't track unread posts.
Grades in Discussion Forums
- Often instructors will assign ratings to discussion forum posts and replies.
- Once the instructor has graded the post or reply, the rating will appear in the bottom left corner of the post.
- Grades can also be viewed from the grades
 option in the left menu.
 - Instructors often use the sum of ratings option for discussion posts, where the points awarded for your initial post and replies are added together to make your final grade. Please note that if your instructor grades the initial posts before the replies are due or if you happen to check your grade before your instructor is finished going through all the posts and replies, your grade might seem lower than expected. Check the bottom left corner of your initial posts and replies to see if all of them have been rated yet.
- Instructors can reply either to the whole class within a post, or to just you. If a reply is private, a message will appear above the reply indicating that you are the only one who can see the reply. Students do not have the option of replying privately to other students or to the instructor. If your instructor posts a private reply you'd like to respond to, please see the course materials for how your instructor would like to be contacted.
Replying to Q and A Forums
When instructors use a Q and A Forum, the process to reply to the forum prompt is slightly different. Please see the instructions below for how to post in this type of forum.
Instructions
- Enter the course in Moodle and click on the Discussion Forum. If it is a Q and A Forum, a blue box will appear under the forum title indicating this.
- You should see one post from your instructor. Click the subject to enter that post.
- Read the prompt your instructor has written and click Reply in the bottom right corner.
- Type your reply in the resulting textbox. For more formatting options or to enter pictures, audio, or video, click the Advanced button.
- When you are done with your response, click Submit.
- You have 15 minutes to make any edits to your response.
- You will not see your classmates' posts immediately after posting. You are able to see them after the 15-minute editing window has ended. If you are not able to see them, refresh your browser page or come back to the discussion later.
- Once you see the posts from your classmates, you can reply to classmates as you do in a typical form. See the instructions from your instructor for specific requirements.
- Note that instructors might post more than one question that needs your reply. Additional questions will appear on the first page of the discussion forum. See the assignment directions for specific instructions.
Submitting an Assignment
Moodle assignments are a common way students submit files to instructors for grading. These files might include documents, slide presentations, videos, images, etc. The pink assignment icon ![]() indicates where the assignment should be turned in.
indicates where the assignment should be turned in.
Adding a File
- Log into Moodle and click on your course.
- Locate the assignment name you want to turn in and click either on the assignment name or the assignment icon.
- Instructions for the assignment might be included on the next screen. Instructions might also be listed in the lesson guide sheet. If you are unsure of the instructions for the assignment, please get in touch with your course instructor.
- Click the Add submission button near the bottom of the screen.
- The next screen is where you will add your completed file to the assignment. There are two options for how to do this.
- Locate the file on your computer and drag and drop the file into the box with the grey arrow. You can do this by clicking on the file on your computer desktop or in the file explorer and dragging the mouse cursor to the box with the blue arrow on the Moodle page. You can let go of the mouse when the dotted line around the box turns blue.
- Click the add file icon in the upper left corner of the file submission area and use the file picker to locate your assignment.
- Repeat if you need to add more files to your assignment. Thumbnails of all the files to be turned in will appear in the file submission area.
- Click Save changes.
- Your assignment has now been submitted. Your instructor will be notified that your assignment is complete and will be able to view the file(s) you have turned in.
Deleting a File
Follow these instructions to delete a file prior to submitting the assignment.
- Click on the thumbnail in the file submission area of the file that you want to delete.
- On the resulting window, click Delete near the upper left corner.
- Click OK on the confirmation screen.
- The file will disappear from the file submission area. Note that this only deletes the file from the file submission area, not from your computer.
- Follow steps #4-5 above to add the correct file to the assignment.
Editing a Submission
Follow these instructions to edit a file after submitting the assignment. Note that this option is only available if the instructor allows it for the assignment.
- Locate the name of the assignment you want to turn in and click either on the assignment name or the assignment icon.
- At the bottom of the screen, click Edit submission. Note that this button will only appear if the instructor allows this option for the assignment.
- This will bring you to the file submission area. Follow the steps for deleting a file. Then add a new file following the instructions above.
Deleting a Submission
Follow these instructions to delete a file after submitting the assignment. Note that this option is only available if the instructor allows it for the assignment.
- Locate the name of the assignment you want to turn in and click either on the assignment name or the assignment icon.
- At the bottom of the screen, click Remove submission. Note that this button will only appear if the instructor allows this option for the assignment.
- Click Continue on the confirmation screen to remove the submission.
- Your instructor will see that you have previously submitted something, but will no longer be able to see what you previously submitted.
- Click Edit submission and use the file submission area to add a new file to the assignment.
Online Text Submission
Follow these instructions to submit online text for an assignment. Note that this option is only available if the instruction allows it for the assignment.
- Locate the name of the assignment you want to turn in and click either on the assignment name or the assignment icon.
- If online text submission is an option for the assignment, a textbox will be visible underneath the file submission area.
- Type your response in the textbox. Additional formatting options can be accessed by clicking the down arrow in the upper left corner of the textbox. Note that if your Moodle session times out (this happens after 2 hours of inactivity), your entry will not be saved. If your assignment will take longer than two hours, consider using another program to write your entry and then copy and paste the text into the online textbox.
- After you are done typing, click Save changes.
- Your assignment has now been submitted. Your instructor will be notified that your assignment is complete and will be able to view the text you have turned in.
Possible Errors
-
Document filetype cannot be accepted
- The file being uploaded does not match the file type that the instructor has specified for the assignment. For example, if the assignment asks for a .docx (Word) file, you will not be able to upload a PDF or other text document. The accepted file types are listed underneath the file submission area. For questions regarding the accepted file types, please contact your instructor.
Checking Grades and Feedback
Viewing Final Grades
After your instructor has submitted your final grade for a course, that grade can be viewed on Portal. You can also access grades from previous semesters through Portal.
Grade Report
- Visit portal.mlc-wels.edu and log in using your MLC username and password.
- Choose Grades from the top menu and click Grade Report.
- Your grades for the current semester will be displayed. Click on the blue semester heading to see grades from previous semesters.
Unofficial Transcript
- Visit portal.mlc-wels.edu and log in using your MLC username and password.
- Choose Grades from the top menu and click Unofficial Transcript.
- Your unofficial transcript for the courses you've taken at MLC will be displayed. Please see the MLC website for information on how to request an official transcript.
Grade Card
Grade cards are only issued for Continuing Education Courses. Grade cards are printable and can be used to provide proof of credit or clock hours for licensure or other certification purposes.
- Visit portal.mlc-wels.edu and log in using your MLC username and password.
- Choose Grades from the top menu and click Grade Card.
- The grade cards for the continuing education courses you've taken at MLC will be displayed.
Frequently Asked Questions
Why can't I see my course?
For online classes, the Moodle course is typically available a few days before the start of the semester. If you cannot find your Moodle course on your dashboard, there are several things to try.
- Check your student schedule on Portal to make sure you are enrolled in the course.
- Check the filter setting on your dashboard and make sure it is set to all (except hidden).
- Adjust the number of courses being shown on your course overview or navigate to the next page(s) of your course list if applicable.
- Check for hidden courses by changing the filter setting on your dashboard.
- If the course has not yet started, check your email (personal and MLC mail) for information from your instructor about when the course will be open.
- Contact your instructor for information about when the course will be open. Instructor email addresses are available in the MLC Faculty Directory.
If none of the above options are successful and your course has either already started or is scheduled to start in the next three days, please contact MLC for help.
Why can't I get into Moodle?
If you are not able to get into Moodle, there are a number of possible reasons. Please read the sections below to troubleshoot the issue.
Local Connection Issues
- If the internet connection in the location where you're working is down, you will not be able to get into Moodle.
- Check another website to see if you are able to access it. It's best to try accessing a website that you don't usually go to.
- If you are not able to access another website, continue with the next step.
- If you are able to access another website, skip to the next section.
- Try using a different device (perhaps a smartphone or tablet) to see if the issue is specific to your device.
- If you are not able to access Moodle or another website from a different device, the issue is likely with your local internet connection. You'll need to contact your local computer guru to address the issue.
- If you are able to access Moodle or another website from a different device, the issue is likely with your first device. You'll need to contact your local computer guru to address the issue. You can potentially keep working on your second device. The Moodle App can help facilitate this.
MLC Connection Issues
- If you can get to other websites, but not the MLC Moodle website, it is likely an issue with the MLC connection, either planned or unplanned.
- Check your email for a Moodle announcement regarding planned Moodle outages and upgrades.
- Check the MLC Network Status page for any updates. This page should be available even if the internet is down at MLC.
- If you are able to access the MLC Moodle website but are not able to log in, it is potentially an issue with your password or username. See the MLC Account Information page for instructions on how to reset your password and/or retrieve your username
If none of the above options describe your situation, please contact MLC for help.
What email address does Moodle use?
Moodle notifications get sent to whatever email address is set in your Moodle profile. By default, that email address is set to your MLC email address. It is encouraged, especially for undergraduates, to keep the email address set to your MLC email address. However, if you would like notifications to be sent to a different email address, you can do so by editing your Moodle Profile.
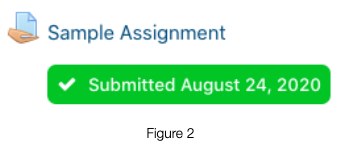
How do I know if my instructor received my assignment?
Typically, instructors will use the Assignment ![]() feature if you're supposed to turn in a document. If you haven't submitted it yet, it will look like figure 1 below on your course page. Note that the due date will only appear if your instructor has set one.
feature if you're supposed to turn in a document. If you haven't submitted it yet, it will look like figure 1 below on your course page. Note that the due date will only appear if your instructor has set one.
After you have submitted the assignment, your view will change to look like figure 2 below. The date in the green box reflects the date that you submitted the assignment. Your instructor will be able to see the date and time that your assignment was submitted. You can edit or resubmit your assignment (if the instructor allows) by clicking the assignment name again. The date will update to reflect the new submission.
How do I check my grades?
Grades for individual assignments and activities can be viewed either within the assignment/activity itself, or from the grades screen.
To view your grades from the grade screen:
- Log into Moodle, and access your course.
- Click Grades from the left-hand menu. If that menu does not appear, click
 in the upper left corner.
 - For each assignment that has been graded, you will see the grade and feedback as pictured below.

- You can also click on the name of the assignment (either from the grades screen or from the main course page), scroll down, and view the feedback from your instructor.
- This view will also show you the link to any annotations that your instructor made on your document. Click the document link (circled in red) to view the annotations.

Why can't I reply to the discussion forum?
Can I use Google Docs?
What is the difference between a discussion forum and an assignment?
How do I contact my instructor?
Who do I ask for Moodle help?
Self-Help
- This website (help.mlc-wels.edu) should be your first stop for Moodle help. Use the search bar above to quickly locate pages related to your question.
- You can also check the Moodle course EDT0001: Introduction to Online Learning if it still appears in your course list.
- Check the course syllabus or other resources the instructor has provided.
Help from Others
- Contact a classmate or your instructor via email or Moodle messenger.
- Contact MLC IT Services.
- Contact the Director of Online Learning.
If you have questions regarding billing, course registration, or other topics outside of Moodle, please contact the MLC Graduate Studies and Continuing Education Office.
How do I fill out my course survey?
Graduate and undergraduate courses make use of Portal for feedback surveys. These surveys are used by MLC and individual faculty members to improve our programs and courses. You will receive a notification from your instructor, on your Moodle course page, or on Portal if you have a survey to fill out.
Instructions
- Access the survey area of MLC's Portal by visiting https://portal.mlc-wels.edu/nwpp/surveys.php
- Log in to the Portal with your Moodle username and password.
- If you’re not prompted to log in, the login area is in the upper right.
- If you encounter difficulty entering the Portal, please contact the MLC IT Services help desk for assistance: helpdesk@mlc-wels.edu or 507-233-9100 during normal business hours.
- Select the survey for your course.
- Follow the instructions on the survey.
What do I do if the area to turn in my Google assignment on Moodle is too tiny to click?
Sometimes Google assignments in Moodle have formatting issues resulting in the box where you need to click to attach your assignment being too tiny to click. To fix this issue, try zooming out in your browser. Instructions are linked below for the most popular browsers, although Google assignments works best in Chrome.