Submitting an Assignment
Moodle assignments are a common way for students to turn in files to instructors for grading. These files might include documents, slide presentations, videos, images, and more. The assignment icon, a hand holding a piece of paper, indicates where the assignment should be turned in.
Adding a File
- Log into Moodle and click on your course.
- Locate the name of the assignment you want to turn in and click either on the assignment name or the assignment icon.
- Instructions for the assignment might be included on the next screen. Instructions might also be listed in the lesson guide sheet. If you are unsure of the instructions for the assignment, please contact your course instructor.
- Click the Add submission button near the bottom of the screen.
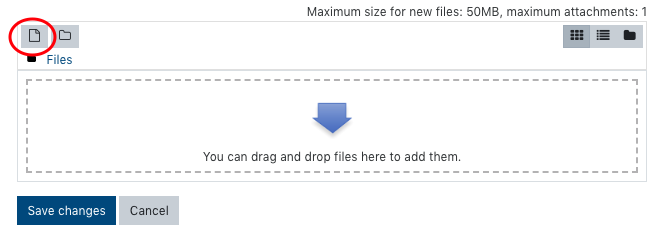
- The next screen is where you will add your completed file to the assignment. There are two options for how to do this.
- Locate the file on your computer and drag and drop the file into the box with the blue arrow. You can do this by clicking on the file either on your computer desktop or in the file explorer and dragging the mouse cursor to the box with the blue arrow on the Moodle page. You can let go of the mouse when the dotted line around the box turns blue.
- Click the add file icon in the upper left corner of the file submission area and use the file picker to locate your assignment.
- Repeat step #5 if you need to add more files to your assignment. Thumbnails of all the files to be turned in will appear in the file submission area.
- Click Save changes.
- Your assignment has now been submitted. Your instructor will be notified that your assignment is complete and will be able to view the file(s) you have turned in.
Deleting a File
Follow these instructions to delete a file prior to submitting the assignment.
- Click on the thumbnail in the file submission area of the file that you want to delete.
- On the resulting window, click Delete near the upper left corner.
- Click OK on the confirmation screen.
- The file will disappear from the file submission area. Note that this only deletes the file from the file submission area, not from your computer.
- Follow steps #4-5 above to add the correct file to the assignment.
Editing/Removing a Submission
Follow these instructions to edit or delete a file after submitting the assignment. Note that this option is only available if the instructor allows it for the assignment.
- Locate the name of the assignment you want to turn in and click either on the assignment name or the assignment icon.
- At the bottom of the screen, click either Edit submission or Remove submission. Note that these buttons will only appear if the instructor allows those options for the assignment.
Possible Errors
-
Document filetype cannot be accepted
- The file being uploaded does not match the file type that the instructor has specified for the assignment. For example, if the assignment asks for a .docx (Word) file, you will not be able to upload a PDF or other text document. The accepted file types are listed underneath the file submission area. For questions regarding the accepted file types, please contact your instructor.