Moodle Dashboard
After logging into Moodle, the Dashboard is the first screen that you will see. The dashboard will show all the visible classes that you're currently enrolled in. The dashboard is also customizable so you can quickly access your current courses and other information.
Dashboard Overview
The following is based on the default view of the Dashboard and does not reflect any customizations you might have made.
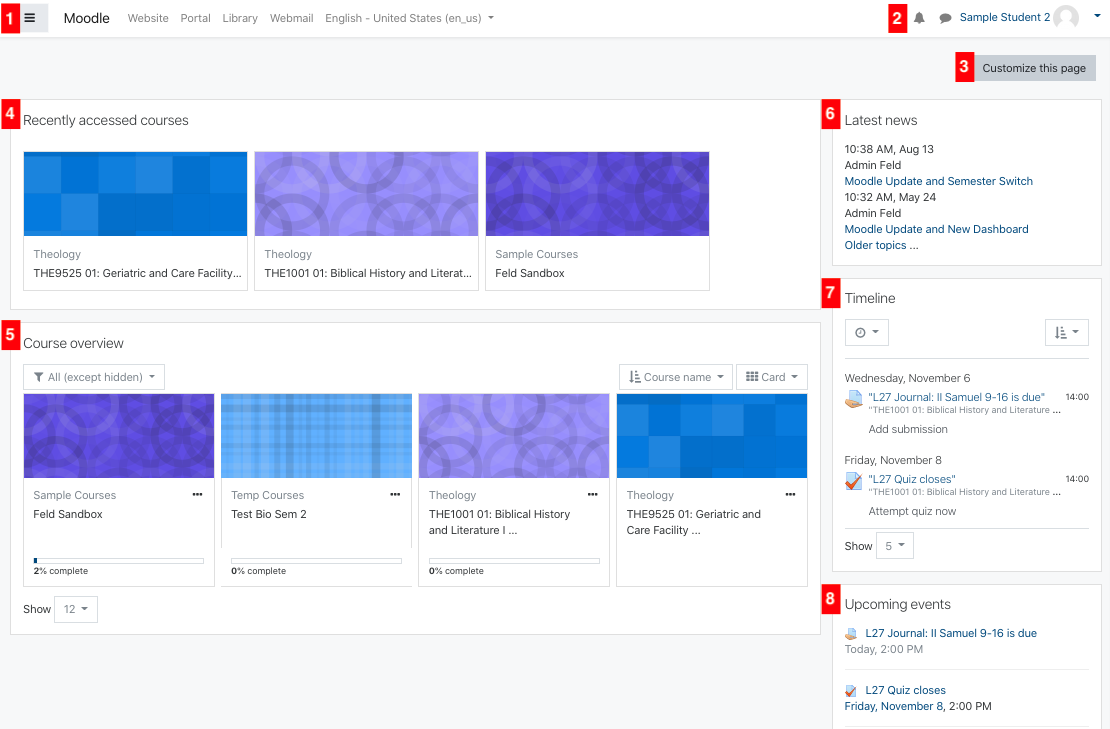
1. Top Left Toolbar
-
 : shows/hides the left-hand menu.
 - Moodle: click to go back to your Dashboard from any other Moodle page.
- Website: click to go to the MLC Website.
- Portal: click to go to the MLC Portal.
- Library: click to go to the MLC Library section of the MLC Website.
- English: click to quickly change your displayed language.
2. Top Right Toolbar
-
 : click to see your notifications.
 -
 : click to access Moodle Messenger.
 - Your Name/Photo: click to get back to the Dashboard, edit your profile, view your grades, access Moodle Messenger, adjust your preferences, or log out of Moodle.
3. Customize This Page
- Click here to customize your dashboard.
4. Recently Accessed Courses
- Shows the courses that you have recently accessed. This list is automatically populated.
5. Course Overview
- Shows all the visible courses that you're currently enrolled in.
- Only courses that instructors have made available are visible here. See the FAQs for more information.
-
 : click to adjust the filter for the course overview section.
- All (except hidden): shows all courses except for those that either you or your instructor have hidden from view.
- In Progress: shows all visible courses in the current semester.
- Future: shows all visible courses in future semesters. Note that due to current MLC practice, you likely will not see any courses in this view.
- Past: shows all visible courses from past semesters. Note that due to copyright concerns, instructors typically hide courses a few weeks after the end of the semester.
- Starred: shows all courses that you have marked with a star.
- Hidden: shows all courses that you have hidden.
-
 : click to adjust how courses are sorted in the course overview section.
- Course Name: sorts courses alphabetically by the name of the course.
- Last Accessed: sorts courses based on the last time you accessed the course.
-
 : click to adjust how the courses are displayed in the course overview section.
 - Show: click to adjust how many courses are shown on the page. If you have more courses than the chosen number, either choose a bigger number to show more courses or use the arrows that will be in the bottom right corner of the Couse Overview section to see the next page of courses.
6. Latest News
- Shows news posts from the Moodle administrator. Check here for information about scheduled Moodle maintenance, updates, and new features.
7. Timeline
- If your courses have items with dates attached to them, the timeline shows the upcoming items for all of your courses.
-
 : click to change which items are visible based on their due date.
 -
 : click to sort by date or by course.
 - Show: click to adjust how many items are visible in the list.
8. Upcoming Events
- Shows the calendar events for all of your courses. This is only populated if your course utilizes the course calendar.
Customize Your Dashboard
Editing Existing Blocks
- To begin customizing your dashboard, click Customize this page (#3 in the image above) after logging into Moodle.
- After you click, two additional icons will appear within each page block.
-
 : click or click and drag to rearrange the block on the dashboard. Blocks can be located in the main center area or in the smaller column on the right. On a narrow browser window or mobile device, the right column blocks will appear at the bottom of the page.
 -
 : click to access the settings for the individual block.
- Configure block: brings you to the options specific to the block.
- Hide block: hides the block from your Dashboard.
- Delete block: removes the block from your Dashboard.
- When you're finished customizing your Dashboard, click Stop customizing this page in the top right corner. The customization icons will disappear.
- To reset the Dashboard to the settings shown in the image above, click Reset page to default.
-
Adding New Blocks
- To add a new block to your dashboard, click Customize this page (#3 in the image above) after logging into Moodle.
- If the left menu is hidden, click
 to make it visible.
 - Click Add a block at the bottom of the left menu.
- Choose the type of block you'd like to add from the resulting list.
- See this list for explanations of the available blocks. Note that not all of the blocks listed are available for student use.
- After you click on the name of the block you'd like to add, it will appear at the top of the column on the right. Rearrange the blocks and edit the block's settings using the directions above.
Course Cards
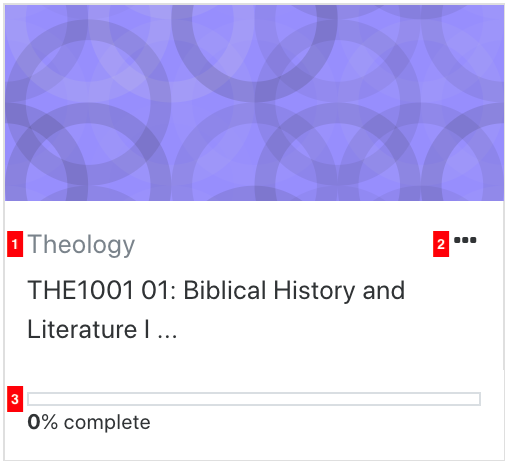
The following is what a course card looks like if the Dashboard is set to show Cards. Similar features are available in the List or Summary views.
- The name and department of the course. To view the full course name, choose the List or Summary views.
- Click here for options to Star or Hide the course. Starred and hidden courses can then be filtered.
- If course completion is enabled, this shows the percentage of course activities that you've completed.


